Virtual Machines
Contents
Virtual Machines is the starting section. Here and in all other views we have implemented a “one-step” approach, and we also made it work without moving from view to view. So all actions on VMs can be managed from one screen view.
In this section you can perform actions over a VM that is create, start, stop, delete it. Besides, here you can configure the machine editing its service offering parameters, group, firewall rules. Finally, you can access a VM selecting the most appropriate way. We support three options for accessing a VM: via the console, SSH or HTTP.
Below you will find the detailed information on the aforementioned options for VM management via CloudStack-UI.
Virtual Machines List
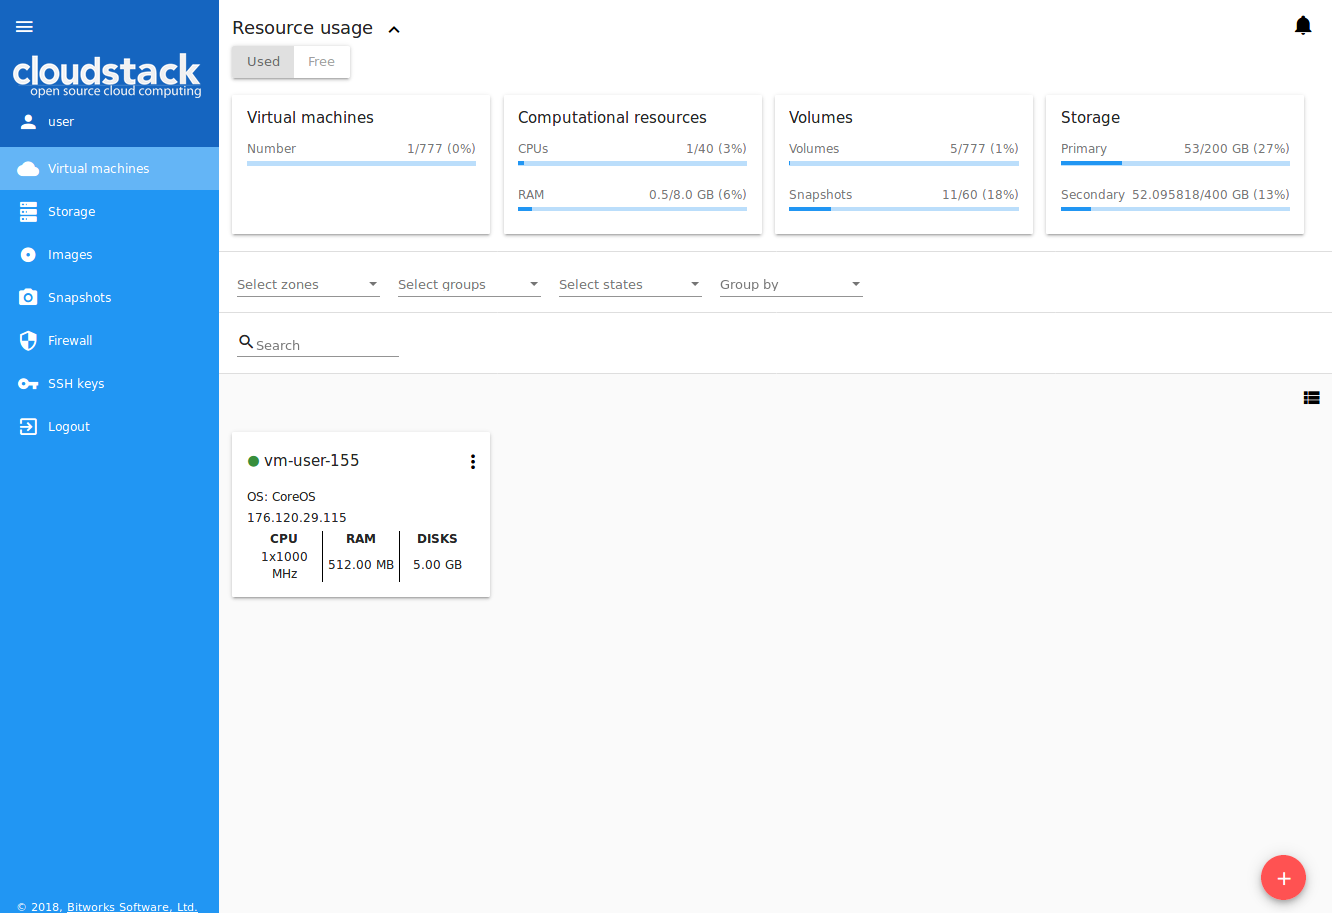
At this page, you can see the list of your virtual machines available to your user only.
If you are a Domain Administrator you can see the virtual machines of all users in the domain.
You can change the data representation of existing virtual machines from “card” to “list”. We have added the switch ![]() /
/![]() in the upper-right corner of each section. This improvement gives a user an opportunity to work with data in each specific section in a more convenient way.
in the upper-right corner of each section. This improvement gives a user an opportunity to work with data in each specific section in a more convenient way.
A list view can be switched to a box view:

And vice versa, switch a list view to a box view:

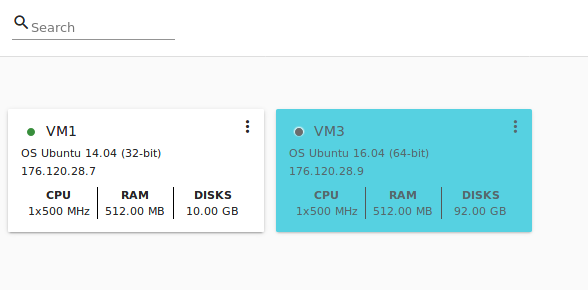
For each VM in the list you can see the following information:
- VM name and IP;
- State - shows the VM state by color spot: green for Running, red for Stopped, yellow for changing status;
- OS family;
- CPU;
- RAM;
- Disks.
To the right the Actions button ![]() expands the list of actions available for the VM.
expands the list of actions available for the VM.
Filtering of Virtual Machines
The filtering and search tool will help you to find a virtual machine in the list.
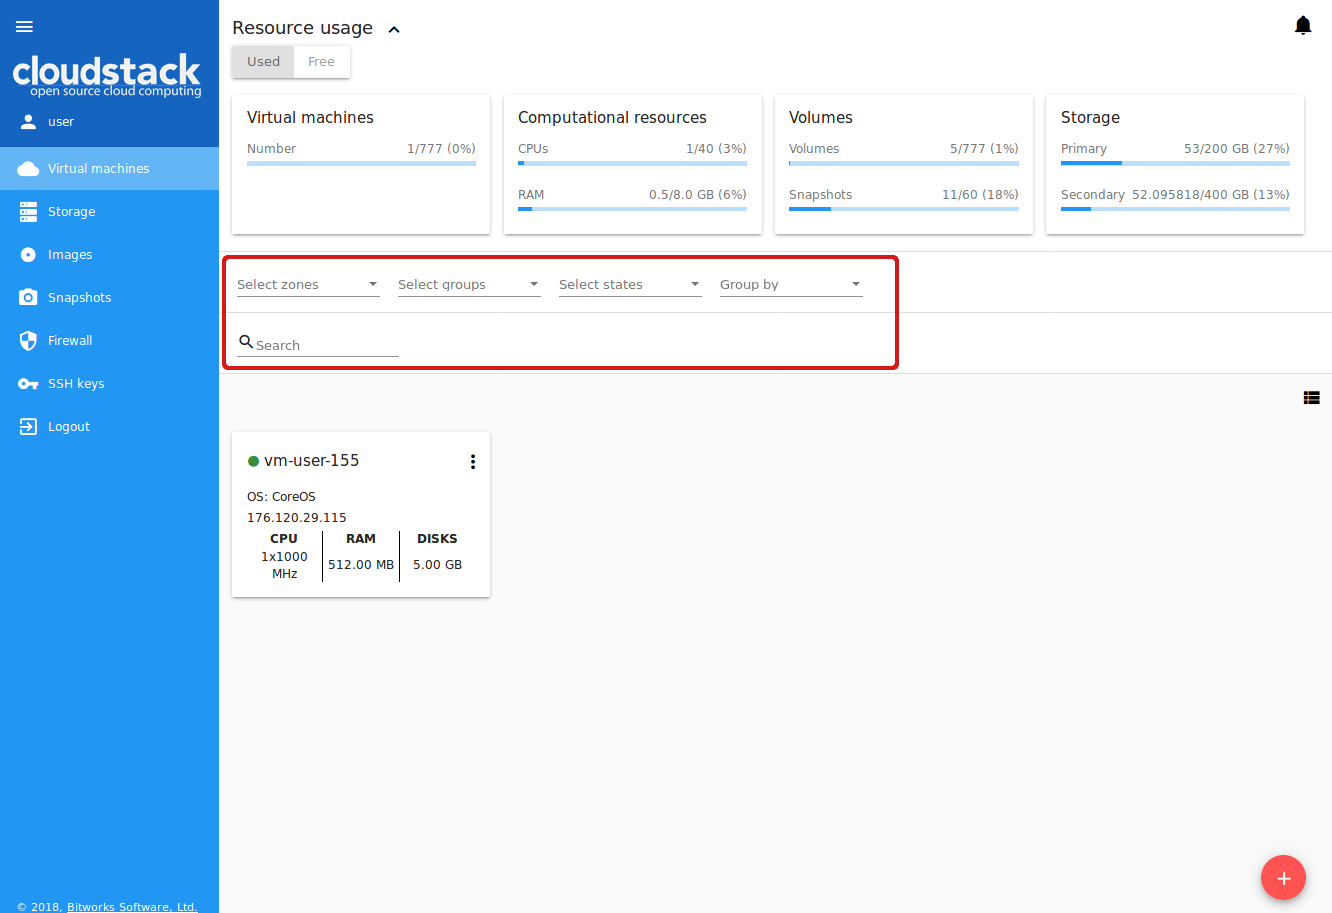
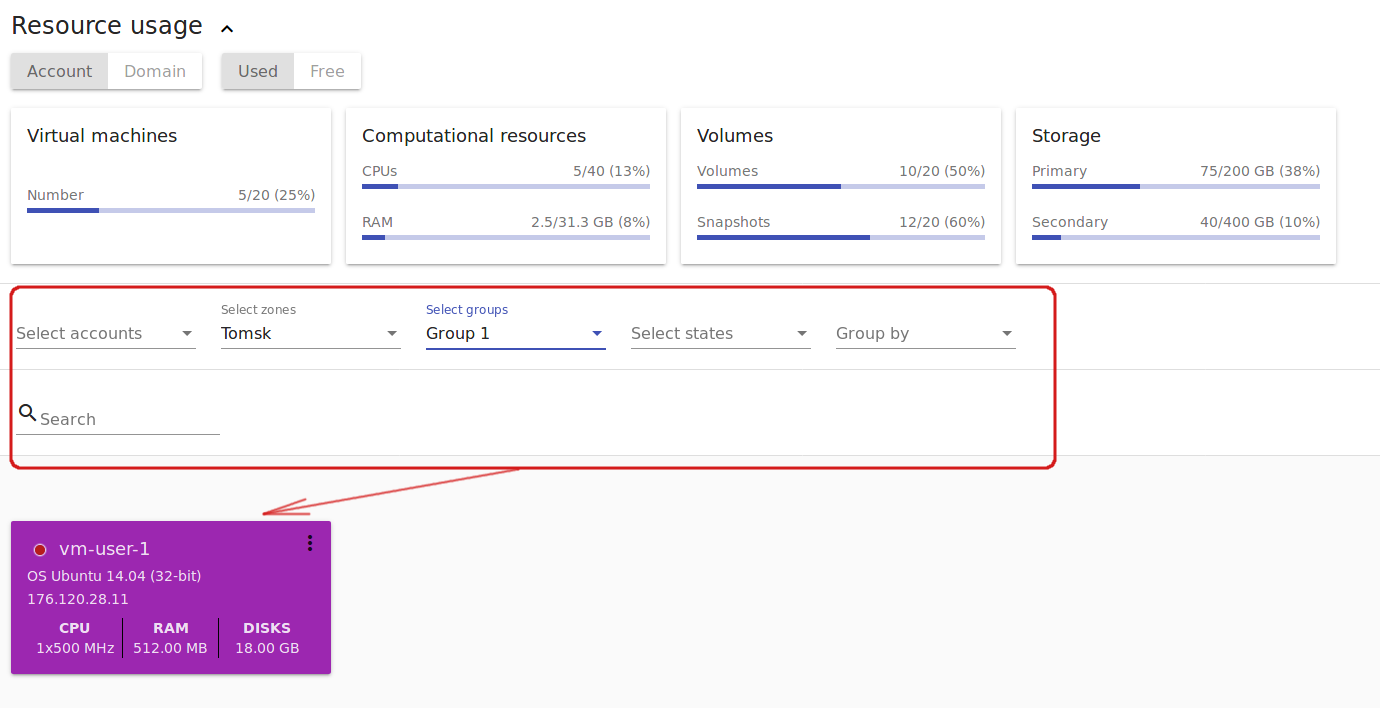
You can filter the VM list by accounts (available for Domain Administrators) and/or zones and/or groups and/or states. In the drop-down lists tick the filtering parameters and see the immediate result.
Besides, VMs can be grouped by zones and/or groups and/or colors and/or accounts. Grouping makes it easier to identify necessary VMs on the list.
Use the search tool to find a virtual machine by its name or a part of the name.
Under the Virtual Machines section, you can open a form to create a new virtual machine.
Create a Virtual Machine
Creating a new VM in CloudStack-UI is a one-step action. You can select options from one screen without additional steps.
Please, note that a virtual machine is created with a root disk so you do not need to add any volume at the VM creation step. If necessary, you can add a data disk to the VM later.
To create a new VM click the “Create” button ![]() at the bottom-right corner.
at the bottom-right corner.
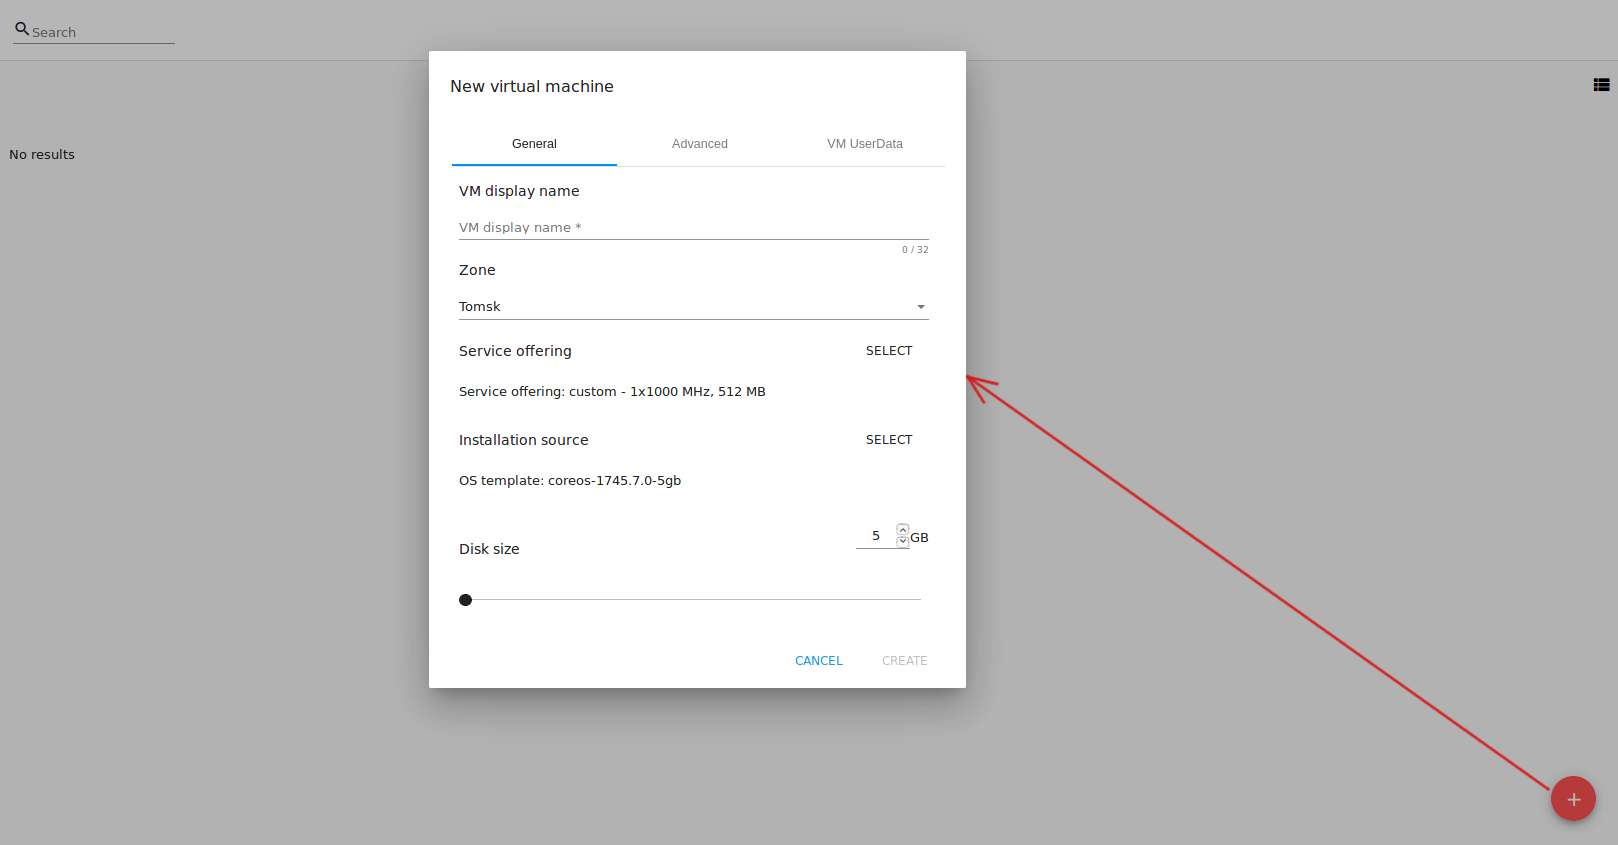
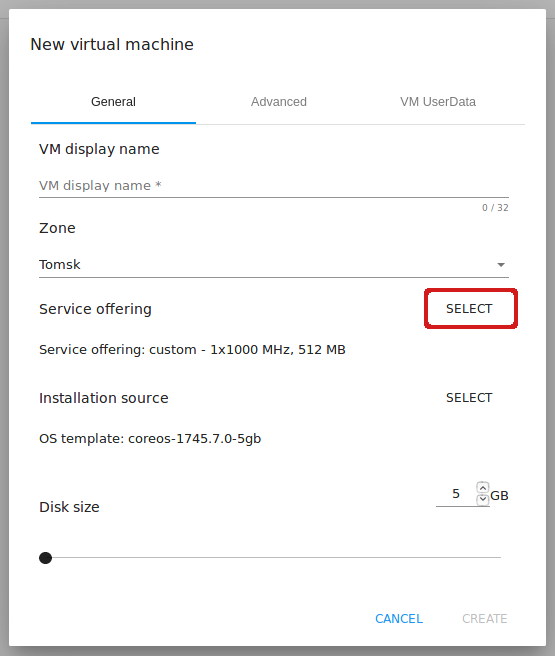
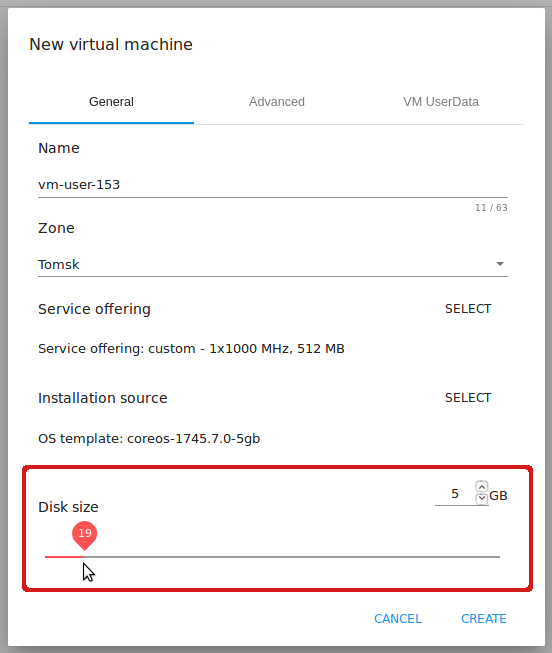
The New virtual machine form contains three tabs: General, Advanced and VM UserData.
In the General tab the following fields should be filled in:
Note
Required fields are marked with an asterisk (*).
- VM display name * - A name of VM that will be displayed in the machine list and in any other interface place (except VM details). You can define here any VM name you wish.
- Zone * - A zone of VM operation. Select a zone from the drop-down list. The list of available zones is managed by a Root Administrator. More information about zones in CloudStack can be found in the official documentation.
- Service offerings * - Select a set of options and resources for a VM, such as templates for creating virtual machines, disk storage, and other. In the block of the form, a default service offering displays if it is specified in the configuration file.
Click “SELECT” in the Service Offerings block and choose any other option you wish in the modal window.
The list of available service offerings is managed by an Administrator. Service offering availability is determined by zone in the configuration file. Service offerings are devided into two lists: Fixed and Custom.
Fixed service offerings are the offerings with fixed parameters. They can not be changed.
Custom service offerings are offerings with adjustable parameters. You can set the amount of CPU cores, CPU memory and Network rate as you need.
By default, the dialog box opens at a list the default service offering belongs to (if it is defined in the configuration file). If no default offering is defined, the Fixed list opens first. If there are no offerings in the Fixed list, the Custom list of offerings opens first. If there are no available service offerings in either of the lists, you will see a notification.
Use the switcher “Fixed/Custom” above the list to select a necessary type of offerings.
If service offering classes are determined in the configuration file (see the configuration guide), the list of service offerings is displayed as a list grouped by the determined classes. You can filter the list by classes using the filtering tool above the list. Classes provide additional semantics defining the purpose of VM.
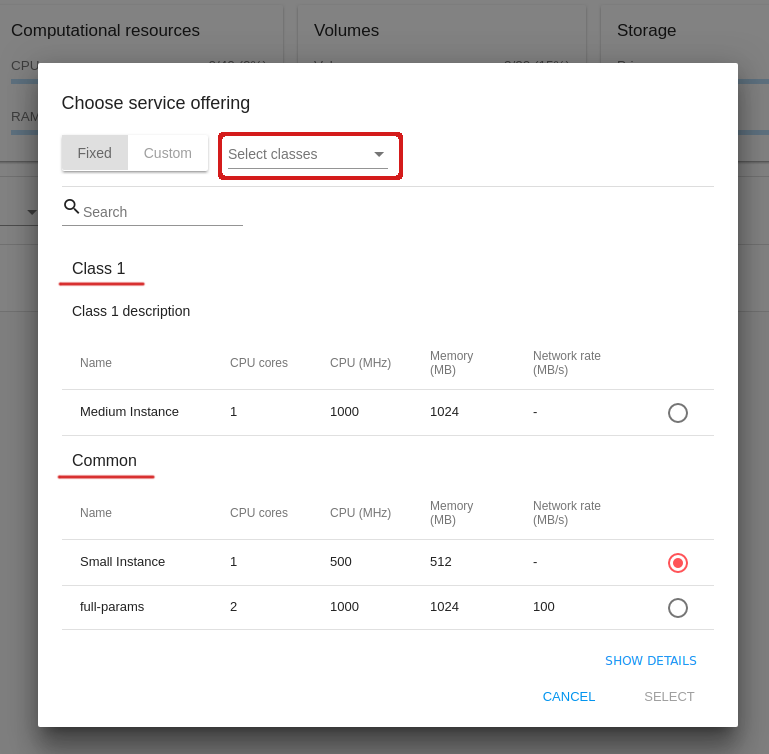
You also can use the search tool to find an option in the list by a name or a part of the name.
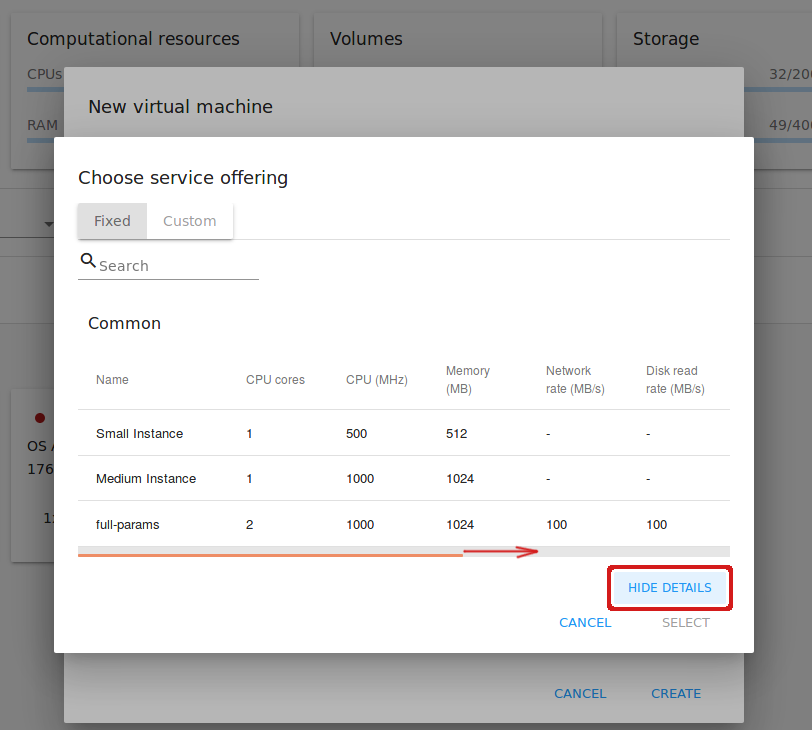
Fixed Service Offerings
For fixed service offerings the parameters are provided in the table per each option. Four main parameters are provided by default. They are:
- CPU Cores;
- CPU (MHz);
- Memory (MB);
- Network Rate (Mb/s).
Click “SHOW DETAILS” to the right to expand the range of parameters. Scroll the table to right and you will see:
- Disk read rate (Mb/s);
- Disk write rate (Mb/s);
- Disk read rate (IO/s);
- Disk write rate (IO/s).
You can hide the additional parameters by clicking “HIDE DETAILS”.
Choose the option in the list and click “SELECT” below.
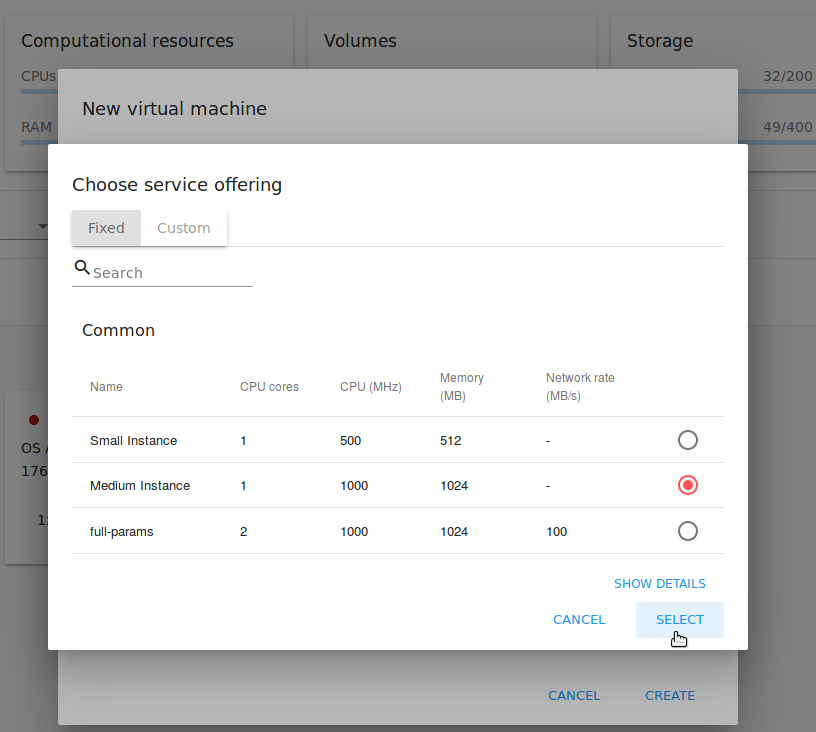
The settings will appear for the VM service offerings.
Custom Service Offerings
For custom service offerings the parameters are also provided in the table per each option. Besides, you can see more parameters by clicking “SHOW DETAILS”.
By selecting an option in the list, you open a modal window where you can set values for the following parameters:
- CPU Cores;
- CPU (MHz);
- Memory (MB).
These parameters can be predefined in the configuration file by an Administrator. The values specified there will be used as default parameters for a custom service offering.
Administrators can set limits for custom service offering parameters in the configuration file. That means you cannot set values larger than the limits specified for custom service offerings.
Besides, the system checks the available account resources. And if you try to enter a value larger than the available amount of resources, the system will automatically change it to the maximum available value.
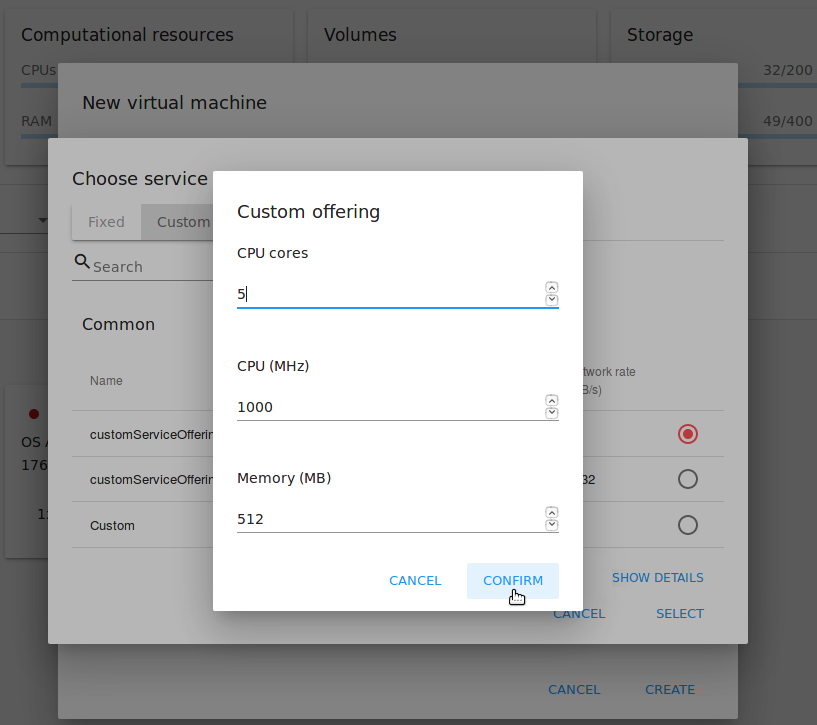
Click “CONFIRM” to set the custom service offering parameters. The modal window will close and the set values will appear in the list for the selected custom service offerings option. Click “CANCEL” to drop all the settings.
Click “SELECT” below the list to assign a selected service offering to your machine. The custom settings will appear for the VM service offerings. Custom service offering parameters are saved to account tags (see the list of tags) if they are supported for the account. This will make it easier for you to use saved custom parameters for service offerings next time at VM creation as they will be predefined in the form automatically.
Note
The system checks the amount of available account resources. In case a selected service offering does not fit the amount of available account resources, a warning message will appear saying the offering cannot be selected.
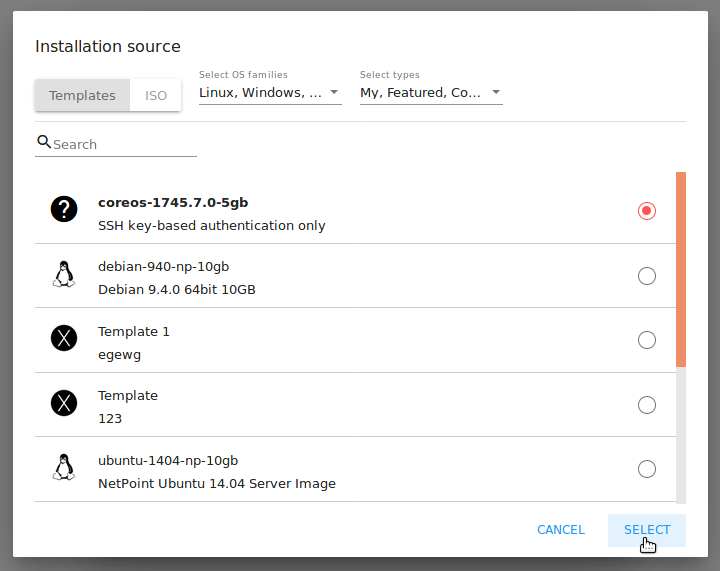
Installation source * - Select an installation source - a Template or an ISO file - that will be used to create the machine from. In the block you can see the installation source selected by default. Click “Select” to choose an installation source you wish. In a modal window you will see a list of templates/ISOs with the “Ready” status available for the selected zone as well as for user’s account or the whole domain.
The filtering tool allows finding a necessary option by selecting among templates/ISOs by OS families, types and groups, or search the source by a name or a part of its name.
Tick the source in the list and click “SELECT” to implement the selected source.
Click “CANCEL” to drop selected options. No source will be selected then.
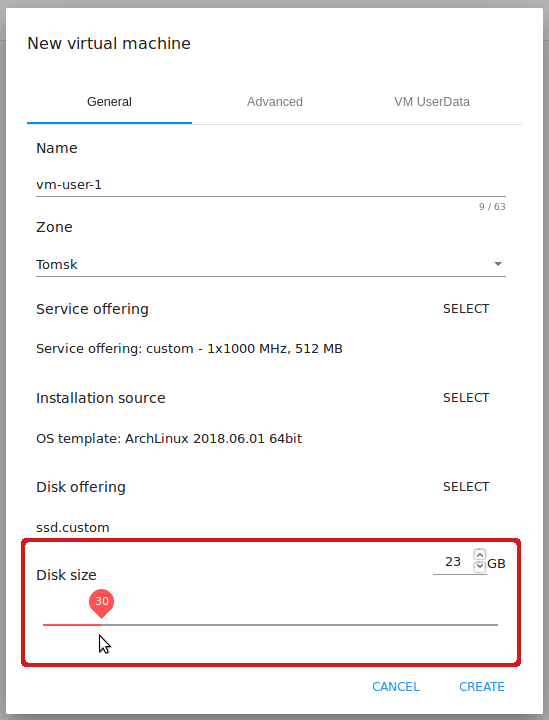
The Disk size slider below the Installation source block allows changing the size of a root-disk of the VM. The default minimum size is determined by the account limits and shown in the number field. Move the slider or enter a number value in the field to set the root-disk size.
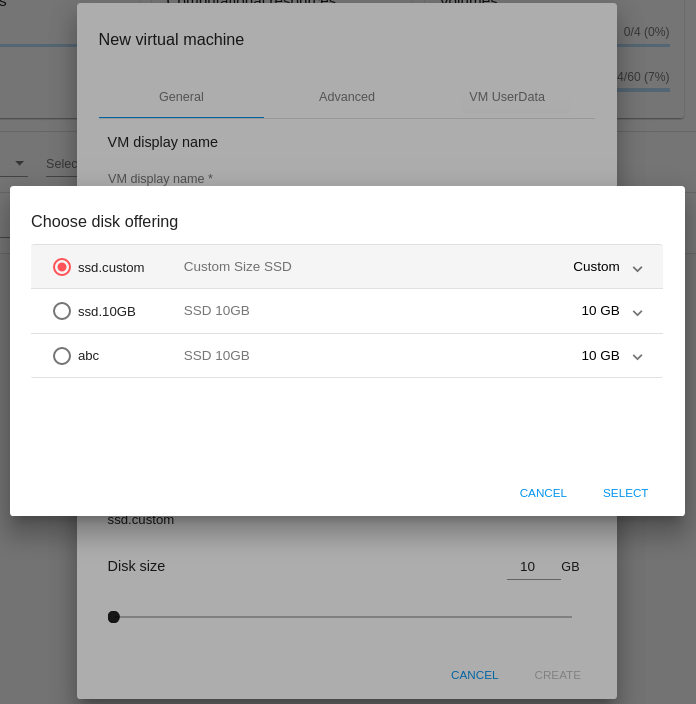
- Disk offering - Available if ISO is selected as a source. Here you can see a disk offering preselected for the machine. To choose another disk offering open a modal window by clicking “SELECT” in the disk offering section and choose a disk offering in the list of available disk offerings. The list of available options is managed by an Administrator. Disk offering availability is determined by the zone defined in the configuration file.
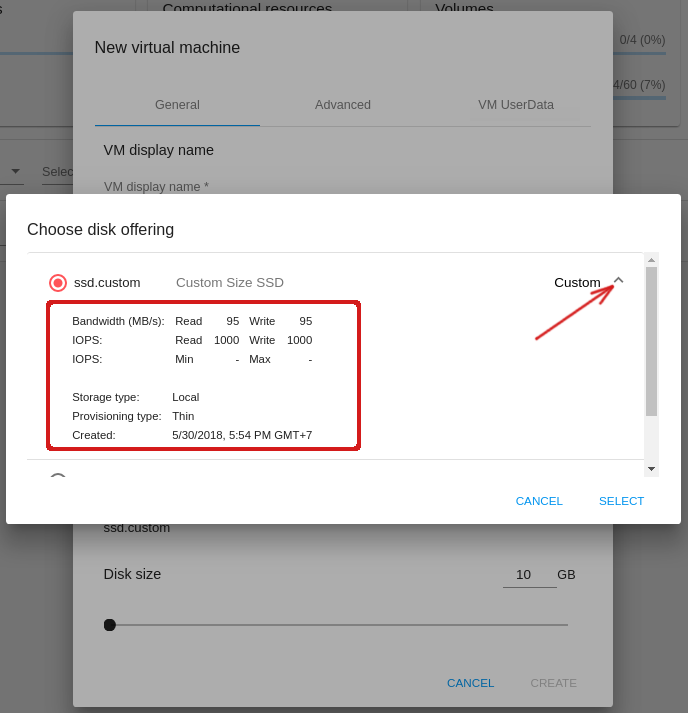
For each disk offering you can expand detailed information by clicking the arrow icon or the whole line in the list. In the appeared section you will see a range of parameters. The following parameters are shown by default:
- Bandwidth (MB/s): Read/Write rates;
- IOPS: Read/Write rates and Min/Max values;
- Storage type;
- Provisioning type;
- Creation date.
Use the scrolling tool to view them all.
More parameters can be added via the configuration file by an Administrator. Select a disk offering in the list and click “SELECT”.
If the selected disk offering has a custom disk size (it is set by Administrator), you can change the disk size. Move the slider up to the volume size you wish.
Note
If you do not have enough account resources, you will not be able to select the disk that does not fit the available amount of resources - an error will display.
Find more about disk offerings in the official documentation.
In the Advanced tab you will find the following fields:
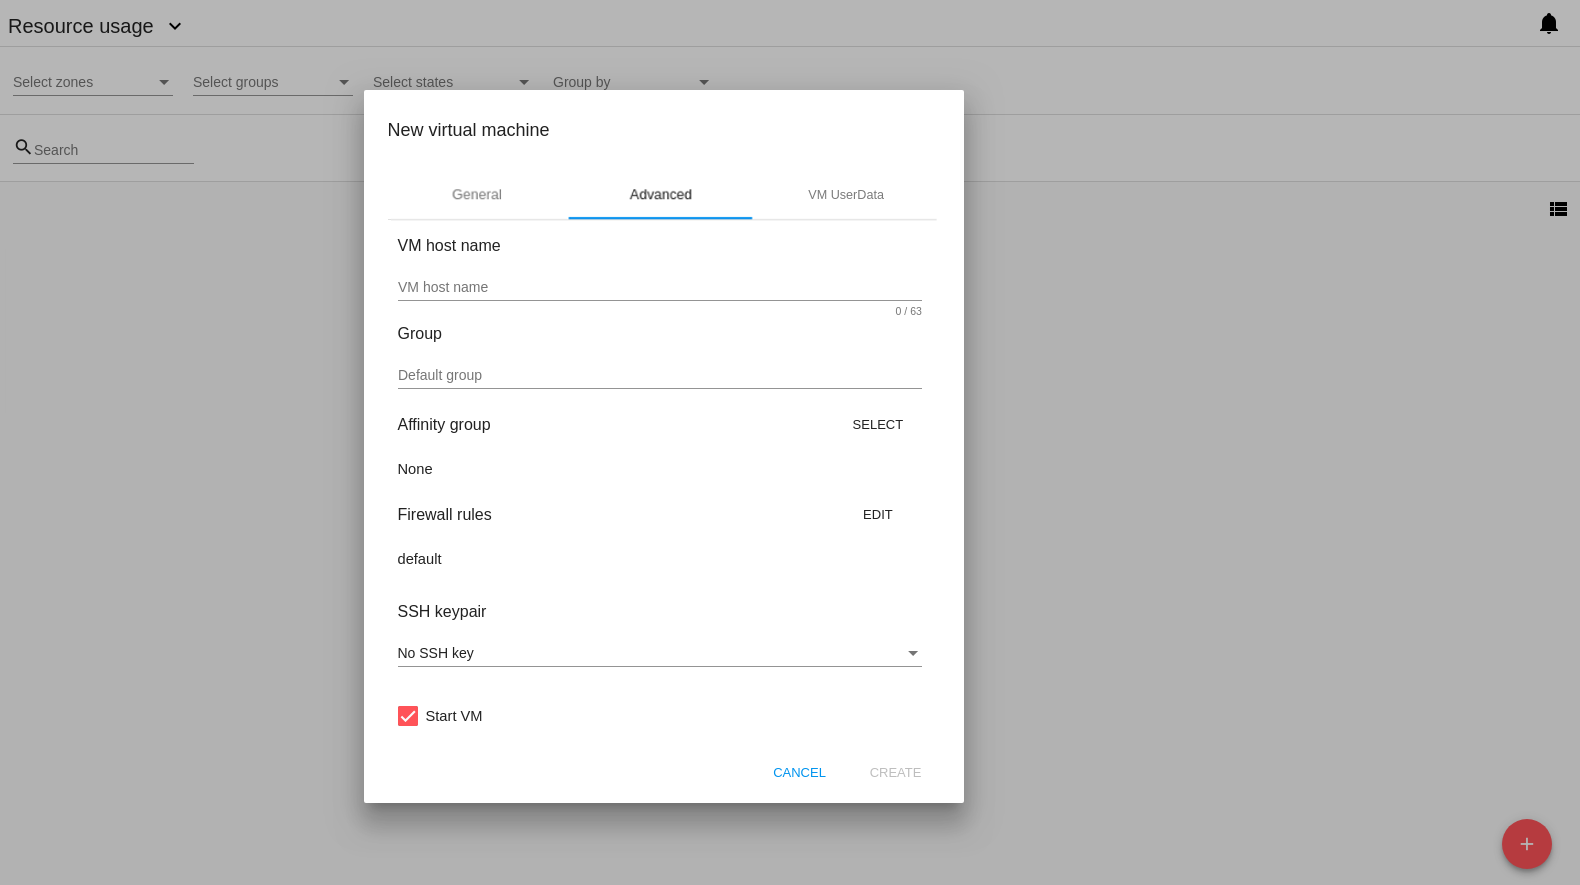
VM host name - This is a hostname for the machine. It will be shown only in the Virtual Machine tab of the VM details sidebar. The field is optional. You can enter any name you wish but it should start with a Latin letter, contain figures, Latin letters and ‘-’ (up to 63 symbols) and be unique within the zone. If the field is left empty, the system auto-generates a name in the following form:
vm-<UID>.Group - Select a group from the drop-down list. Or create a new group by typing its name right in the field. If no group is assigned, a Default group will be displayed for this machine.
Affinity group - Select an affinity group in the list or create a new group filling in the form. By clicking “SELECT” in the block you open a form with the list of existing groups and a creation block above the list.
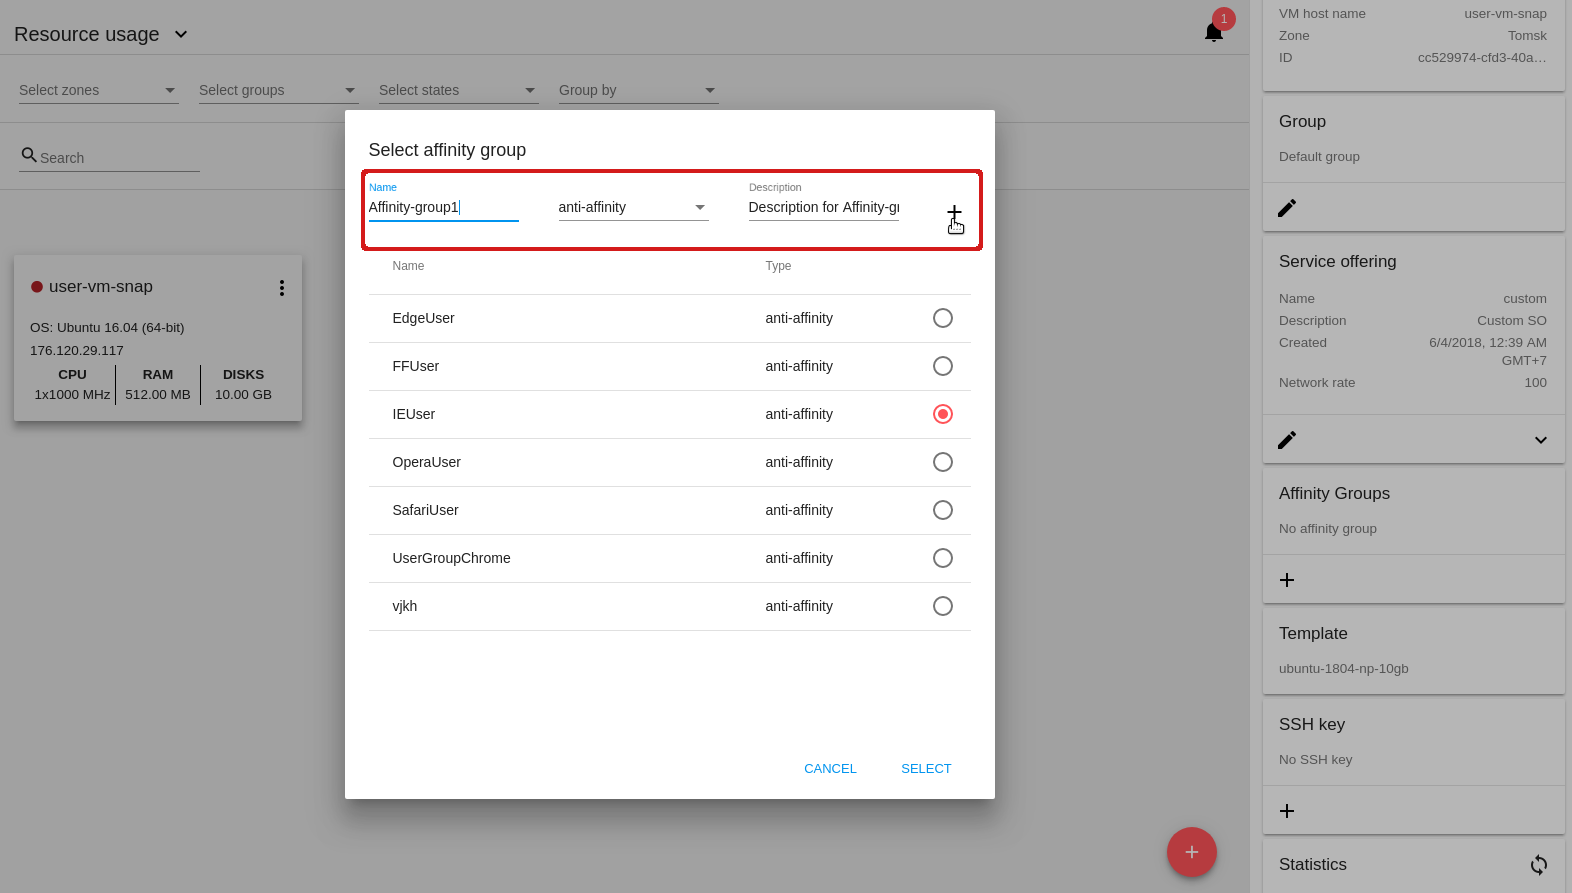
Create an Affinity group. To create a new affinity group you should fill in the form at the top of the dialog box:
- Name * - Enter a name for the group. The name should contain letters, figures, start with a letter and should not contain spaces. Maximum length is 63 symbols.
- Type * - Select type of the group - “anti-affinity” or “affinity”.
- Description - Provide a short description. Maximum length is 63 symbols.
Click “+” to add the new group with the specified settings to the list.
Select a group. Click on a group in the list and press “SELECT”.
What an affinity group is you can read in the official documentation.
Firewall rules - Allows to select a security group for the machine. A default security group, if it is defined in the configuration file, is selected by default. If you want to change it, click “EDIT” to select another security group for the VM. In the appeared window choose between “Create new” or “Select Shared” options.
Create a new security group
A new security group can be created on the base of templates. This security group will be created as a private group used for this VM only.
When creating a new security group, you can see the templates in the “All templates” section of the modal window. To form your custom security group, select a template in the “All templates” list at the left and move it to the “Selected templates” list at the right by clicking the arrow icon:
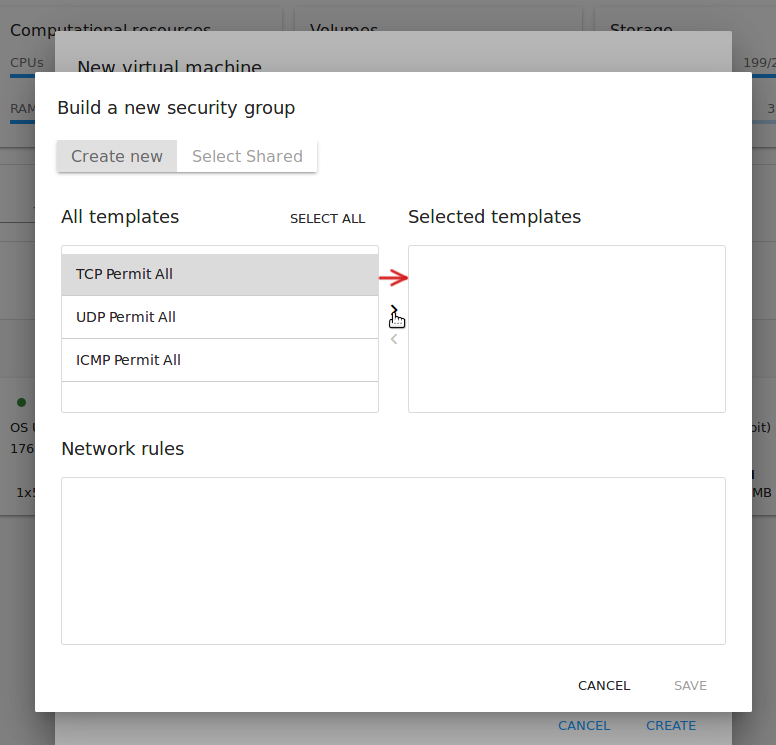
Click “SELECT ALL” to move all templates from left to right at once.
Click “RESET” to drop all selected templates.
In the list below you will see the rules corresponding to the selected templates. All of them are checked as selected. Uncheck those you do not wish to add to your VM as firewall rules.
Click “SAVE” to apply the selected rules to your virtual machine.
Click “CANCEL” to drop the selected options. No rules will be assigned to the virtual machine. You will return to the “Create new virtual machine” window.
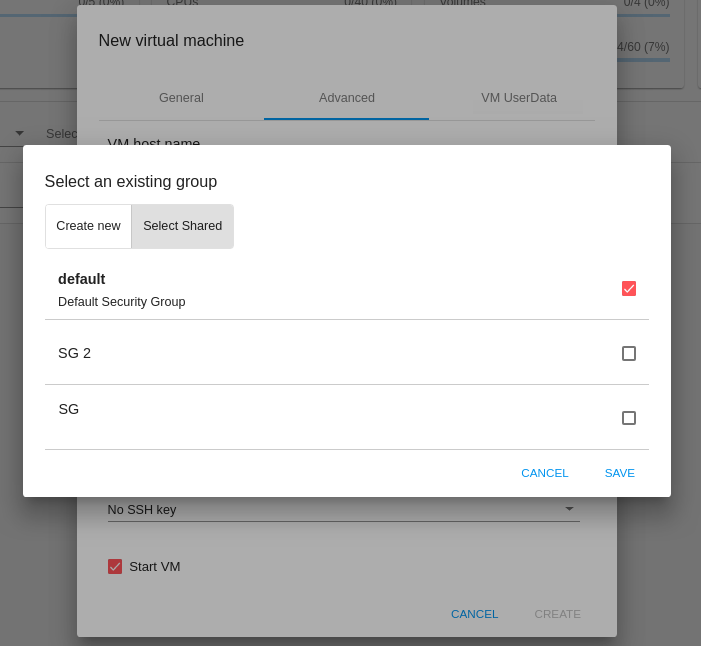
Select Shared security group
If you would like to select an existing group of firewall rules, you can click the “Select Shared” option and tick those groups in the list that you want to assign to your VM. The security groups in the Shared list are used by other VMs in the domain. That means you won’t be able to uncheck some rules in the group that you do not want to include into the list (like at creating VM from a template). You can assign only the whole shared security group to your VM.
You can edit a shared security group after the VM is created. In the Network tab of the VM details sidebar the assigned shared security group(s) can be viewed and edited. Please, find more information on security group editing in the Network Tab section.
Click “Cancel” to drop the selected options. No rules will be assigned to the virtual machine.
SSH keypair - Select an SSH keypair. The list of keys contains the SSH keys available for the account under which the VM is being created. Find more information on SSH keys in the SSH Keys section.
Start VM - Tick the box to start the VM right after its deployment. If this option is activated, the VM acquires an IP and a password (if required by the template). If it is not, the machine IP is not available till VM is started, no password is assigned to it.
In the VM UserData tab you can add any custom data for the machine. It allows adding necessary settings to the machine and deploying it configured with necessary services. In this tab, you will find a text area, where you can enter the configurations in any format. The maximum allowed size of data is 32 KB.
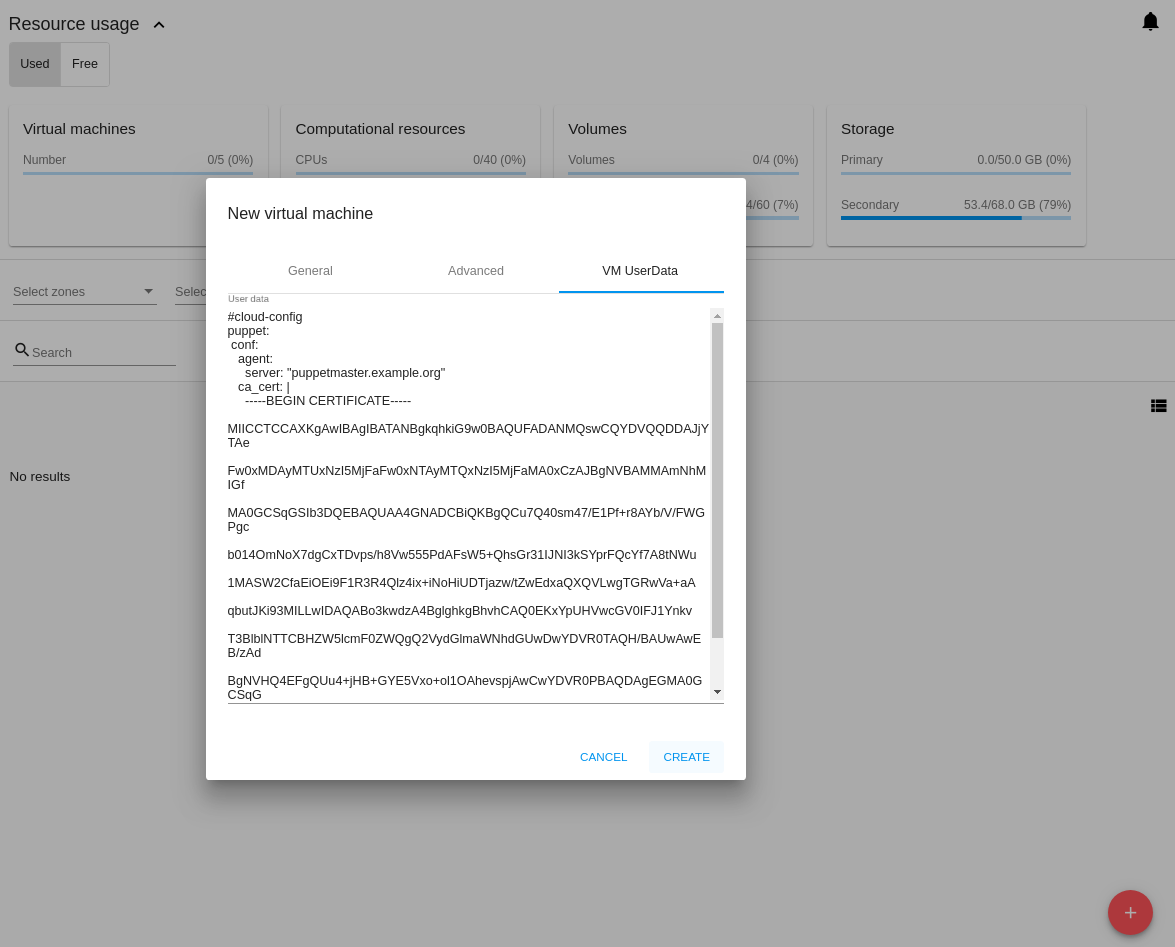
Once all fields are filled in, click “Create”.
For some templates/ISOs used at VM creation you are offered to accept a “Template/ISO Terms and Conditions Agreement”. An administrator is able to specify an agreement for a template or ISO. An agreement may determine, for example, software licensing terms or restrictions on the liability of the software template vendor. A user must confirm it to continue VM installation from a chosen source.
If you are creating a virtual machine on the base of a template/ISO that requires an agreement, read the terms in the appeared window and click “I AGREE” to continue.
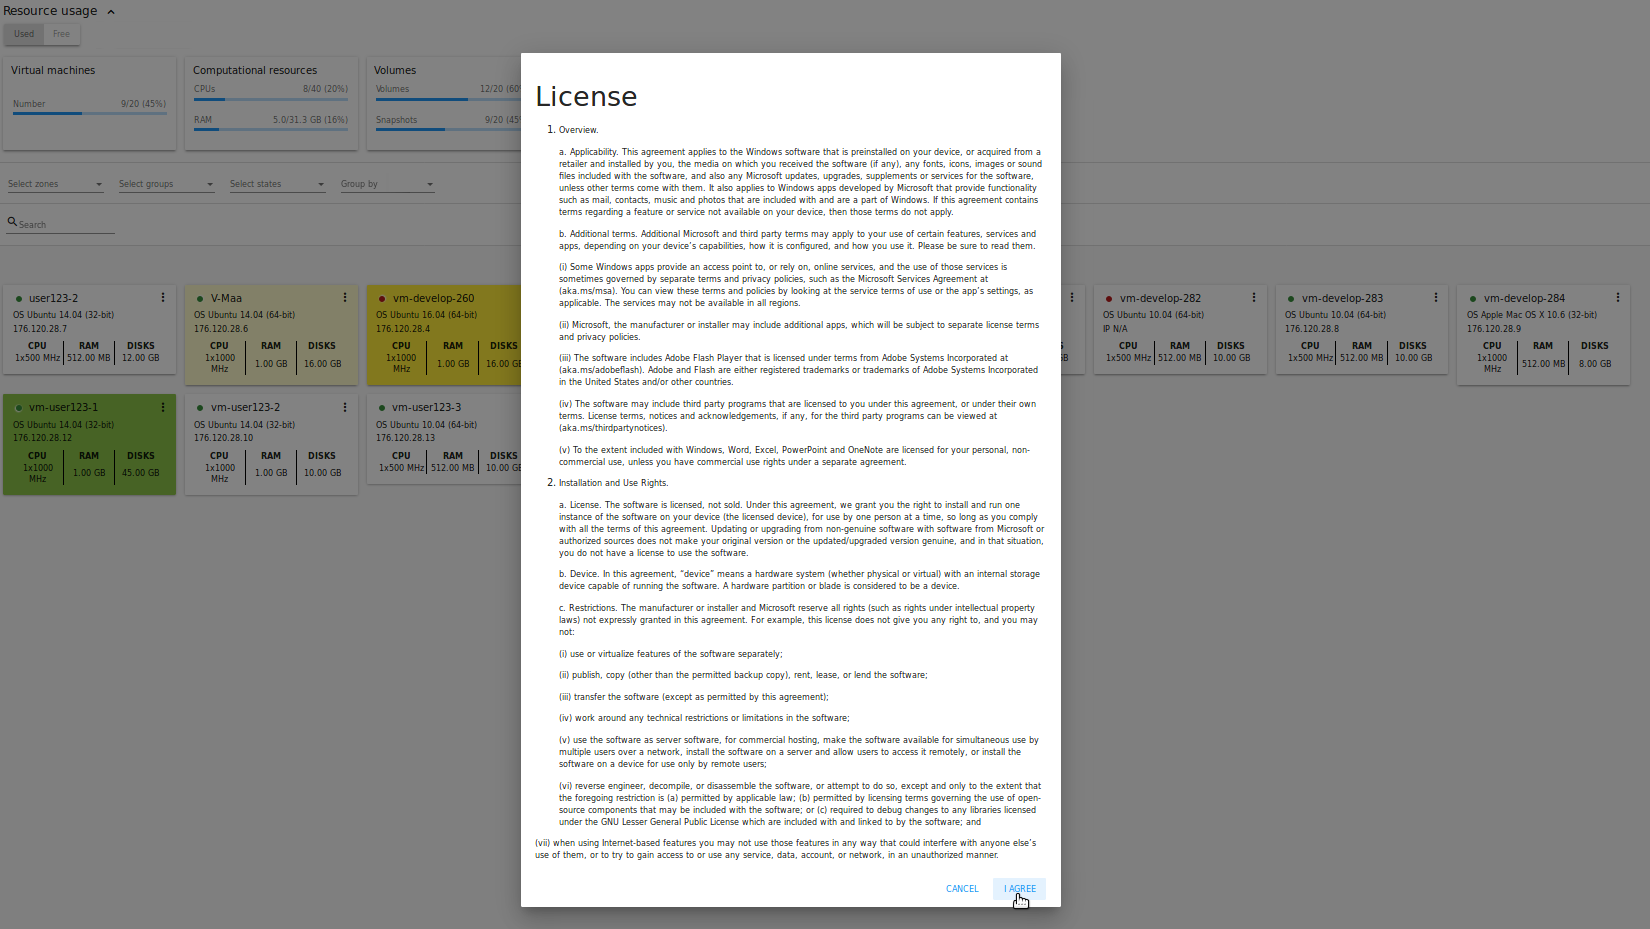
Or click “CANCEL” to close the terms and move back to the creation form. Change the installation source.
After clicking “CREATE”, a dialog window will appear where you can monitor the VM creation process: security group creation, virtual machine deployment, template tags copying, etc. These procedures are fulfilled one by one. A procedure in progress is marked with a spinner in the message. In case of an error occurring at any VM creation step, a user can understand at what step it has happened.
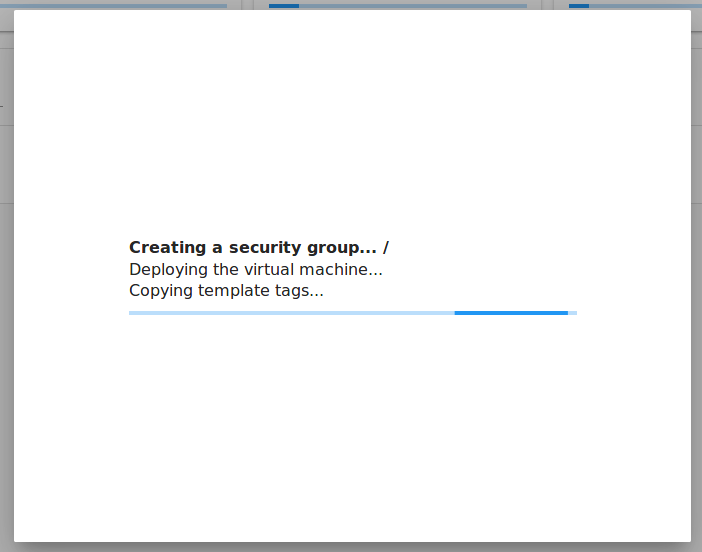
Once the VM creation process finishes, the success message will inform you of that.

The message will show the list of all creation steps and the virtual machine information:
- VM name and IP (if it is available),
- VM Password - This field appears after the VM creation if a password is enabled for the template used for creating this machine. A password is autogenerated. Click “SAVE” next to it in the dialog window if you want to save it for this VM. The password will be saved to the VM tags. You can see the saved password later by clicking “Access VM” in the Actions box for this machine.
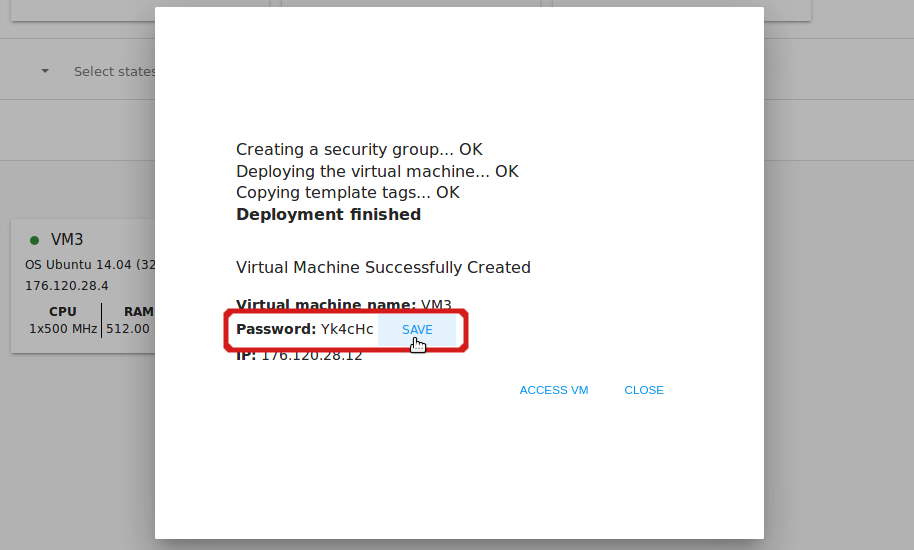
The system will ask you if you wish to save passwords to VM tags by default for the virtual machines created in the future. Click “Yes” and the “Save VM password by default” option will be activated in the account settings:
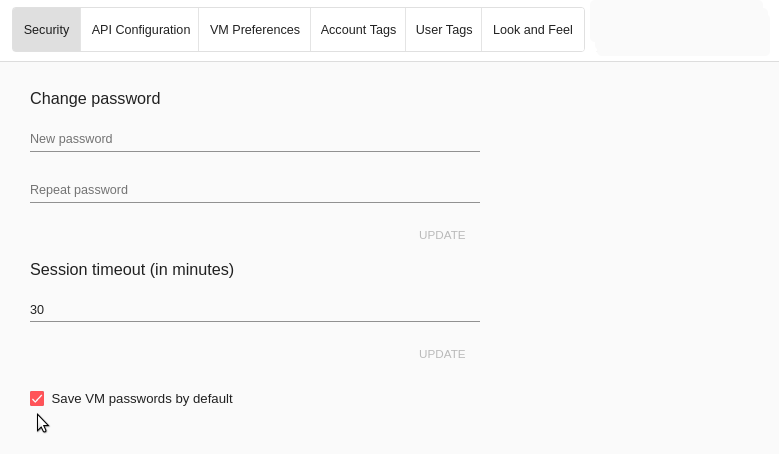
It means the password will be saved to tags automatically for all created virtual machines.
From this window, you can access the VM opening VNC console.
Close the dialog window and make sure the newly created VM is in the list of virtual machines.
Click “CANCEL” to drop the VM creation.
Below, we have summarized possible issues that may take place at VM creation.
Possible Issues When Creating a Virtual Machine
You can face the following issues when creating a virtual machine:
Lack of resources.
An important thing in CloudStack-UI is that the system immediately checks that a user has the amount of resources required to create a virtual machine. It does not allow launching the creation of a VM which will fail for sure because of the resource lack.
If you lack the required amount of resources, the message will appear when clicking “Create Virtual Machine”:
“Insufficient resources. You ran out of Primary storage.”
No VM creation form is available.
VM host name you specified is not unique.
If the name specified for the virtual machine is not unique within a zone, the dialog window after VM creation will show an error. The VM will not be created. The creation form will be closed. You will have to open the VM creation form and fill it in again. You will have to specify another host name for your VM or leave it empty to let the system autogenerate a correct unique host name in the form of
vm-<UID>.
View API logs at VM creation failures
In case an error occurs at VM creation, the dialog box shows the text of the error. Next to it, there is the “Details” button. By clicking it you can open a list of raw logs including JSON requests to the server with their statuses. They can be easily copied by clicking the copy icon below.
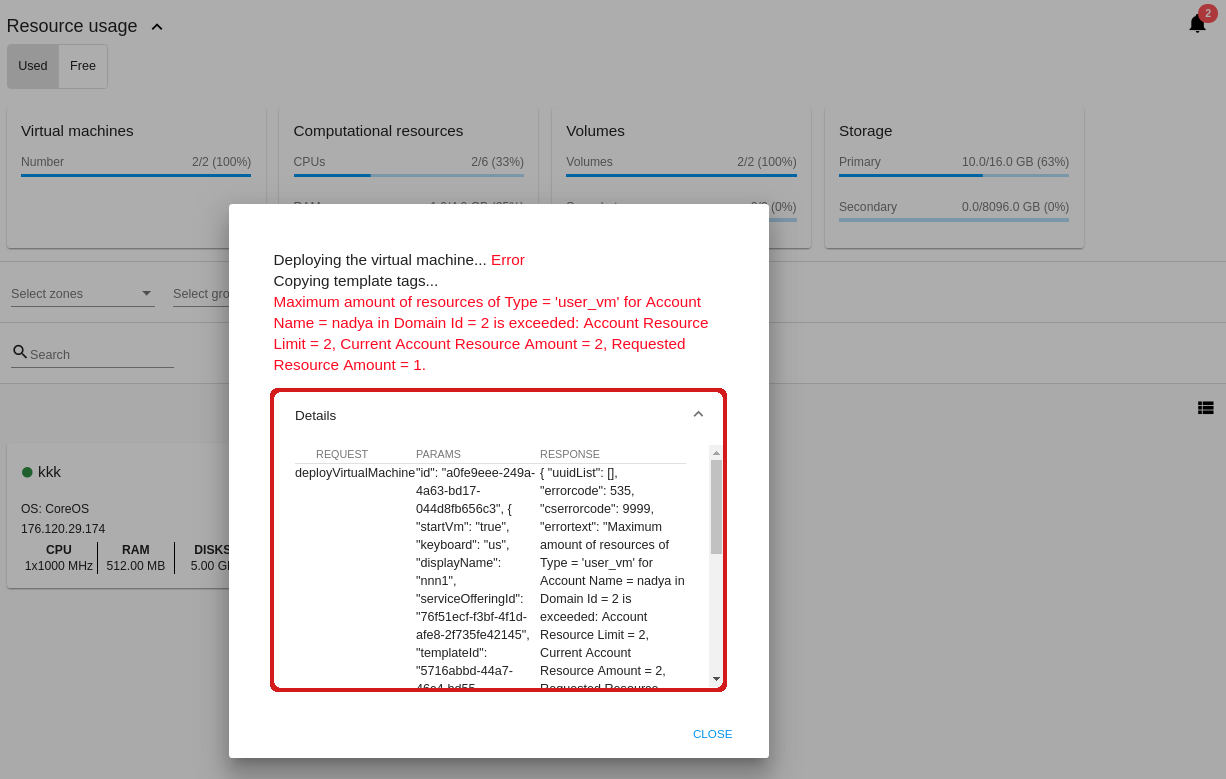
We implemented this feature to provide access to raw API logs and allow you to copy them and address the support service to get assistance in solving the problem in the shortest time.
VM Action Box
Once a VM instance is created, you can stop, restart, or delete it as needed. These actions are available under the “Actions” button ![]() to the right from each virtual machine in the list.
to the right from each virtual machine in the list.
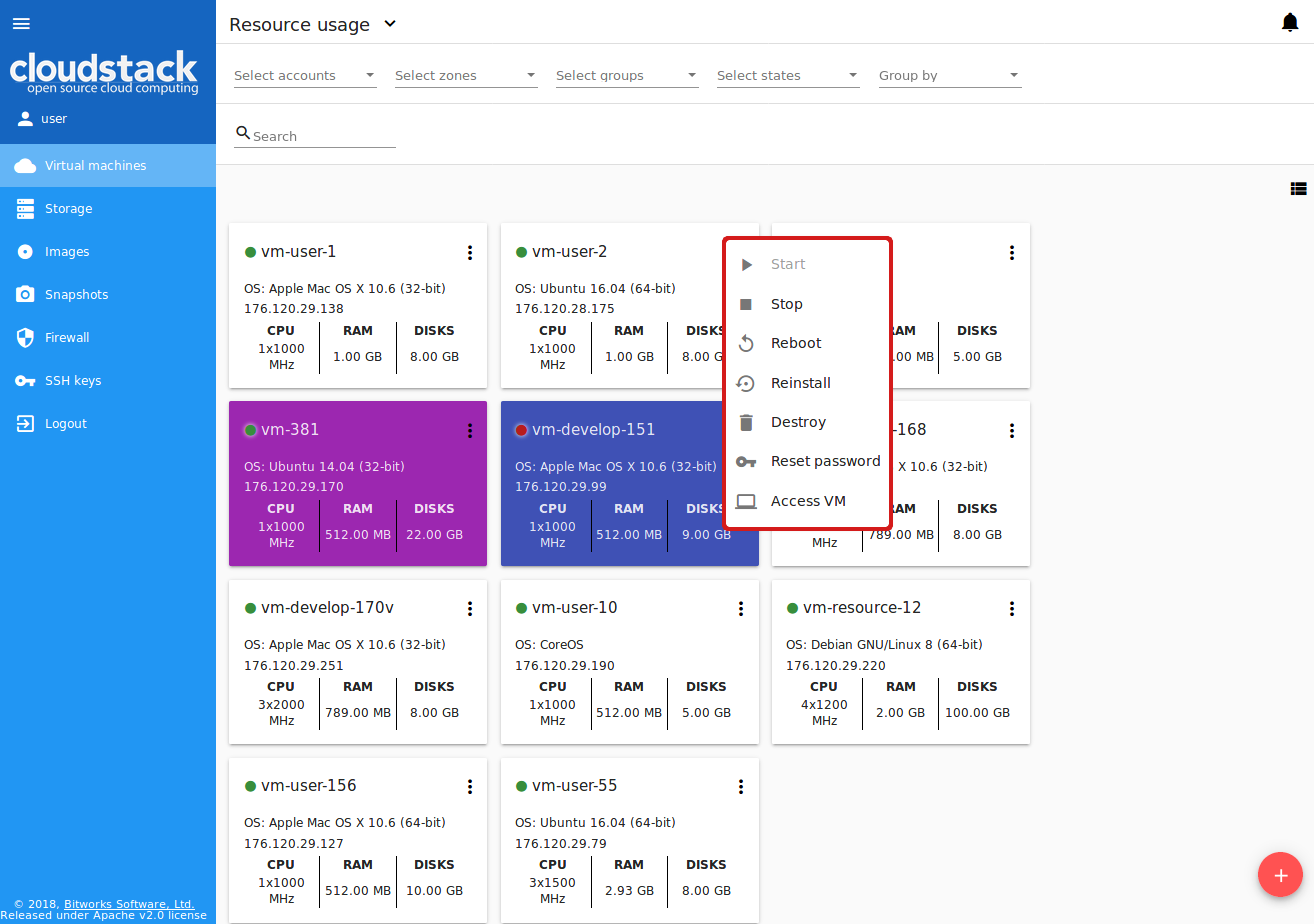
It allows performing the following actions with the VM:
Start VM - Allows a user to launch a VM,
Stop VM - Allows a user to stop a running VM,
Reboot VM - Allows a user to restart a VM,
Reinstall VM - Allows a user to reinstall a VM,
Destroy VM - Allows a user to delete a VM. After deleting the virtual machine will remain in the system. It will look faded in the list and can be recovered later.
To recover a destroyed VM (which is not expunged) open the Actions list and click “Recover”.
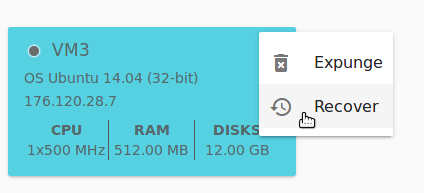
Click “Expunge” to completely destroy the VM. The VM will not be available for recovering anymore.

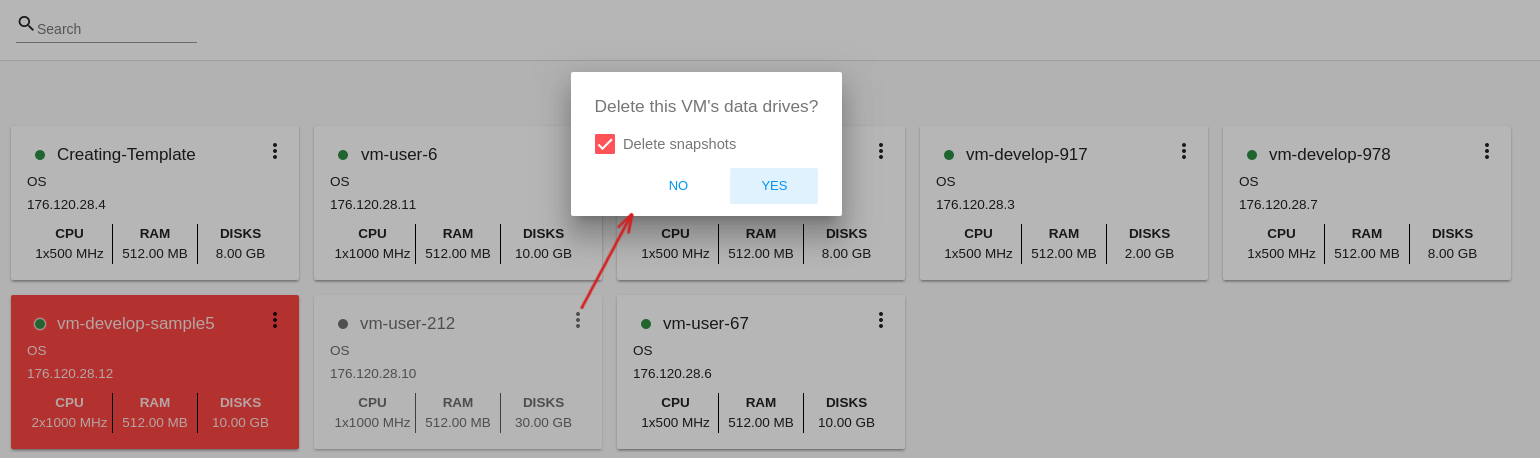
When deleting a virtual machine, if the machine has data disks attached, the system will ask you in a dialog window whether these disks should be deleted. If data disks have snapshots, you will be offered to delete the snapshots as well by activating a “Delete snapshots” option in the dialog.
Confirm your intention to delete disks (and snapshots) by clicking “Yes”. Click “No” to cancel the disk (and snapshots) deleting.
Reset password - Allows a user to change the password for VM (available for started VMs only in case a VM requires a password). The VM will be rebooted if you reset the password.
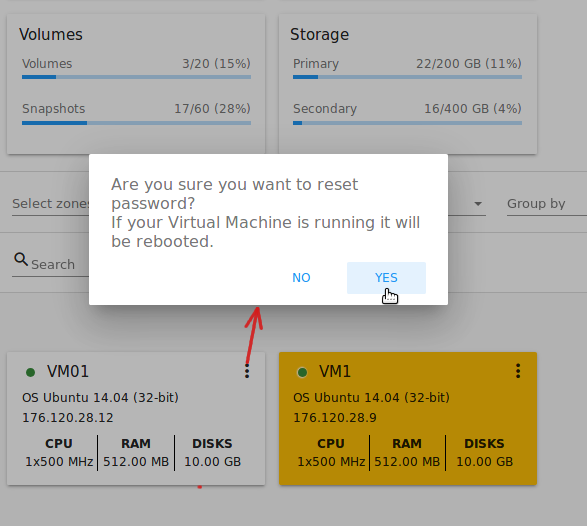
After clicking “Yes” the VM will be rebooted and a new password will be autogenerated for it. You will see the new password in the dialog window.

Click “Save” to save the password for this VM. It will activate the “Save VM passwords by default” option in the Settings section (see Save VM passwords by default). In the future the password will be saved automatically right at VM creation. Click “OK” to close the dialog window.
Access VM - Opens an “Access VM” dialog window which allows to view VM name and IP, view and save a password for the VM and access the VM via the VNC console.
In the Access a Virtual Machine section you can find more information on accessing a VM.
System Logs - This option is available if the Log View plugin is activated via the configuration file. It allows creating and managing a secret token required for secure publishing of VM logs (see more details in the plugin documentation).
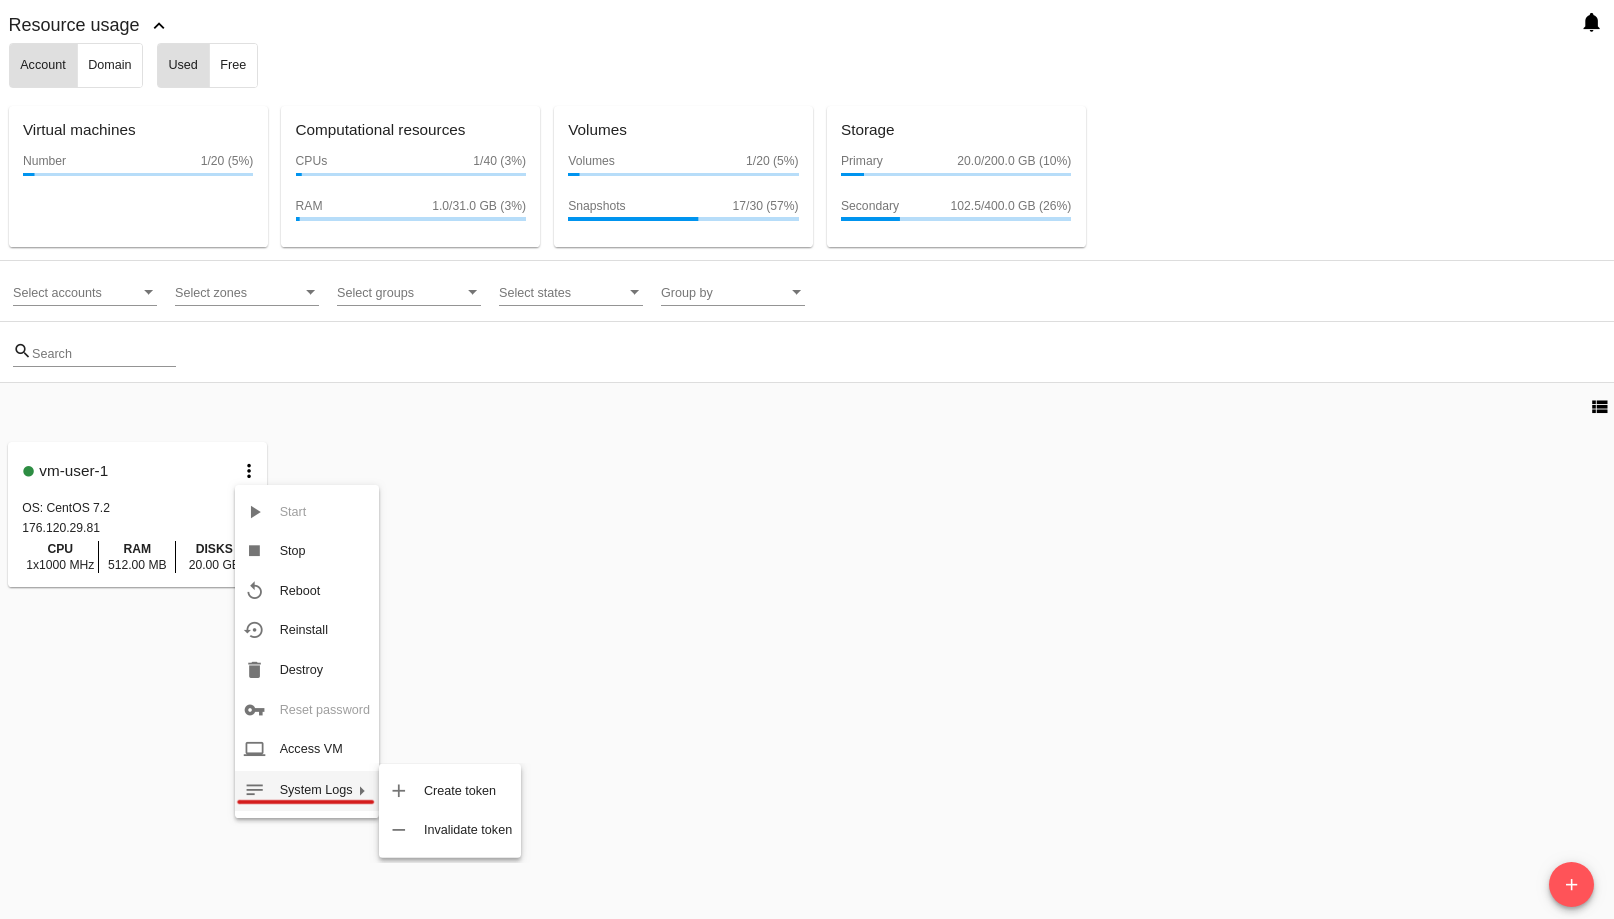
Under the System Logs submenu of the Action box a user can select between two actions:
Create token - Allows creating a token. When selected, it asks to confirm the action and opens a modal window with the newly created token:
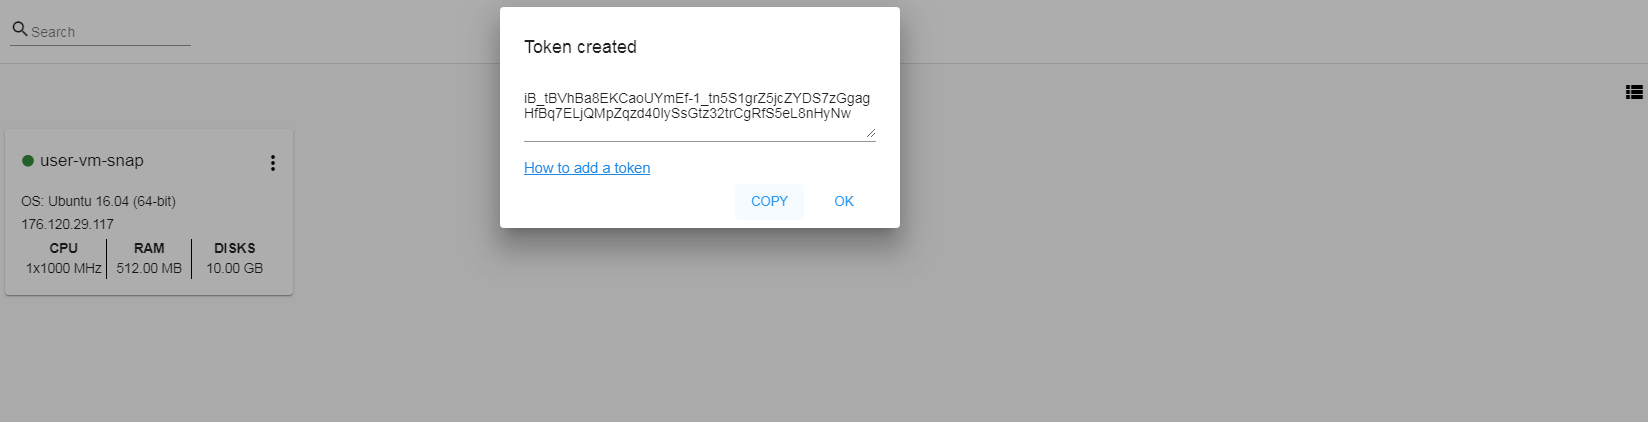
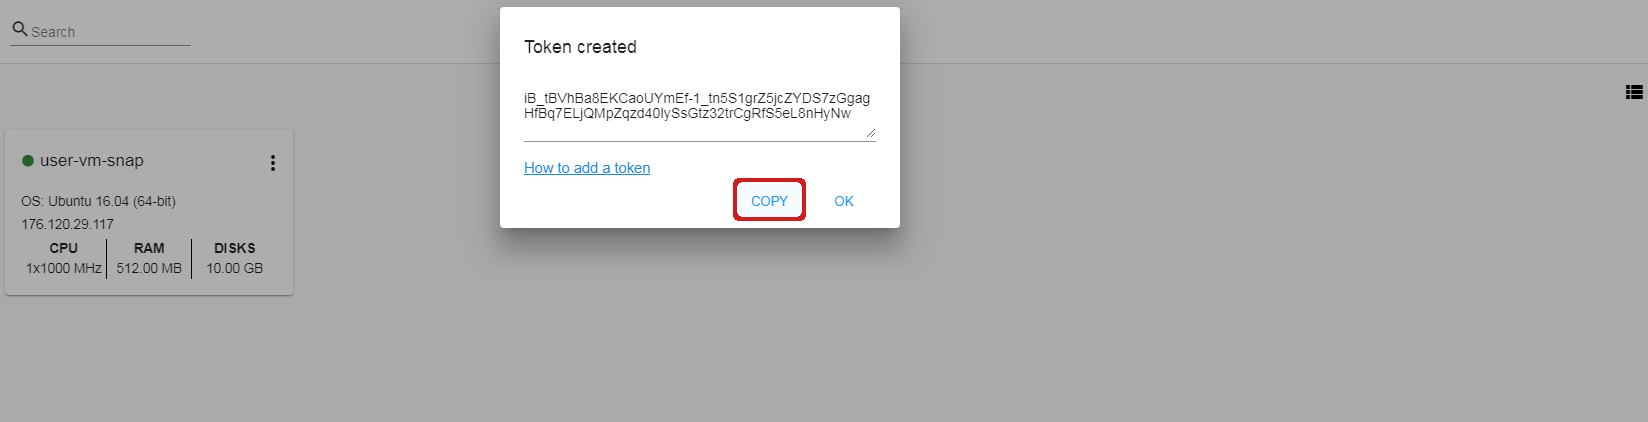
The created token can be copied by clicking COPY.
To access the detailed information on how to add the token to the Filebeat configuration, please, use the provided link to the plugin documentation:
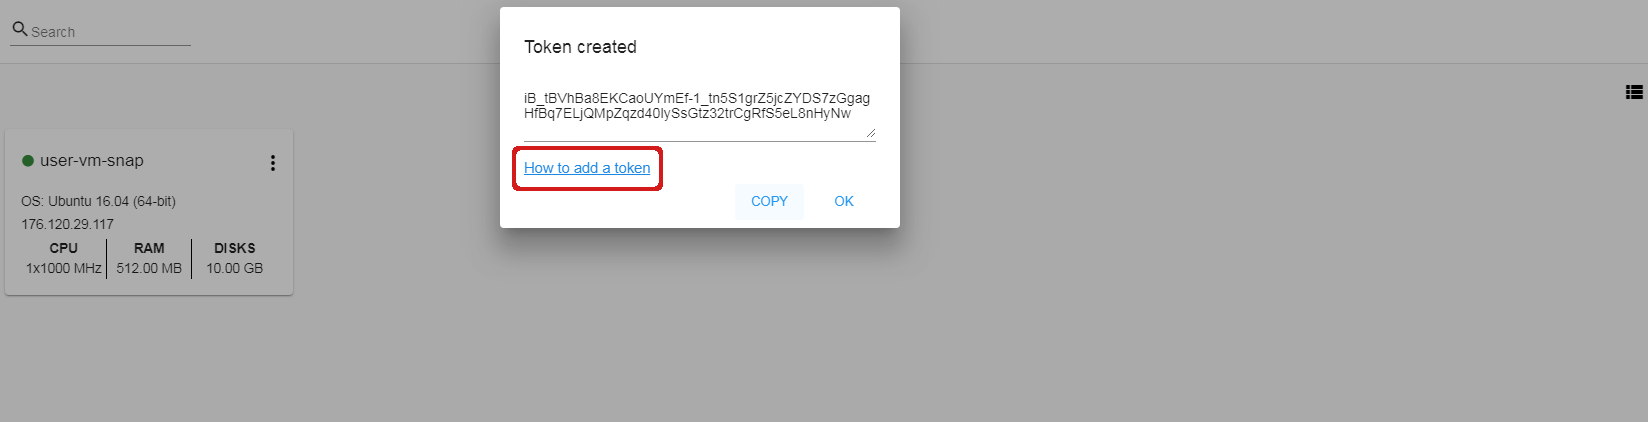
Click OK to close the window.
Invalidate token - Allows making the token invalid. It is necessary in case of compromising when a token needs to be changed to a new one. In the appeared window, input the token into the text field and click INVALIDATE. The token will become invalid.
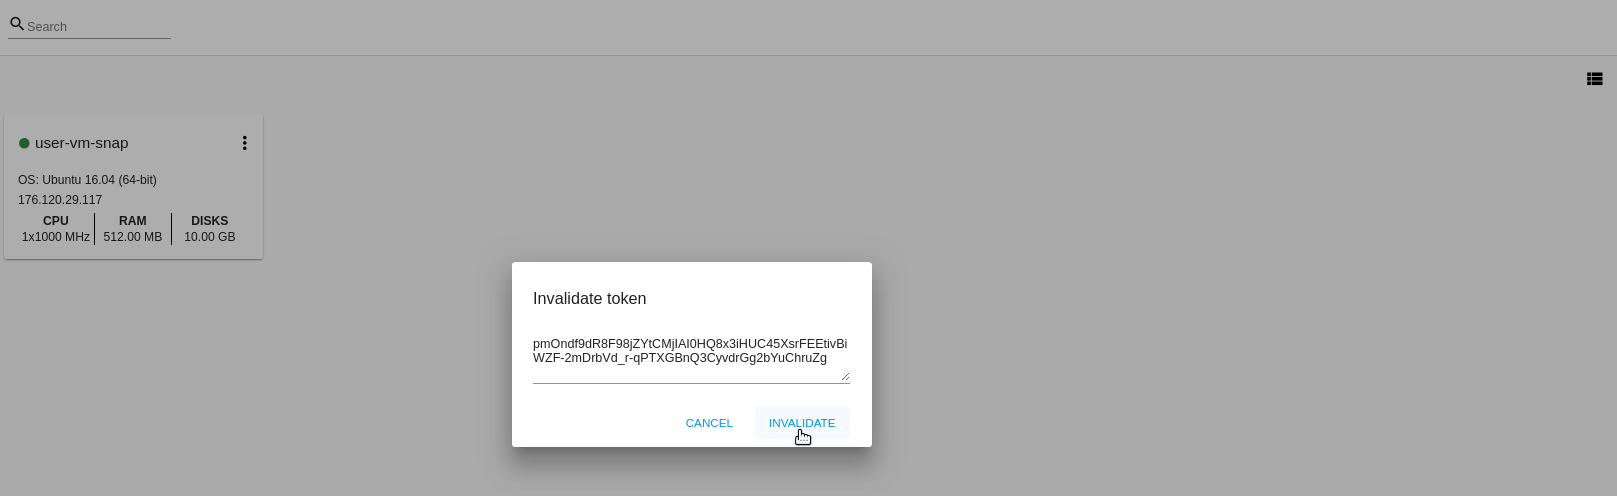
Or you may click CANCEL to close the window. The token will remain valid.
Pulse - It is a custom feature created in CloudStack-UI to visualize the VM performance statistics. By clicking “Pulse” at the Actions box you open a modal window with 3 tabs: CPU/RAM, Network, Disk. There you can see the charts of resources statistics for the VM.
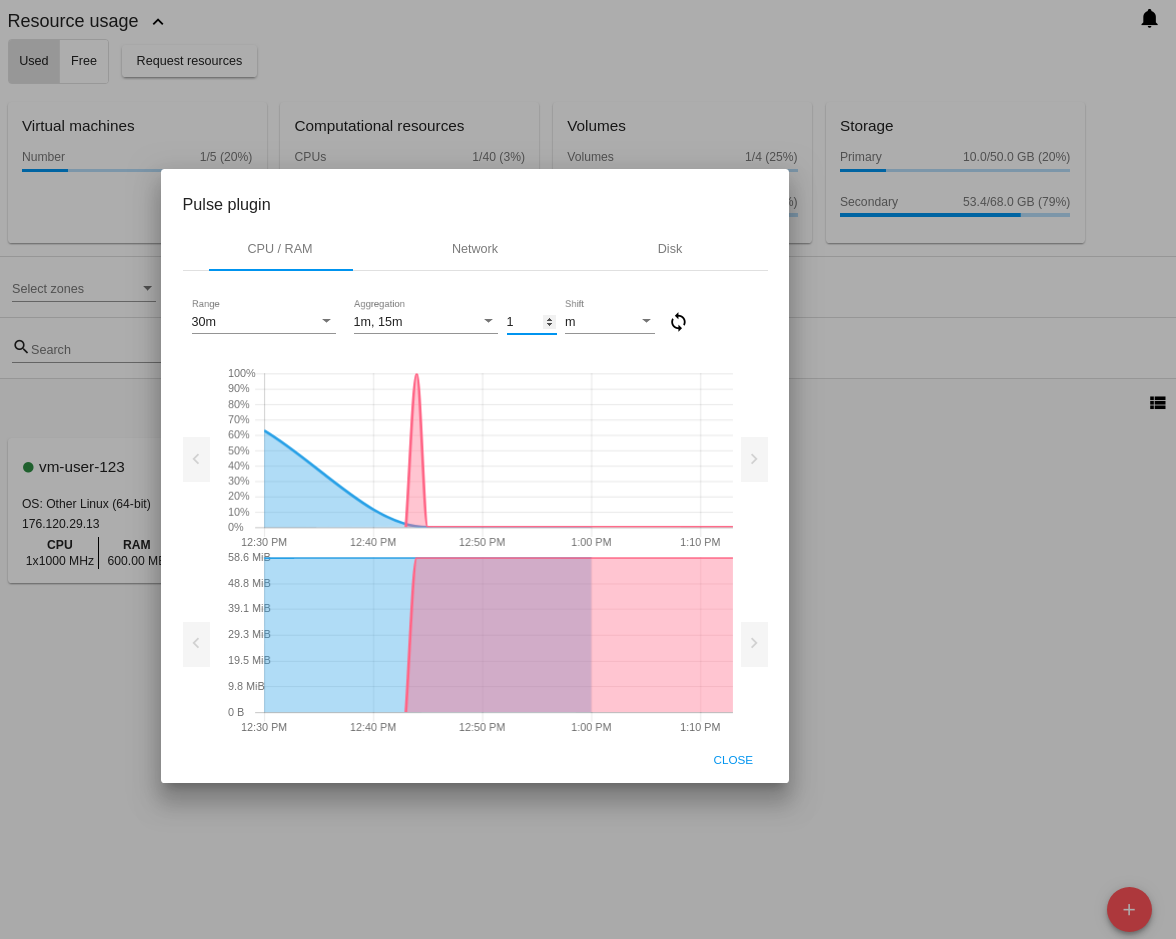
You can adjust the graphs by range, data aggregation period, shift interval and other parameters.
This plugin is convenient for dynamic monitoring of VM performance. Find more information about it in the official documentation. Pulse plugin deployment instructions can be found at the Pulse Plugin page.
Note
Please, note, when performing one of the actions from the list, other actions in this list are disabled until the action in progress finishes.
VM Details Sidebar
For each virtual machine, you can get the details.
By clicking a VM line or card you can open a sidebar to the right.
Here and in all other sections the sidebar width is adjustable - you can change it by hovering over its edge and dragging to the width you wish.
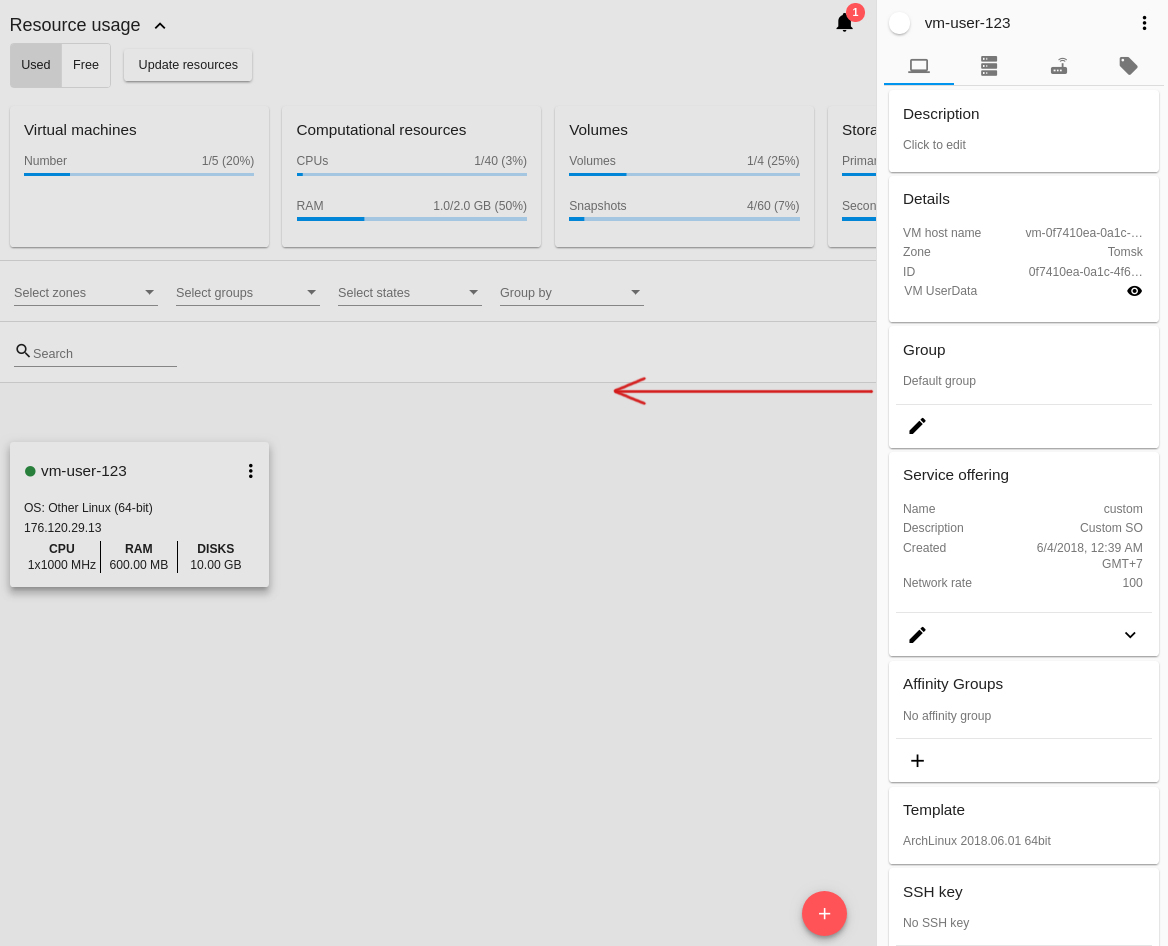
In the details sidebar you will find the information for the selected virtual machine:
- VM name.
- Color-picker
 - Allows marking a virtual machine with a color to distinguish it in the list. The range of available colors for VMs is specified in the configuration file.
 - Actions on the VM. See the VM Action Box section below.
You will see four tabs in the sidebar. Let’s describe what information on the virtual machine is presented in each tab.
Virtual Machine Tab
The Virtual Machine tab contains the general setting of the VM. Some settings can be edited here. At the bottom you can see the Statistics section which shows real-time data for the VM performance.
Description - A short description of the VM. Click the block to edit it. Enter a few words about the VM. Click “Save” to save the description. It is a custom description for your machine. It is saved to tags with
csui.vm.descriptiontag.The description can be edited. Click “Edit”
 to change the description.
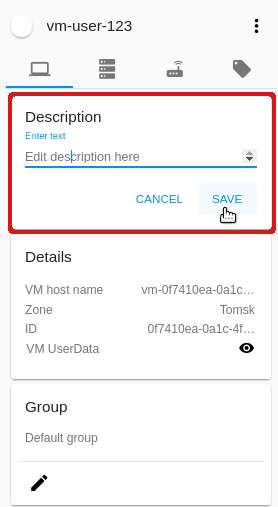
It also can be edited from the Tags tab. Click Edit icon
next to the csui.vm.descriptiontag and change the description text in the appeared form.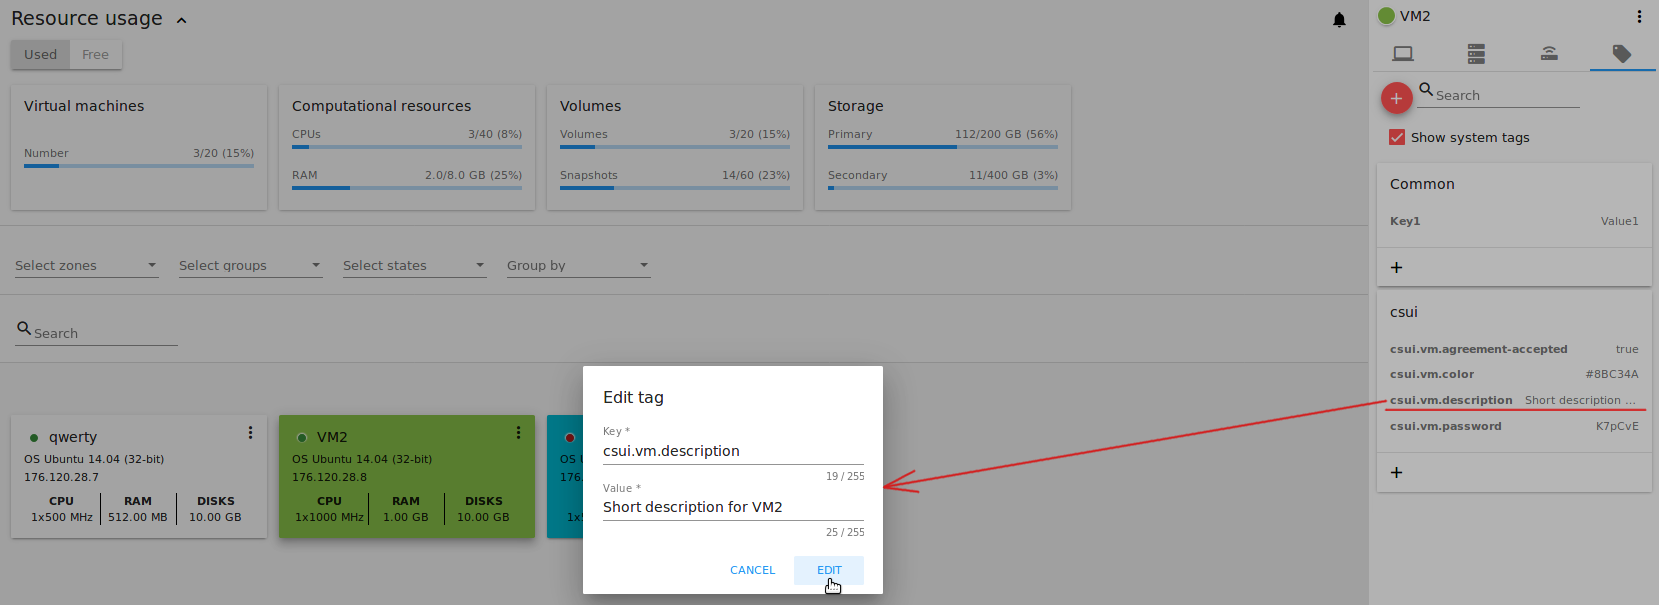
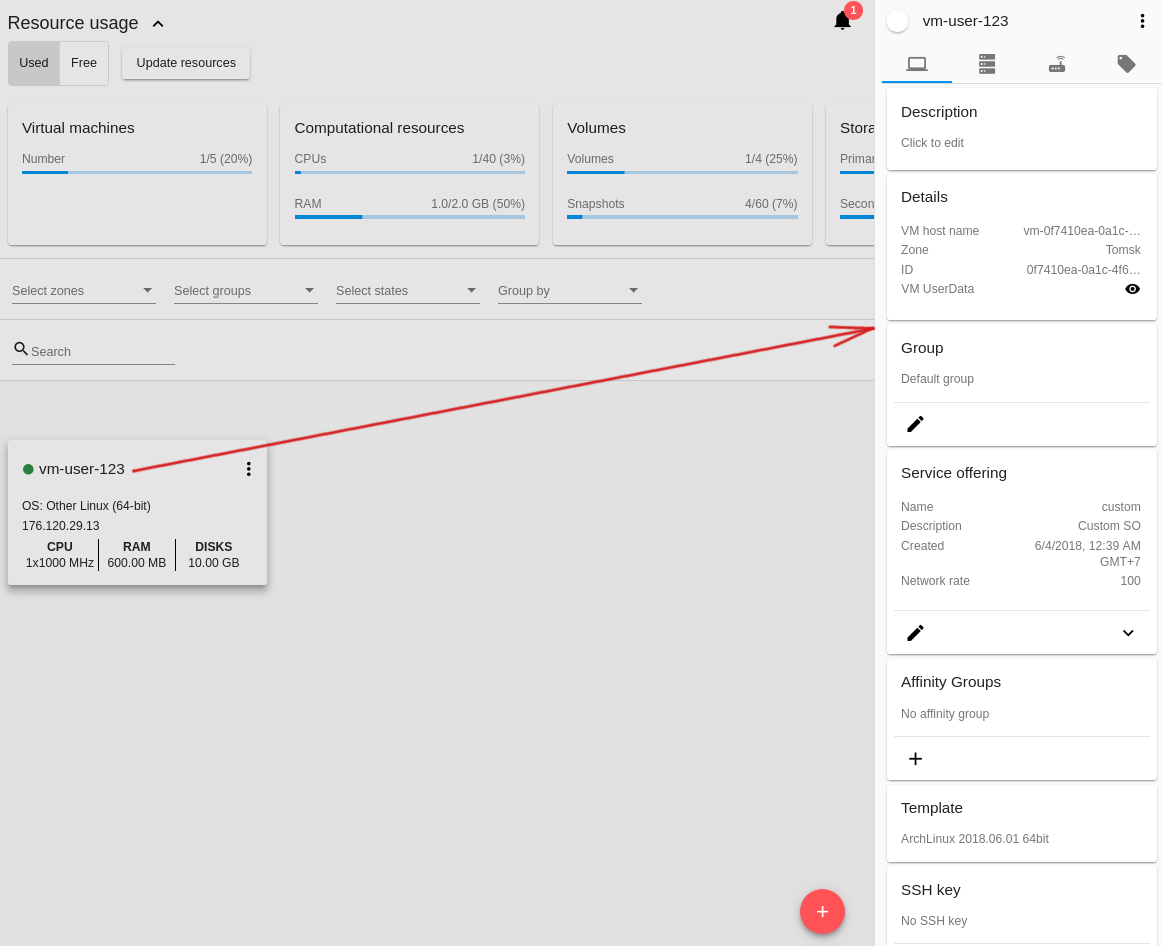
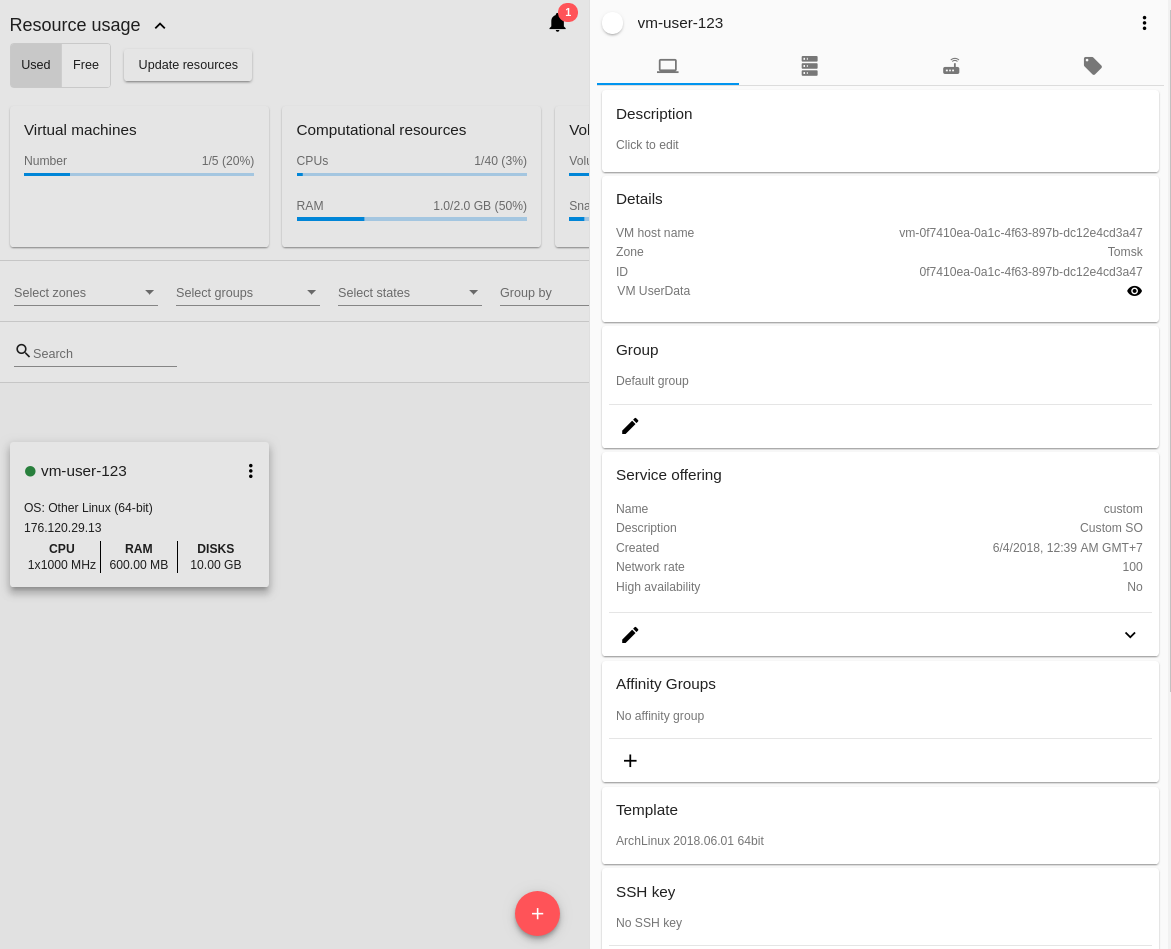
Details - Displays general information about the VM:
VM host name,
Zone selected for the VM to be available in,
Machine ID,
VM UserData - Allows viewing, editing and copying user data applied to the machine.
Click
 to open the modal window and view the user data applied to the machine. Use the scroll tool if the text contains many symbols.
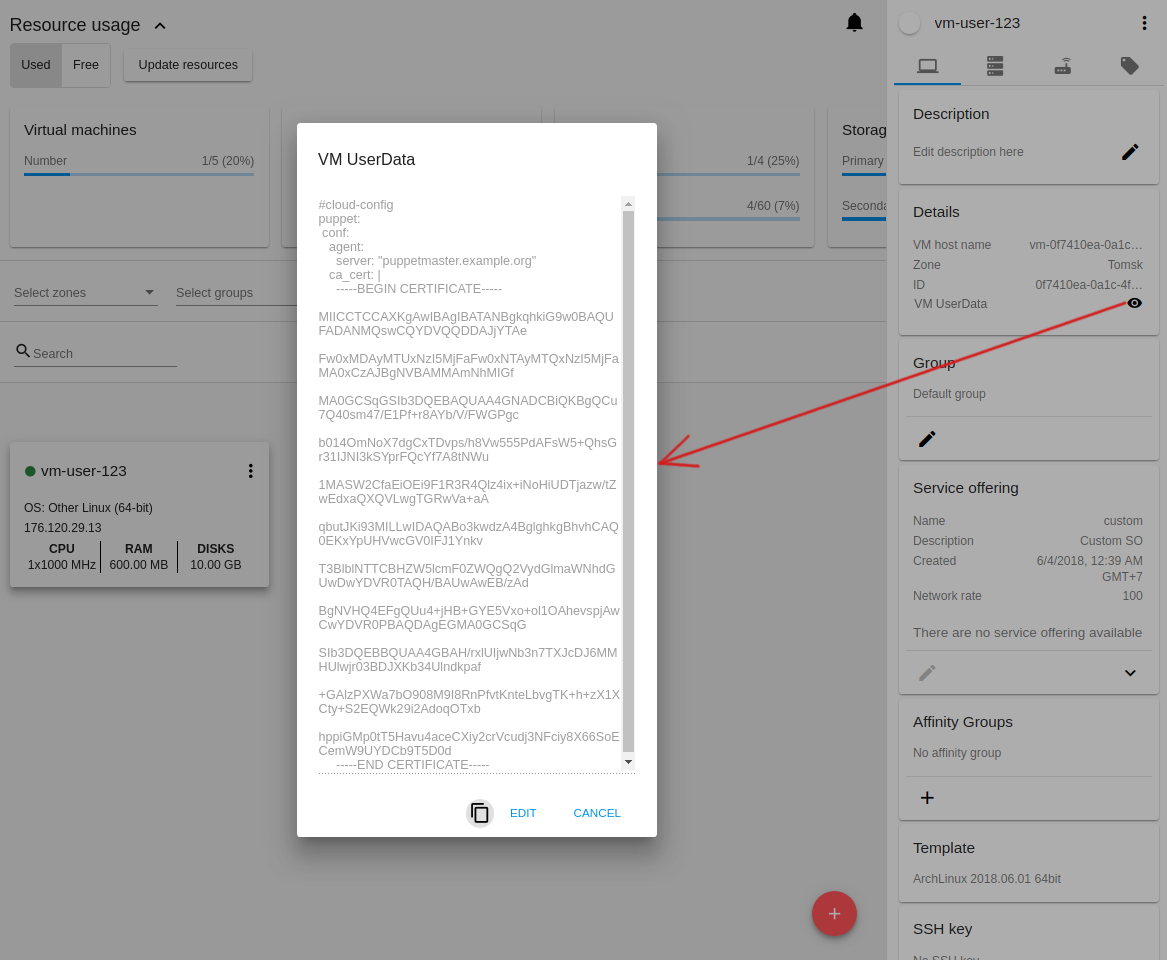
You can copy data by clicking
 .
.Click EDIT to view the data in the editing mode. Make necessary changes and save them.
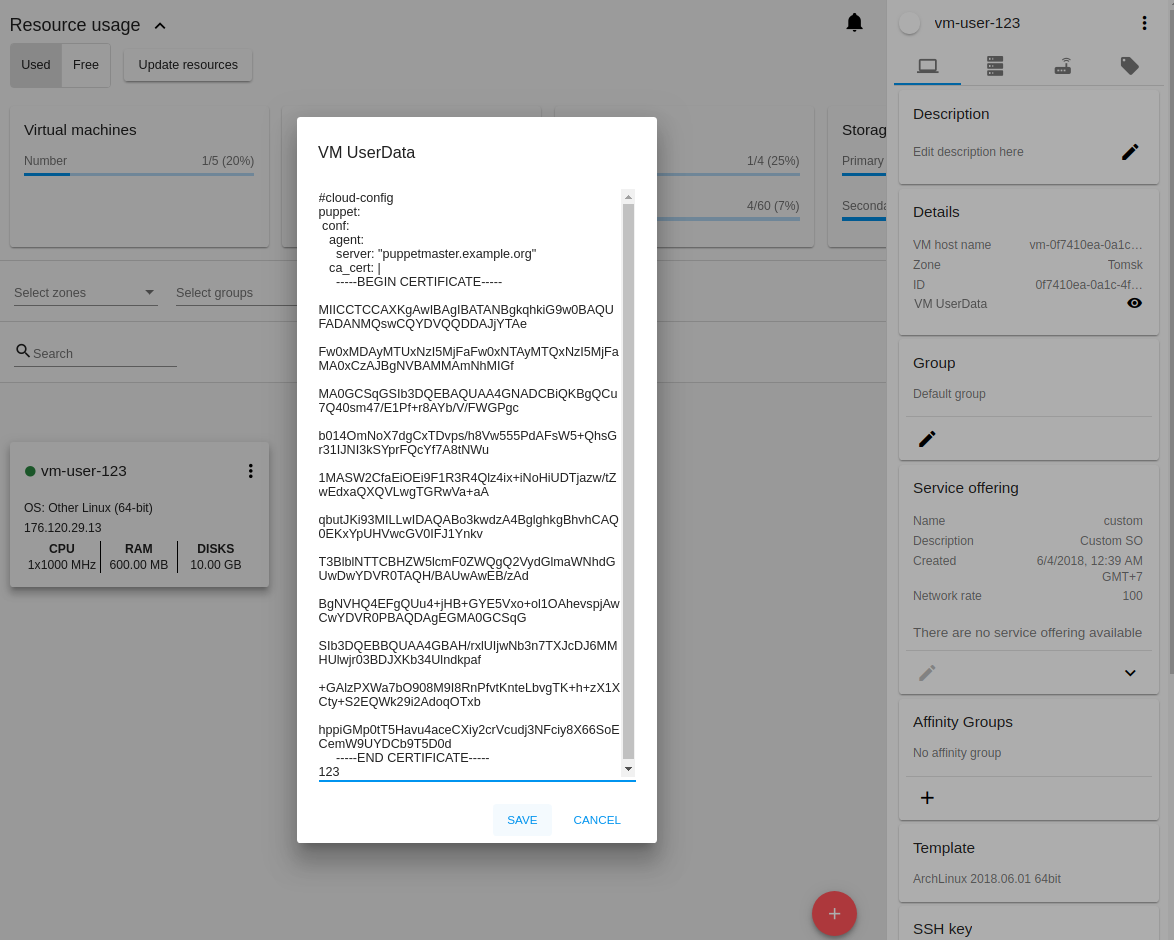
Or click CANCEL to close the dialog window without saving changes.
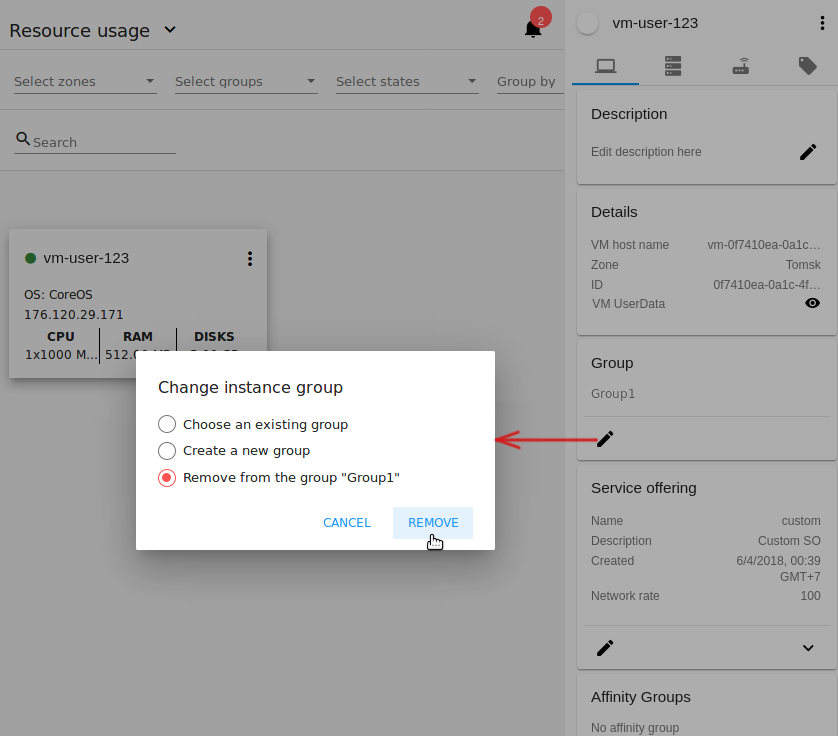
Group - A group the VM is assigned to. Edit this field by clicking the “Edit” button
. In the appeared dialog window choose a group from the drop-down list. Click “Assign” to assign the VM to the chosen group.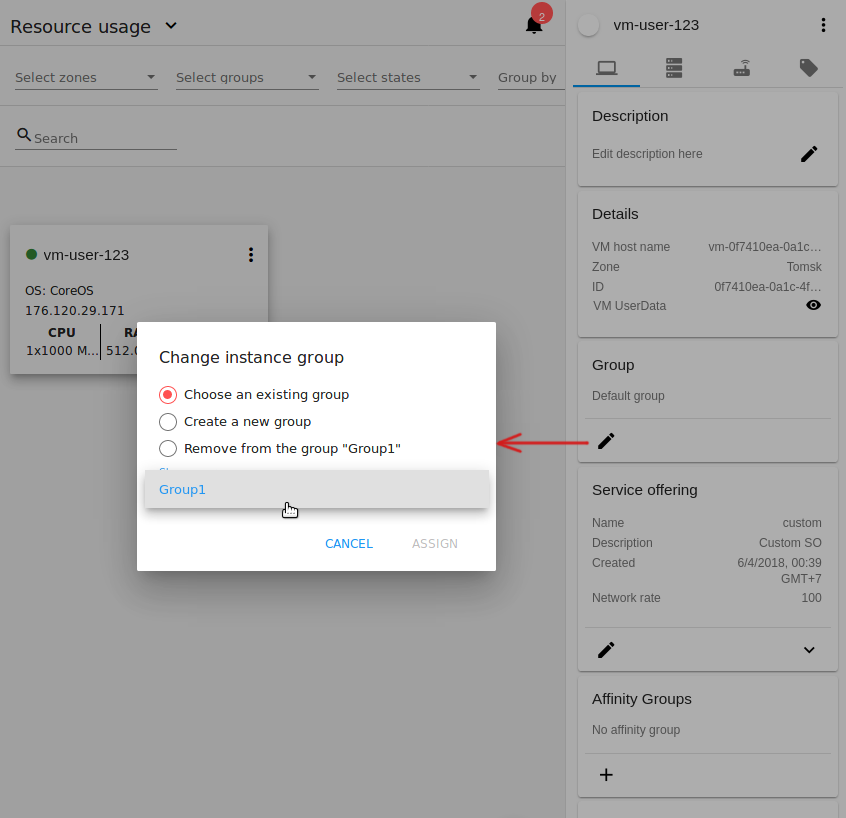
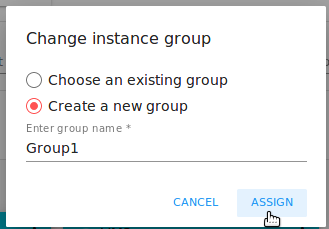
Or you can create a new group right from this window selecting the “Create a new group” option. Click “ASSIGN” to assign the created group to the VM.
To remove a machine from the assigned group select the “Remove from the group” option and click “REMOVE” to eliminate the VM from the group. A Default group will be displayed for this machine.
Service offering - The service offerings of the VM. Expand the section to view the whole list of offering parameters.
Edit this field by clicking the “Edit” button
. In the appeared window you will see the list of available service offerings.The list consists of two sections - Fixed and Custom. In each section, offerings can be filtered by classes if classes are determined in the configuration file.
You can use the search tool to find an offering in the list by a name or a part of the name.
Select an option from the list to change the service offering.
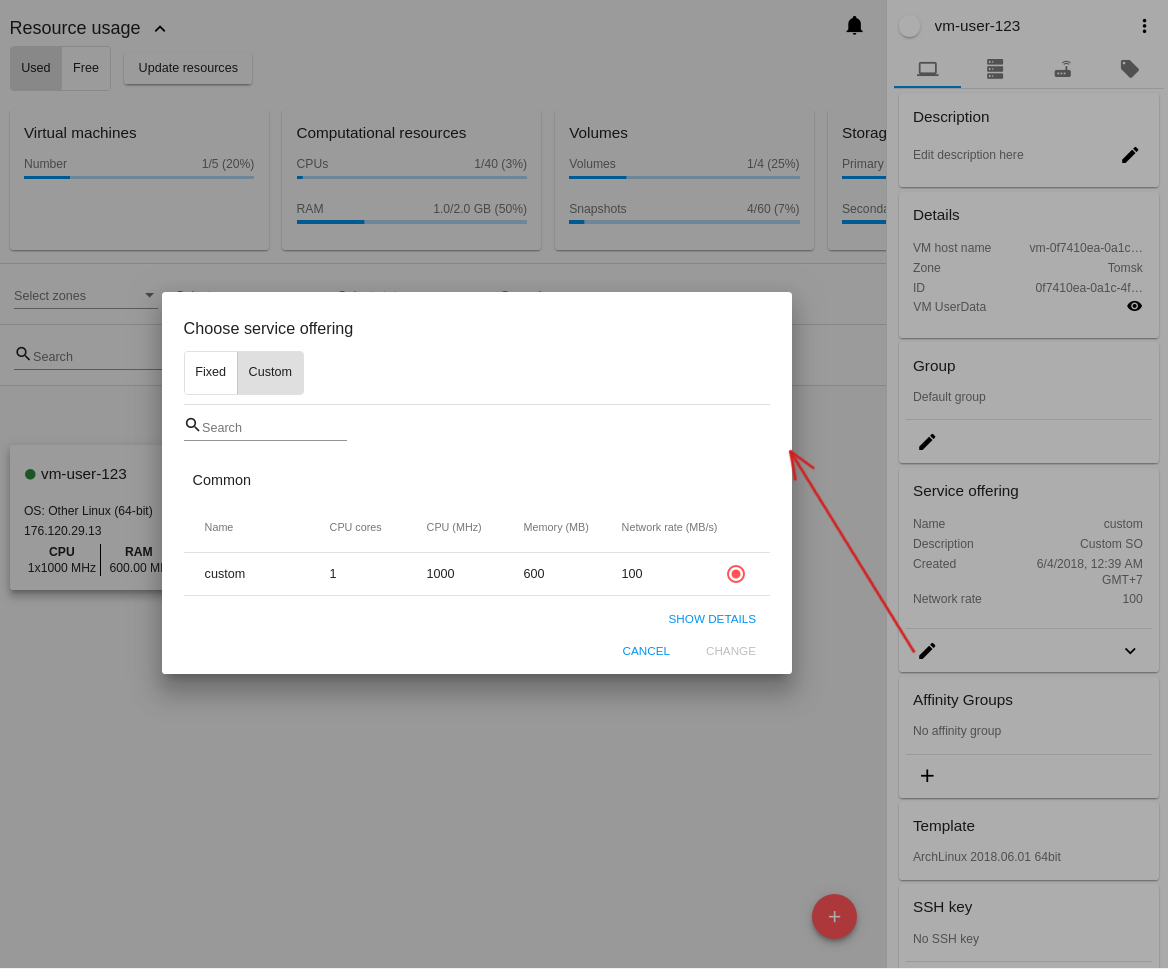
Click “Change” to implement the edits.
Note
The system checks the amount of available account resources. In case a selected service offering does not fit the amount of available account resources, a warning message will appear saying the offering cannot be selected.
A started virtual machine will be rebooted at editing the service offering.
Affinity Group - The affinity group(s) assigned to the virtual machine. A name and a type of groups are displayed here. Groups are listed in alphabetic order. Hovering over a group name shows a description of a group (if provided at creation).
If no affinity group is assigned to the VM, or you wish to add another affinity group to the list, click “Add” (+) in the block. A dialog box appears where you can choose an existing group or create a new one.
Select a group in the list and click “Assign” to assign it to the VM. A user can add several groups to one virtual machine.
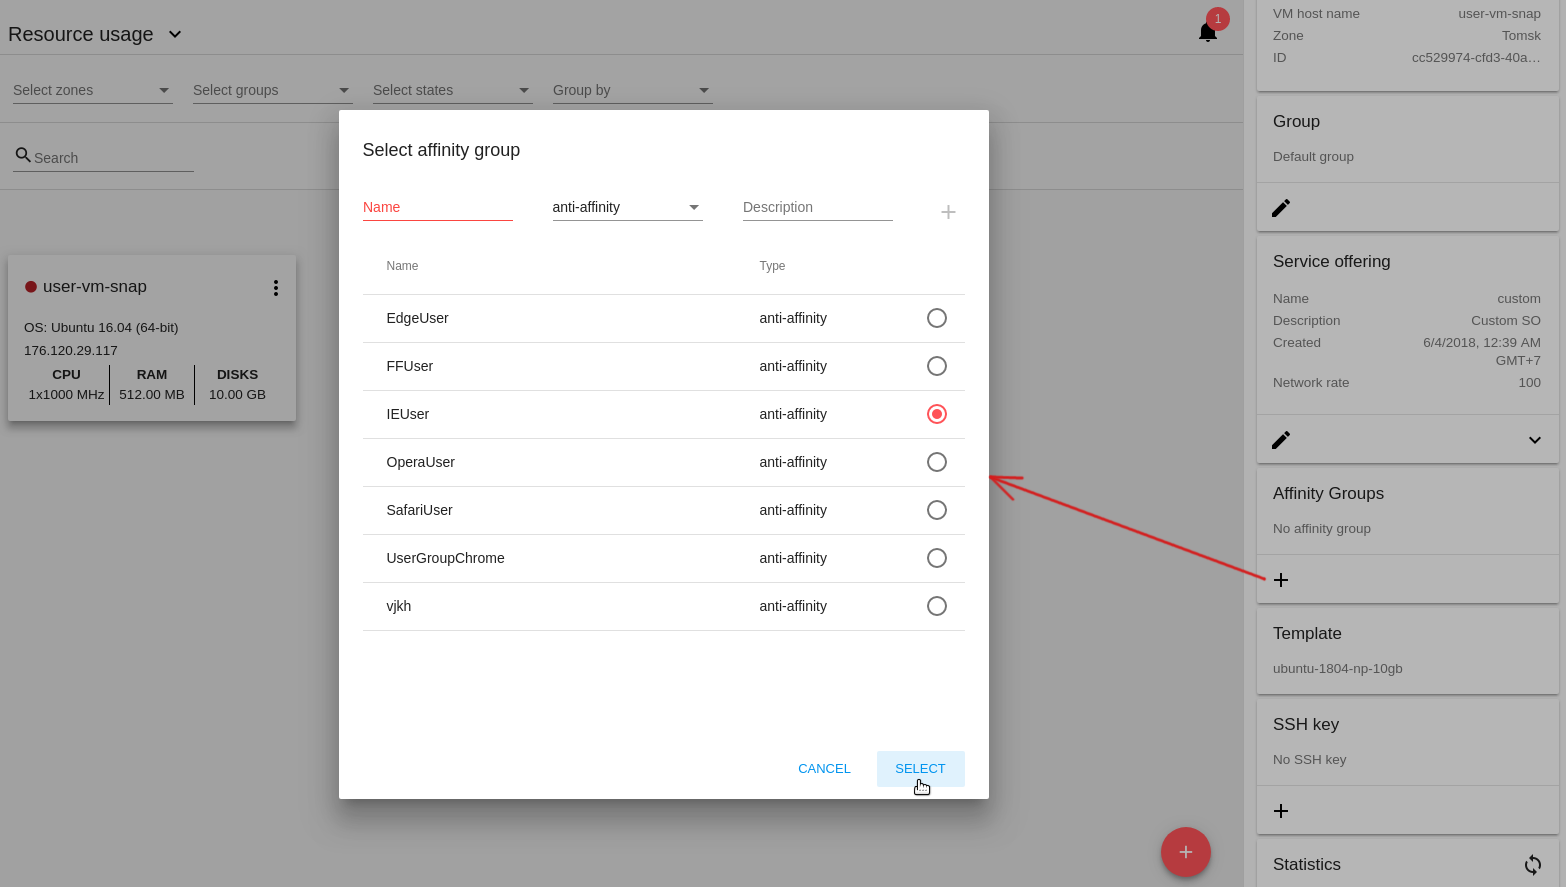
To create an affinity group fill in the form at the top of the dialog box and click “+” to add the group to the list. Then, you can assign the newly created group to the VM.
When assigning an affinity group to a started virtual machine, the system will suggest you stopping the VM. Click “OK” in the dialog window. Then, the VM will be started again.
The selected group/groups can be deleted by clicking
 near the group name in the list.
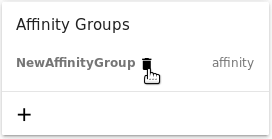
Template - Shows the template used to create the virtual machine.
SSH key - Shows the SSH key of the virtual machine. Add the SSH key by clicking “+”. In the appeared window select the SSH key in the drop-down list and click “CHANGE”:

At saving the new SSH key for a started VM you will see the warning: “You need to stop the virtual machine to reset SSH key.” Click “OK” if you want to stop it right now. Click “Cancel” to drop the edits.
Statistics - shows VM statistics on CPU utilized, Network read, Network write, Disk read, Disk write, Disk read (IO), Disk write (IO). Refresh data by clicking the “Refresh” button
 in the upper-right corner.
VM Snapshots
This section presents the information on snapshots created for the virtual machine. It shows the details for the last taken snapshot, allows viewing a complete list of all machine’s snapshots and managing them. You also can take a VM snapshot in this section.
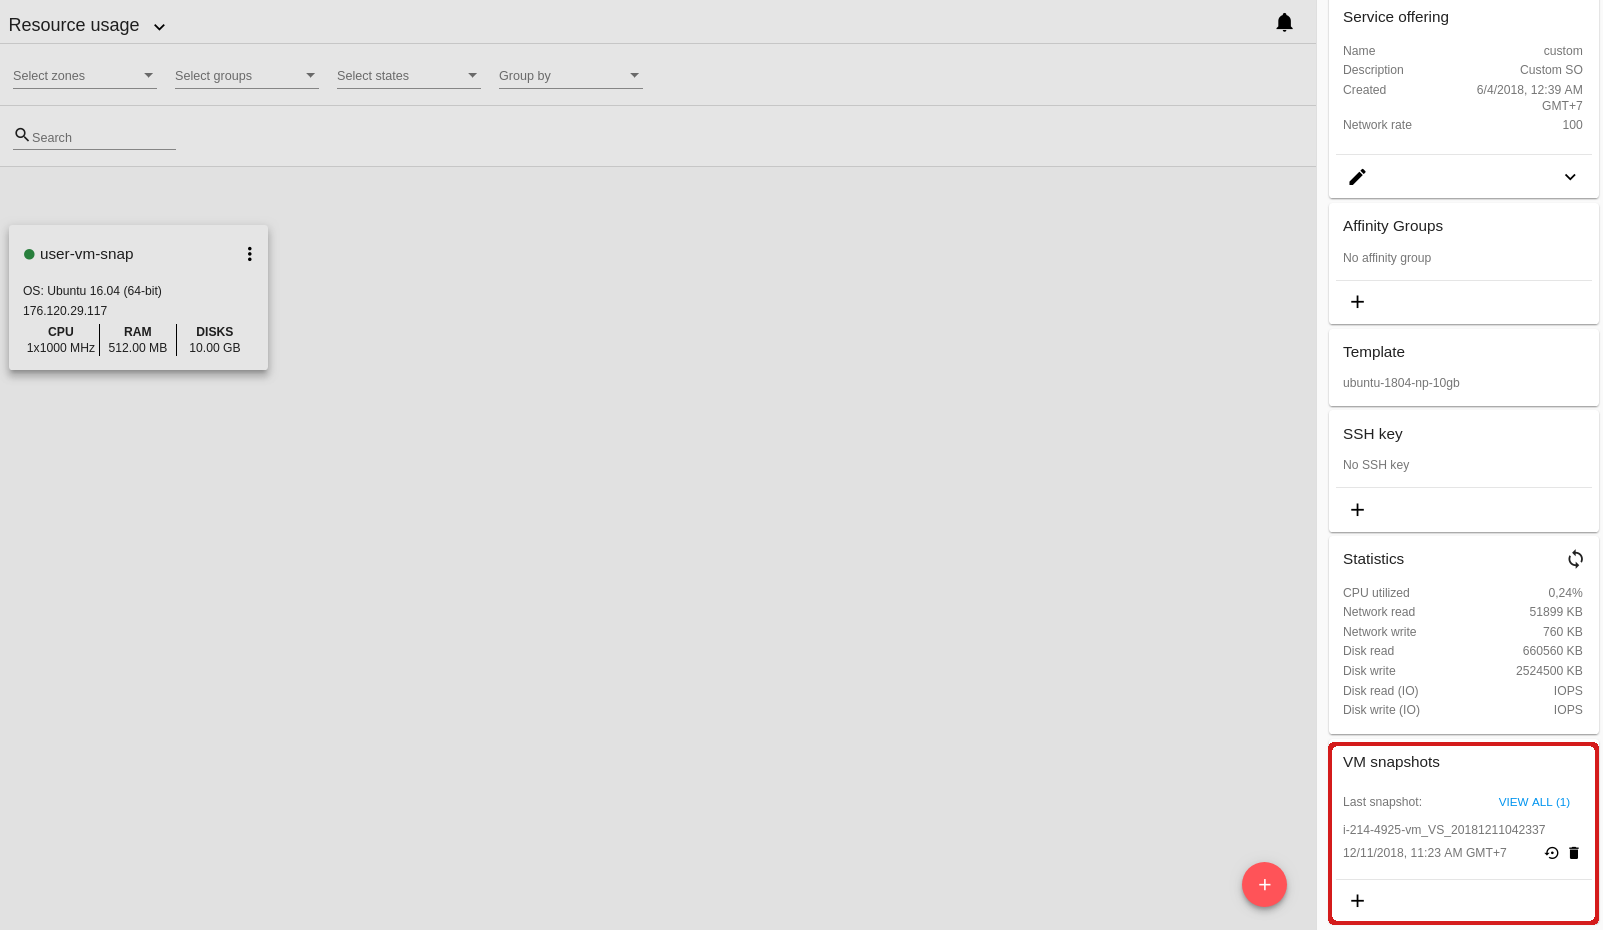
The following information is displayed in this section:
- Details on the last taken snapshot: name, creation date and time;
- “View All” allows viewing a full list of snapshots created for the machine. It opens a modal window where a user can see the list of snapshots and manage them using the action buttons:
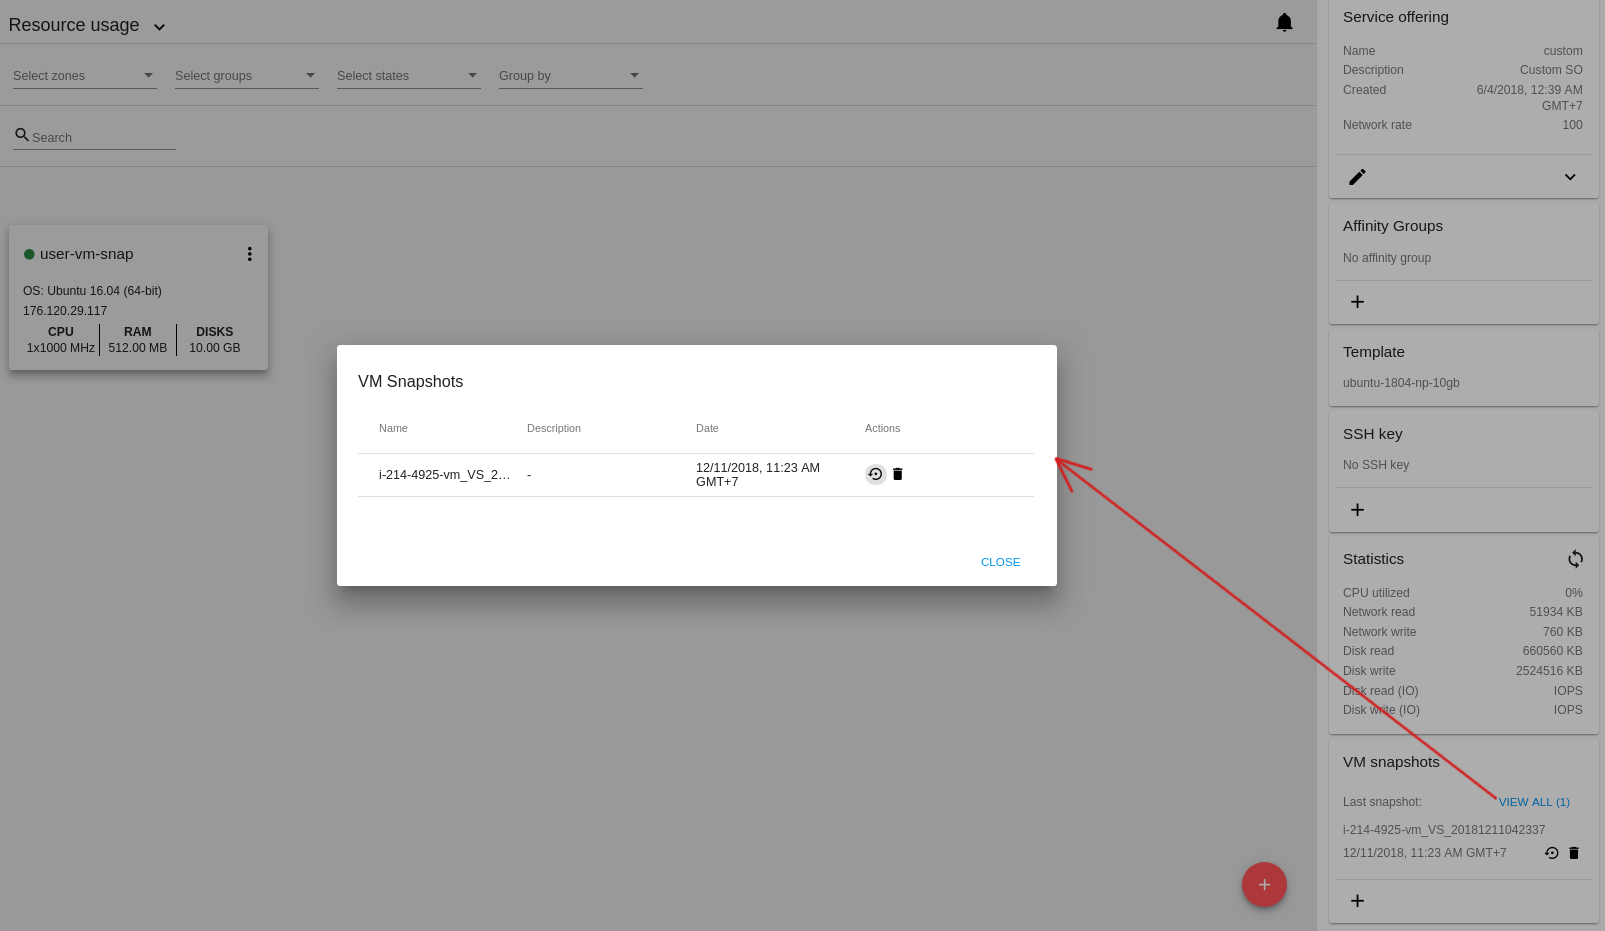
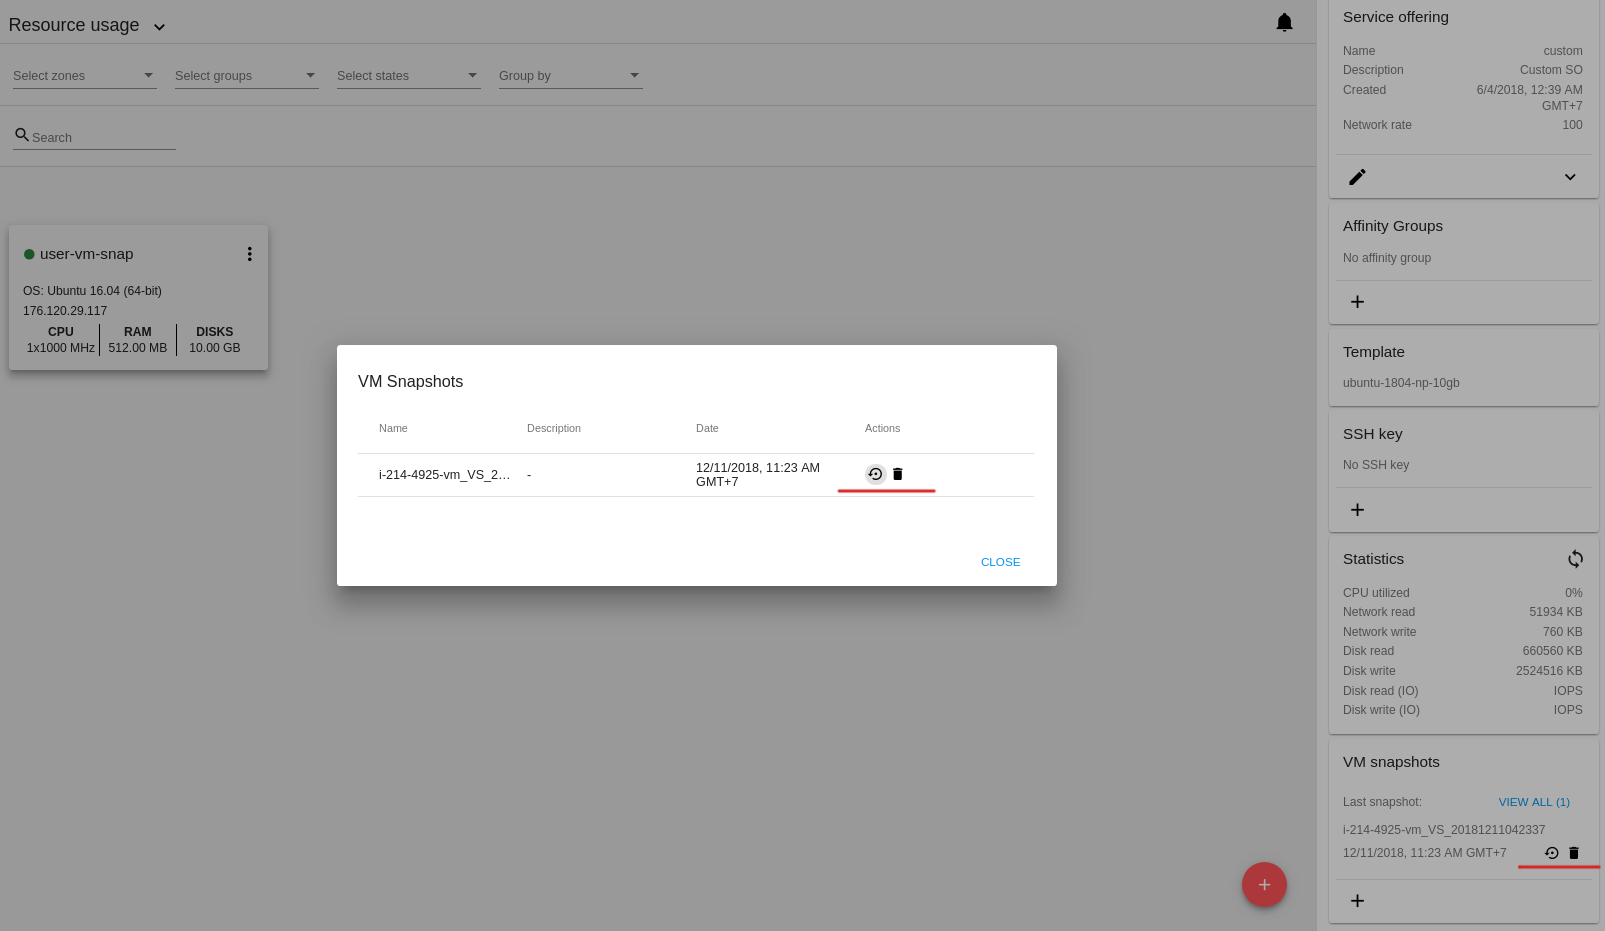
A user can manage snapshots in the list using action buttons:
Revert VM to snapshot - Allows returning the virtual machine to the state captured in the snapshot. It is useful if you implemented any changes to the VM and they went wrong. You can easily restore the VM to its previous state using this action. Select “Revert VM to snapshot” by clicking
 and confirm your action in the dialog window. The VM will be reverted.
Note
The machine cannot be reverted to the snapshot state if the current Service Offering of the VM differs from that used at the moment the snapshot was taken. Besides, the action is not available for stopped machines.
Delete - Allows deleting a snapshot from the system.
Create Snapshot
Note
Taking a VM snapshot is available for machines in the Running state only. The maximum number of VM snapshots can be defined in the configuration file (see the configuration guide).
To create a snapshot click ‘+’ and fill in the appeared form:
- Name - Enter a name for the snapshot.
- Description - Provide a short description for the snapshot.
- Snapshot memory - Check the box to snapshot the VM CPU and memory, i.e. a snapshot of the DiskAndMemory type. Currently, it is activated by default and is not editable.
Once all fields are completed, click CREATE to save the snapshot.
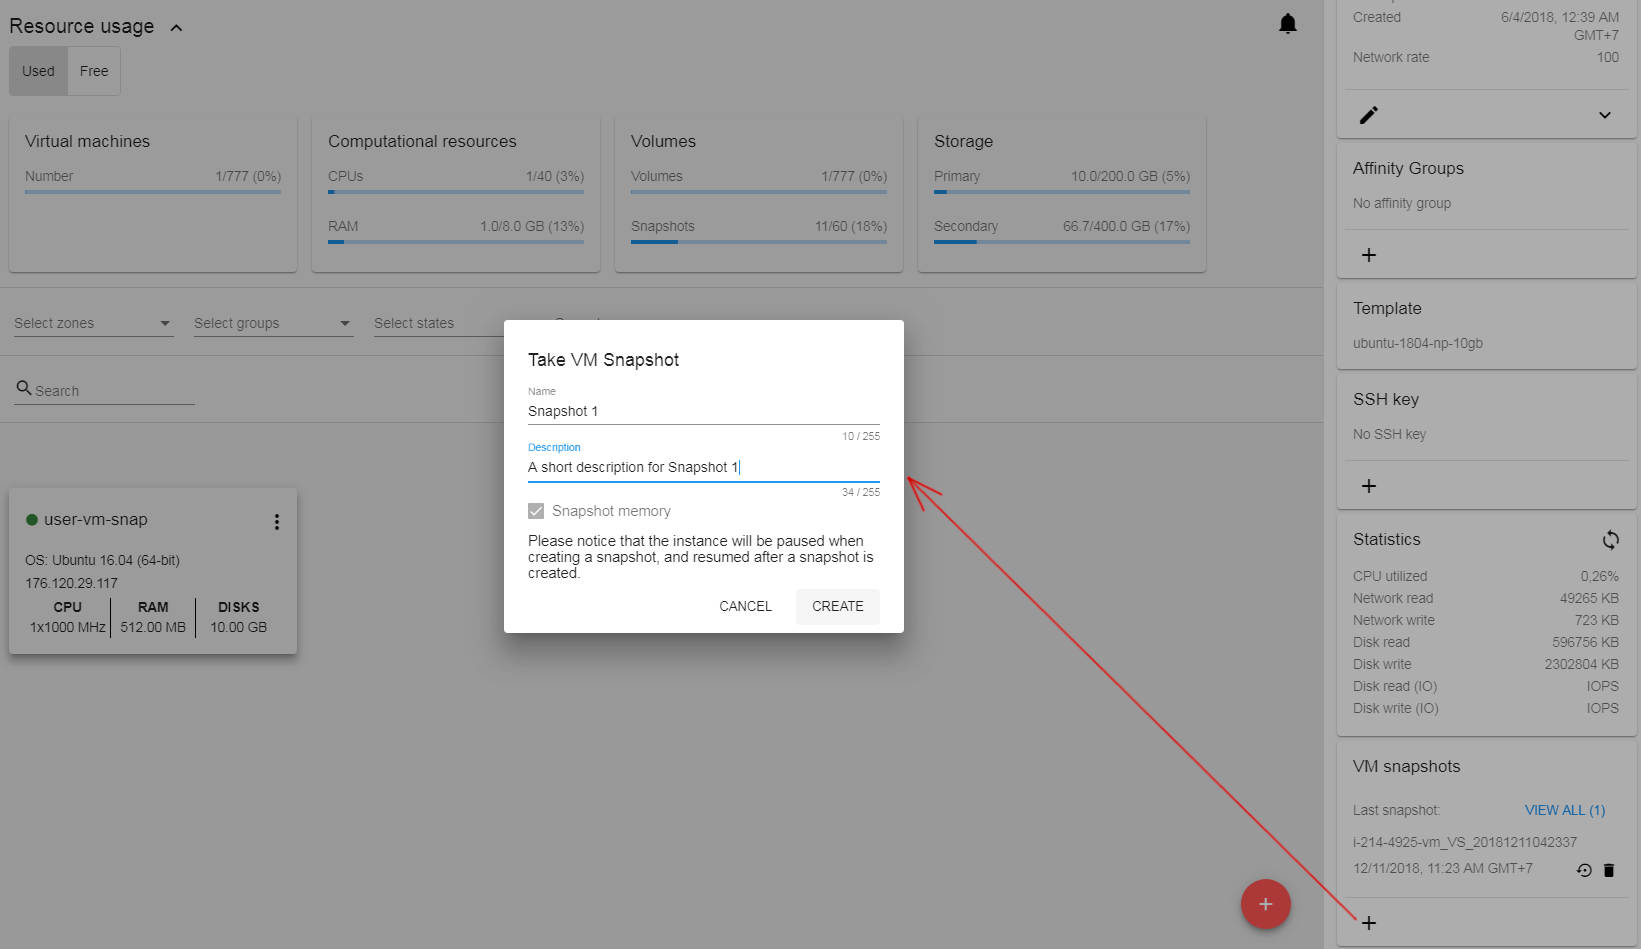
The VM will be paused for creating a snapshot and then resumed. The snapshot will appear in the list of VM snapshots.
To drop the snapshot creation, click CANCEL.
Storage Tab
The second tab - Storage - contains the information on the volumes allocated to the virtual machine as well as snapshots created for the volumes.
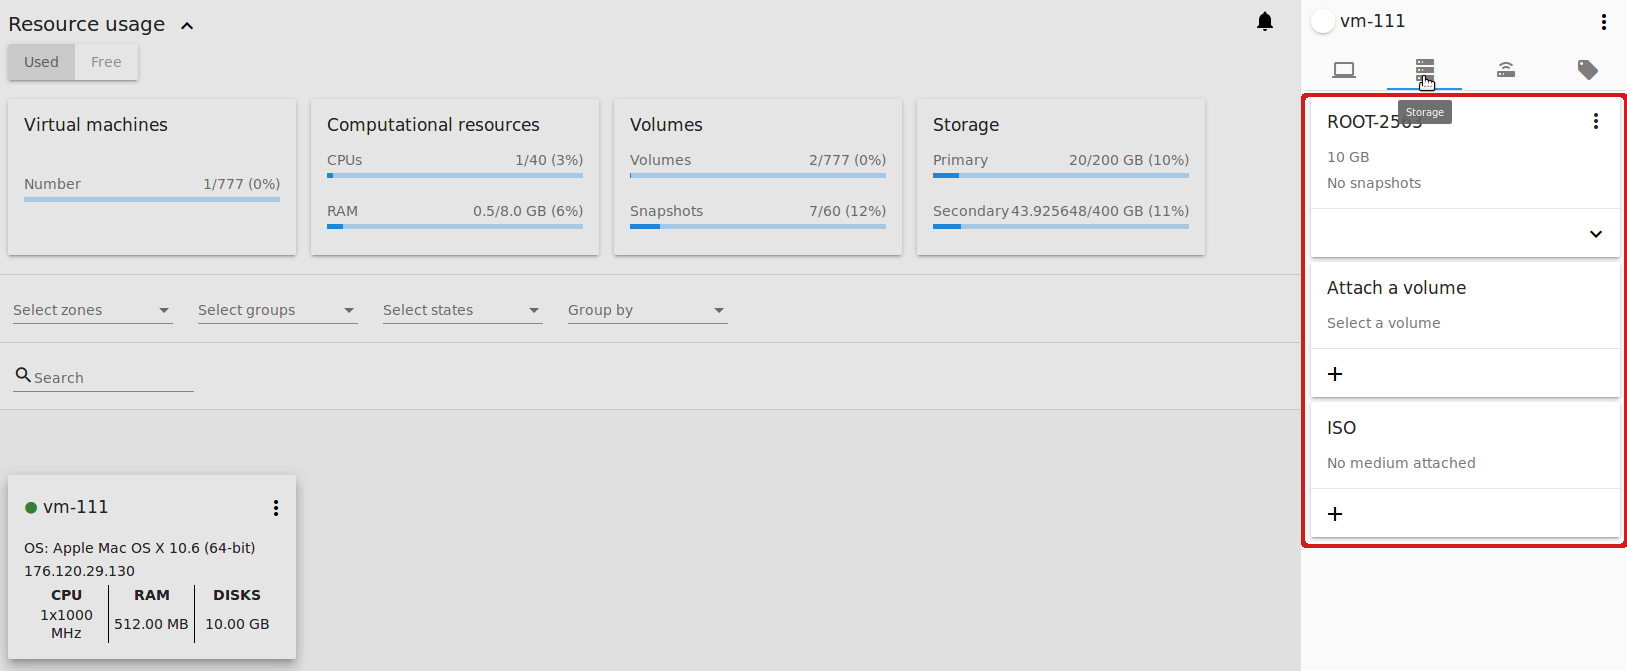
In this tab the following information is presented:
- Disk information
Each VM has a root disk. Besides, data disks can be added to the VM.
The following general information on a root disk is presented (expand the card to see the whole list):
- Name - The disk name.
- Size - The disk size.
- Creation Date and Time.
- Storage Type (Shared/Local).
- Last Snapshot information.
- Action Box.
- Attach a volume - Allows attaching a data disk to the VM.
Note
Attaching volumes available for machines in the «Running» status only. Attaching a volume is not available for machines with active snapshots.
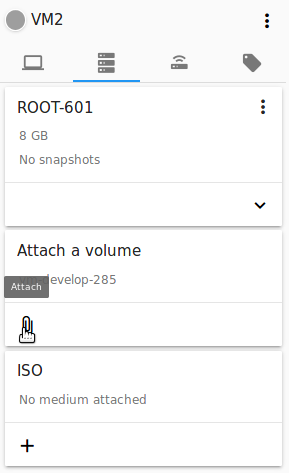
Additional volume (a data disk) can be attached to the VM. Click “Select” to select a data disk. Select a disk in the drop-down list and click “SELECT”.

The chosen data disk will appear for the virtual machine with the “Attach” button. Click “Attach” to attach the selected disk to the virtual machine.
If there are no available spare drives yet, you can create one right from this panel.
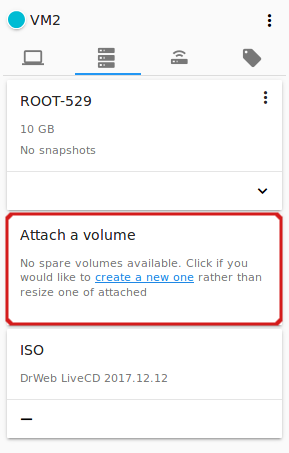
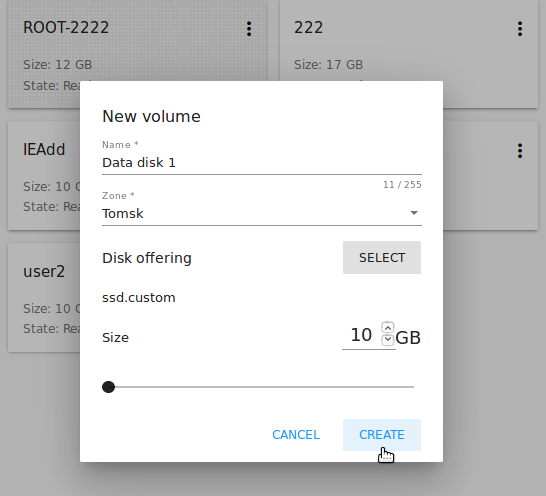
Click “Create new volume” and you will be moved to the Storage section. A “New volume” form will appear where you should specify the following information:
Note
Required fields are marked with an asterisk (*).
- Name * - Name of the new data disk.
- Zone * - Select a zone for it from the drop-down list.
- Disk offering * - Select a disk offering from the list in the modal window. The disk offering list is managed by Root Administrator.
- Size - Set the disk size if it is available. Disk size can be changed if a custom disk offering is selected above.
Once all fields are filled in, click “CREATE” to save the new volume.
Click “CANCEL” to drop the new volume creation.
Move back to the virtual machine information sidebar. Under the “Storage” tab in the “Attach a volume” section click “+” to select an additional disk. Select a data disk in the drop-down list and click “Select” to add it to the “Attach a volume” section. To attach the volume press the “Attach” button.
Volume Action Box
For each volume, the Actions list can be opened by clicking the actions icon ![]() .
.
The following actions on disks are available in this list:
For root disks:
- Take a snapshot;
- Set up snapshot schedule;
- Resize the disk.
For data disks:
- Take a snapshot;
- Set up snapshot schedule;
- Detach;
- Resize the disk;
- Delete.
Take a snapshot
You can take a VM snapshot to preserve all the VM’s data volumes as well as (optionally) its CPU/memory state. This is useful for quick restore of a VM.
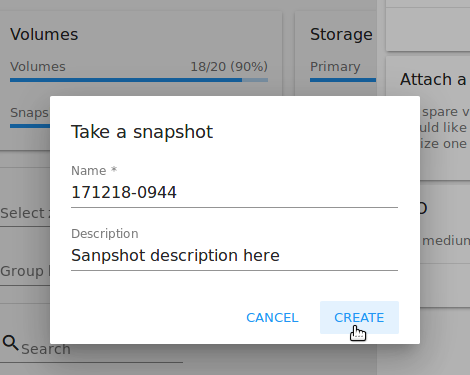
Click “Take a snapshot” in the disk Actions list and in the dialog window enter the following information:
Note
Required fields are marked with an asterisk (*).
- Name of the snapshot * - Define a name for the snapshot. It is auto-generated in the form
<date>-<time>. But you can specify any name you wish. - Description - Add a description of the snapshot to know what it contains.
All snapshots are saved in the list of snapshots. In the disk information, you will see the name and time of the last-taken snapshot. For each snapshot the list of actions is available. Find more information on snapshot actions in the Snapshot Action Box sections below.
Set up snapshot schedule
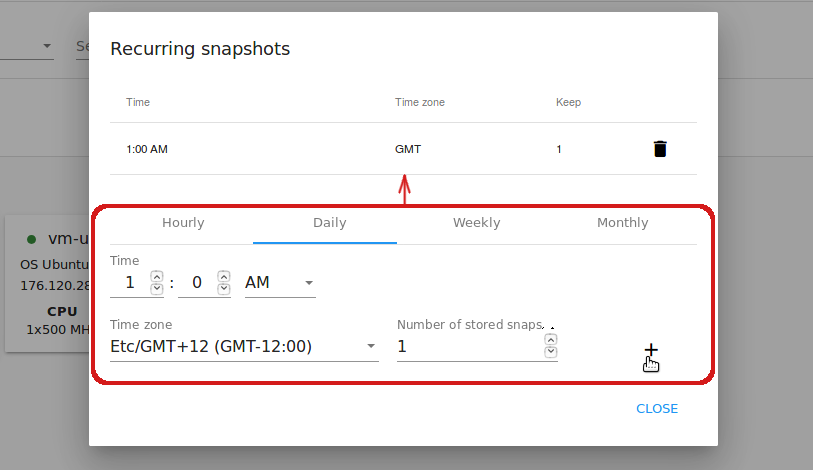
You can schedule regular snapshotting by clicking “Set up snapshot schedule” in the Actions list.
In the appeared window set up the schedule for recurring snapshots:
- Select the frequency of snapshotting - hourly, daily, weekly, monthly;
- Select a minute (for hourly scheduling), the time (for daily scheduling), the day of week (for weekly scheduling) or the day of month (for monthly scheduling) when the snapshotting is to be done;
- Select the timezone according to which the snapshotting is to be done at the specified time;
- Set the number of snapshots to be made.
Click “+” to save the schedule. You can add more than one schedule but only one per each type (hourly, daily, weekly, monthly).
Resize the disk
Note
Disk resizing is not available for machines with active snapshots.
This action is available to data disks created on the base of disk offerings with a custom disk size. Disk offerings with custom disk size can be created by Root Administrators only.
Selecting “Resize the disk” option in the Actions list you are able to enlarge the disk size.
In the appeared window set up a new size using the slider and click “RESIZE” to save the edits.
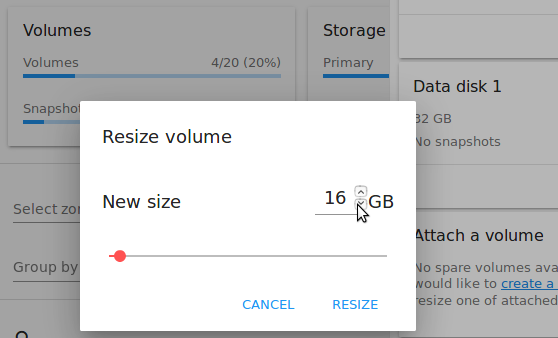
Click “CANCEL” to drop the size changes.
Detach
Note
Detaching a volume is not available for machines with active snapshots.
This action can be applied to data disks. It allows detaching the data disk from the virtual machine.
Click “Detach” in the Actions list and confirm your action in the dialog window.
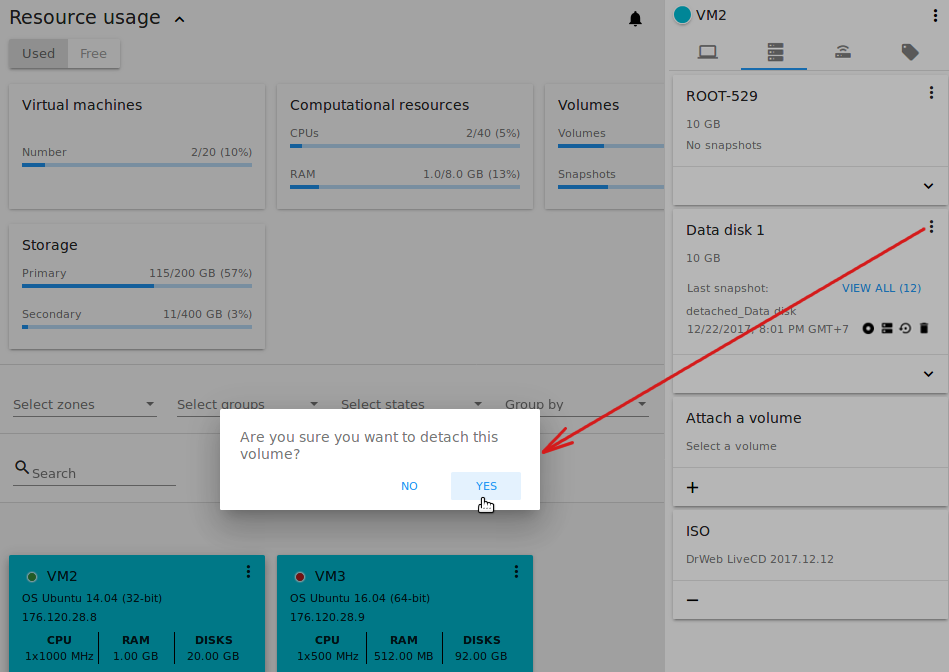
The data disk will be detached. It will be in the list of Spare drives in the Storage section.
Delete
Note
Deleting a volume is not available for machines with active snapshots.
This action can be applied to data disks. It allows deleting a data disk from the system right in the Storage VM details sidebar.
Click “Delete” in the volume Actions list and confirm your action in the dialog window.
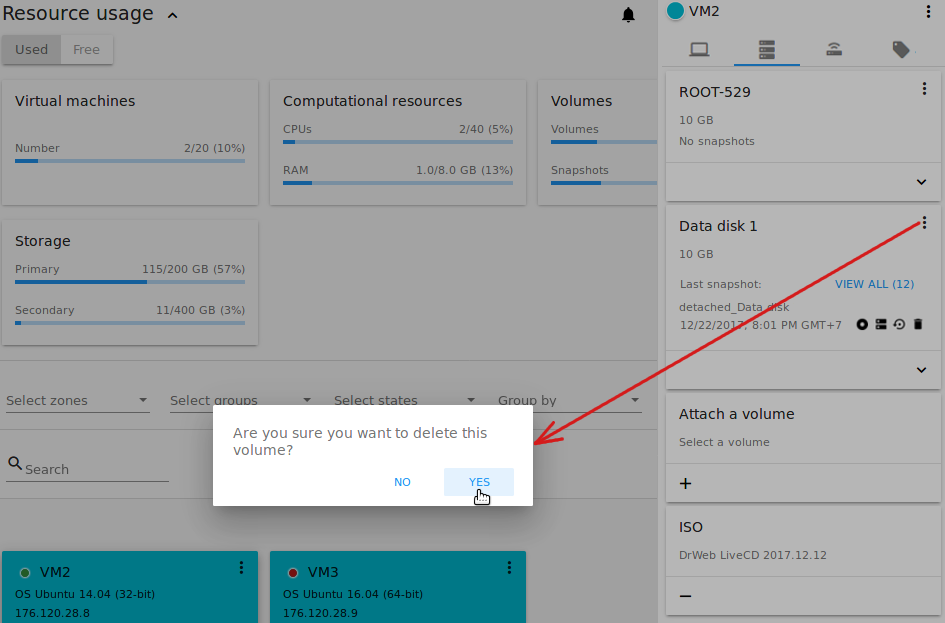
The data disk will be deleted from the system right at this moment.
If a disk has snapshots, the system will ask you if you want to delete the snapshots of the disk as well. Click “Yes” to delete the snapshots. Click “No” to leave the snapshots in the system after volume deleting.
Snapshot Action Box
Note
For a newly taken snapshot all actions except “Delete” are disabled until the snapshot is backed up to the Secondary Storage that may take some time. Once it is backed up, a full range of actions is available to a user.
For each snapshot the following actions are available:
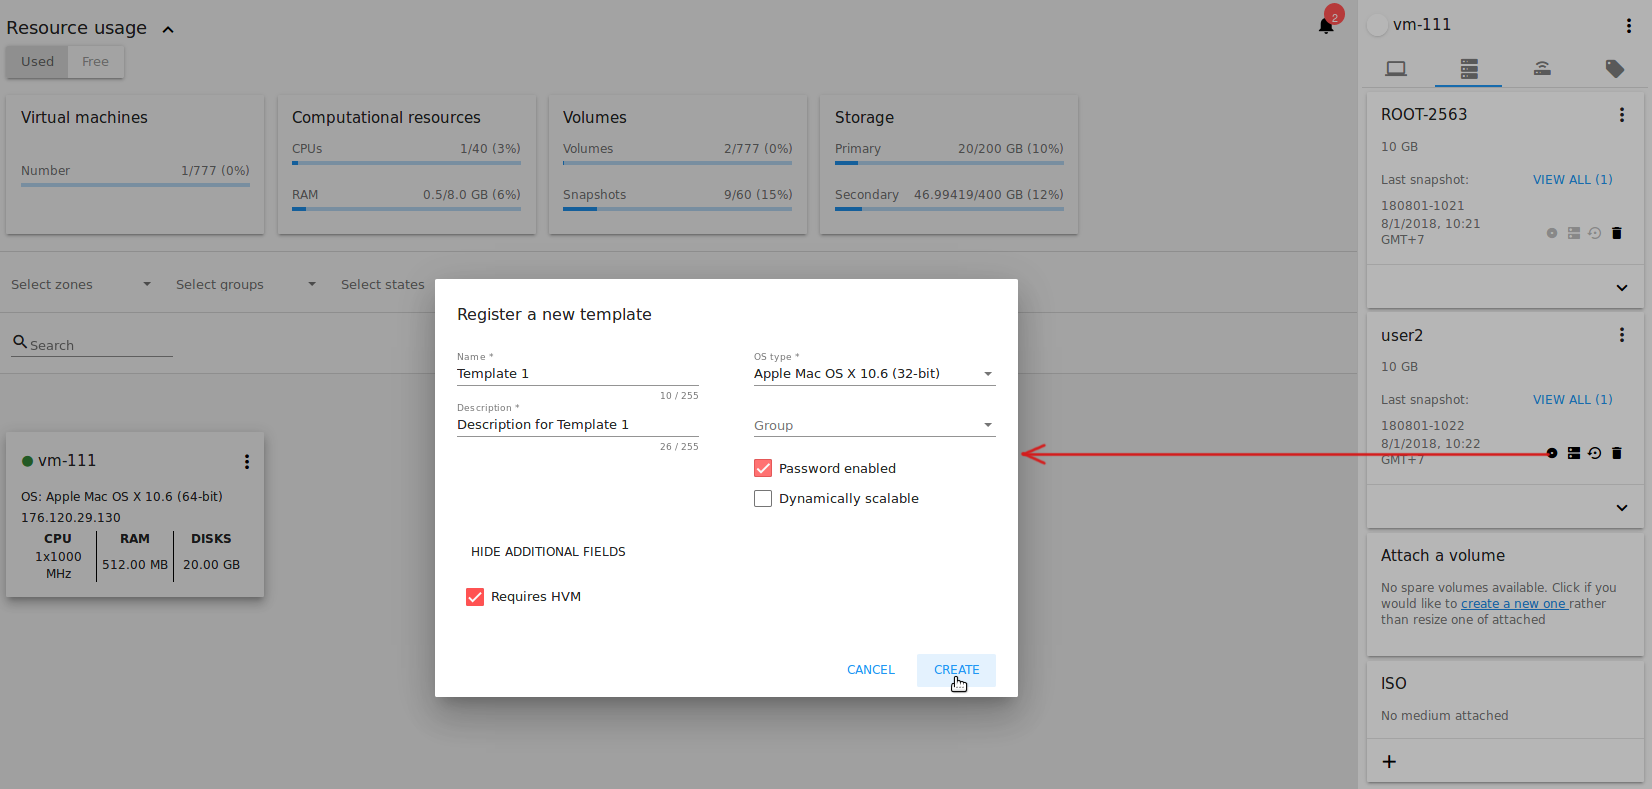
- Create a template - Register a new template right from the disk information block of the sidebar. In the appeared window fill in the form:
Note
Required fields are marked with an asterisk (*).
- Name * - Enter a name of the new template.
- Description * - Provide a short description of the template.
- OS type * - Select an OS type from the drop-down list.
- Group - Select a group from the drop-down list.
- Password enabled - Tick this option if your template has the CloudStack password change script installed. That means the VM created on the base of this template will be accessed by a password, and this password can be reset.
- Dynamically scalable - Tick this option if the template contains XS/VM Ware tools to support dynamic scaling of VM CPU/memory.
Click “SHOW ADDITIONAL FIELDS” to expand the list of optional settings. It allows creating a template that requires HVM. Tick this option in this case.
Once all fields are filled in click “CREATE” to create the new template.
- Create Volume - Allows creating a volume from the snapshot.
Type a name for a new volume into the Name field in the modal window. Click “CREATE” to register a new volume.
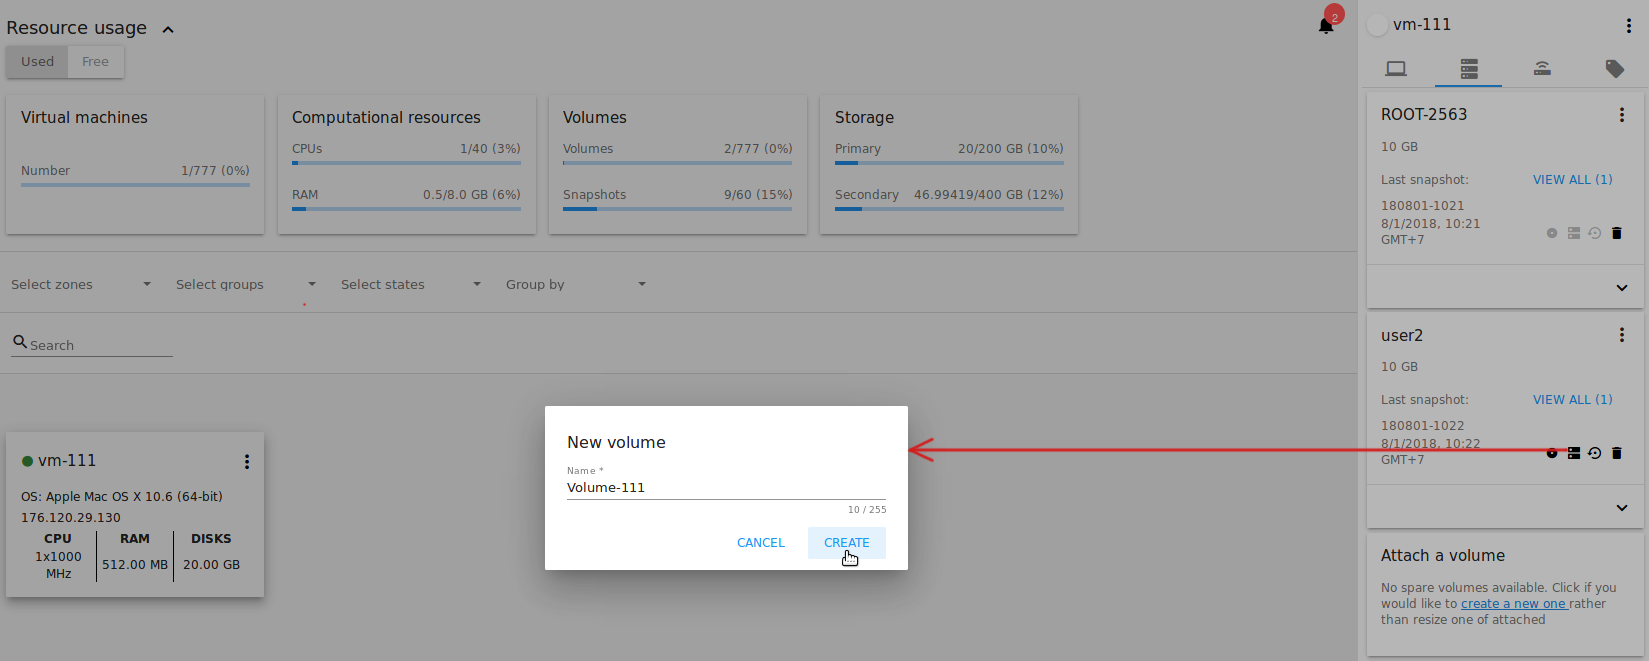
Click “CANCEL” to cancel the volume creation.
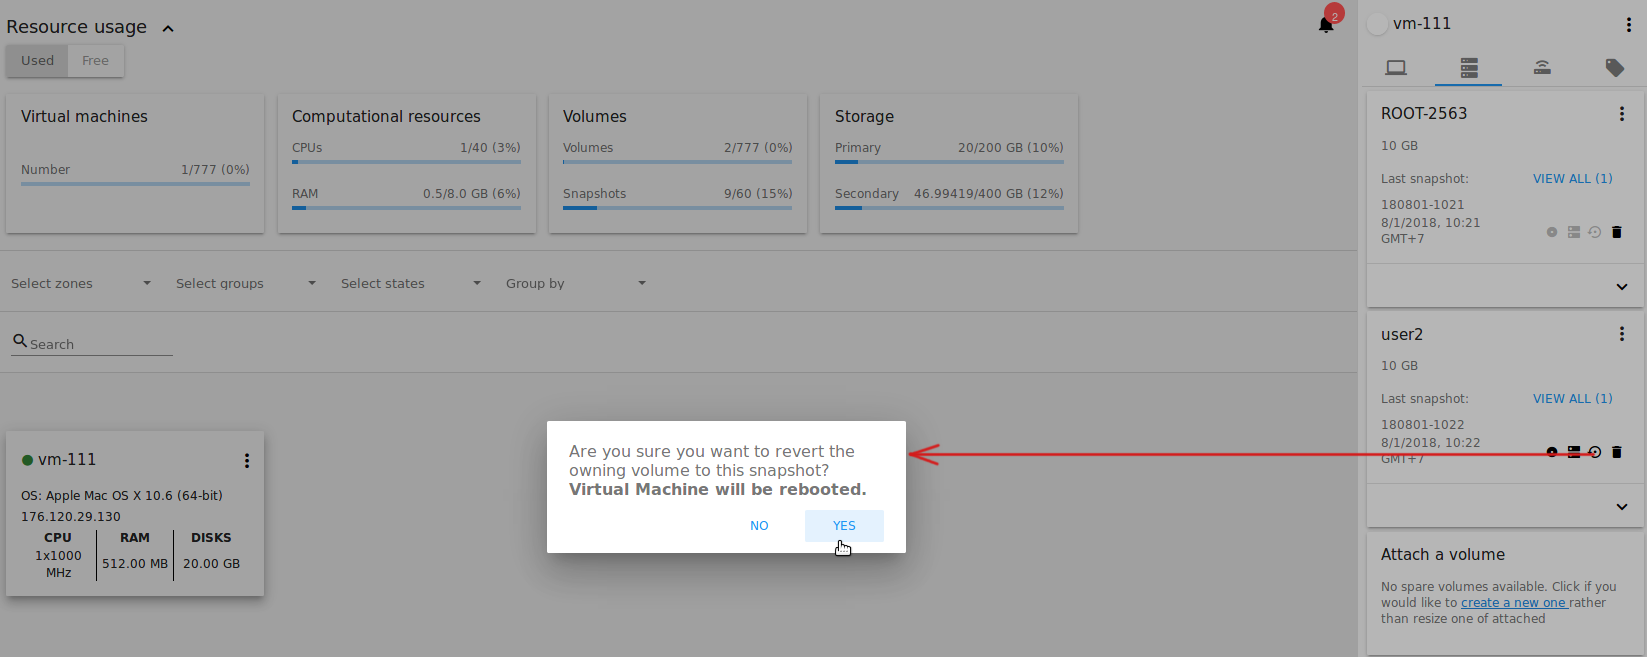
- Revert Volume To Snapshot - Allows turning the volume back to the state of the snapshot.
In the dialog window confirm your action. Please, note, the virtual machine the volume is assigned to will be rebooted.
- Delete - allows deleting the last-taken snapshot.
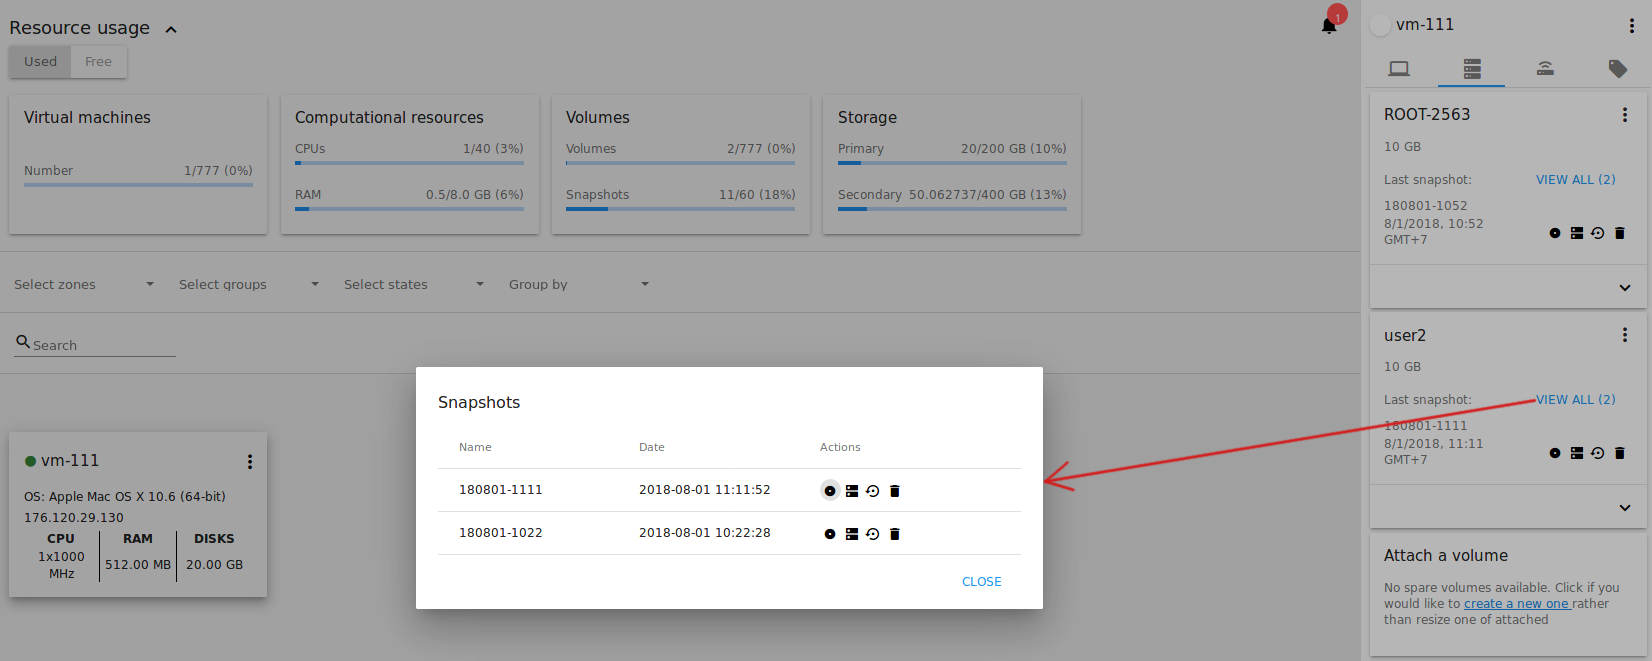
Besides, you can see all the snapshots in the list by clicking the “VIEW ALL” button. In the appeared window you will see the list of all snapshots. For each snapshot in the list, the same actions are available: you can create a template, or delete a snapshot.
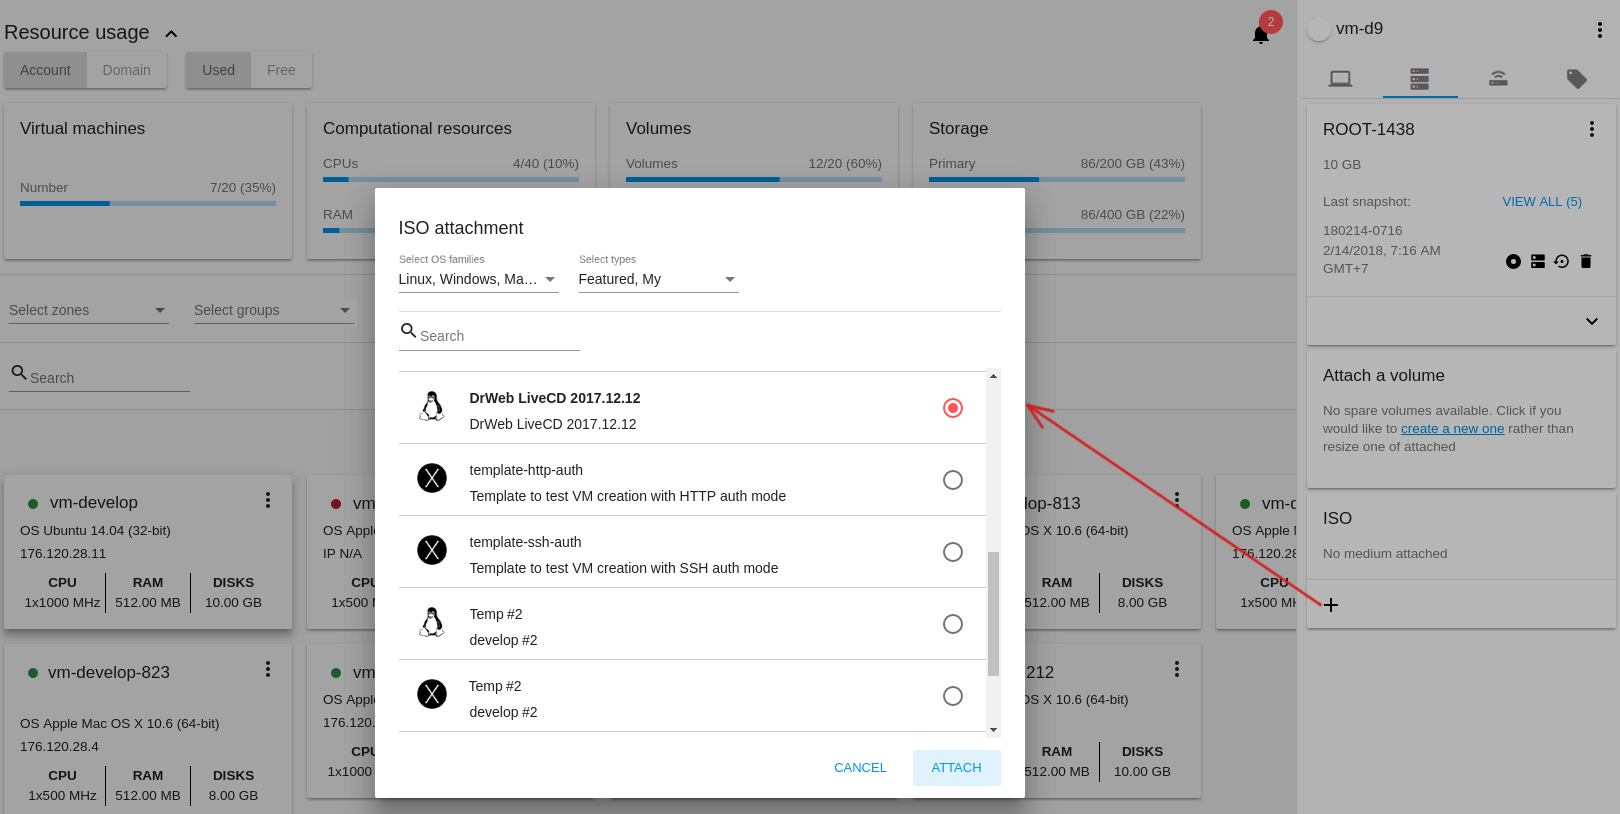
- ISO - Allows attaching ISO.
Attach ISO by clicking the “Attach” button in the ISO card. In the dialog window you will see the list of available ISO files. To easily find the ISO file you need, please, use the search tool above the list. Additionally, you can filter the list by OS family(-ies), by type(-s), by group(-s). Tick the ISO file you wish in the list and click “ATTACH”. The ISO will be attached to the VM.
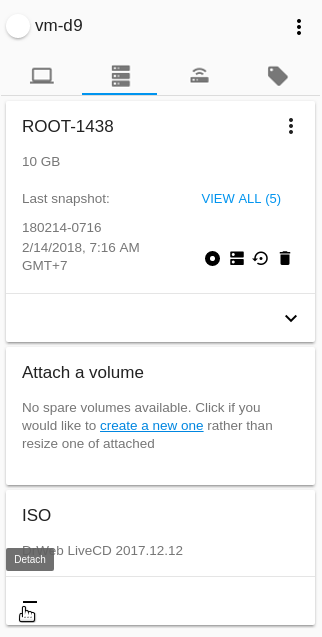
You can detach the ISO file by clicking the “Detach” button.
Network Tab
The Network tab presents the network configurations of the VM.
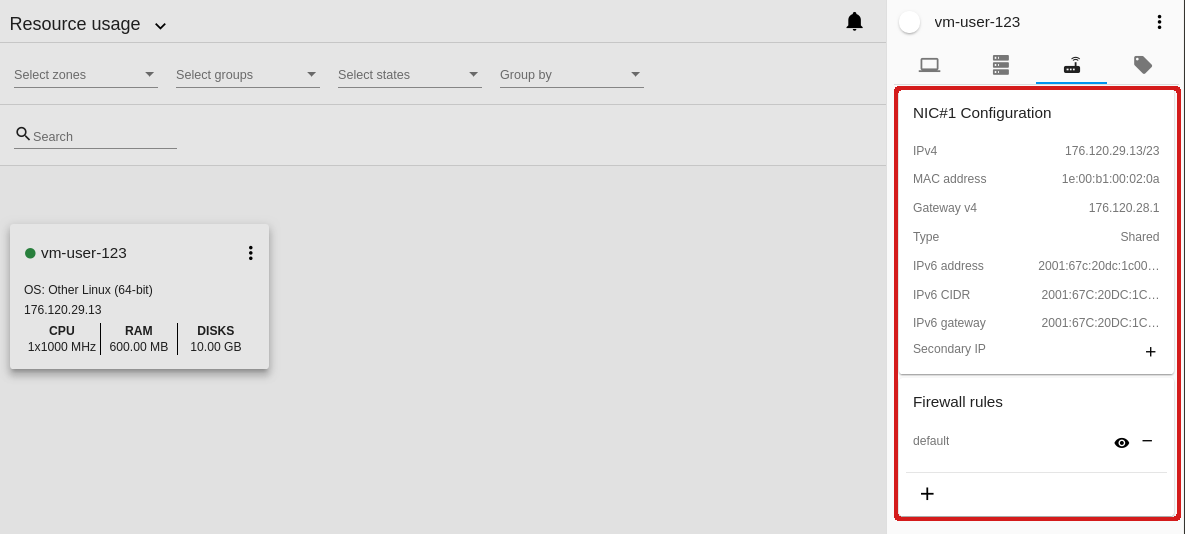
- NIC information - VM network details are shown here: Network namе, Netmask, Gateway, IP, Broadcast URI, Traffic Type, Type, Default, MAC address.
You can add a secondary IP for the VM from this tab. Click “+” next to the Secondary IP option and confirm your action in the dialog window. The IP appears for the VM.
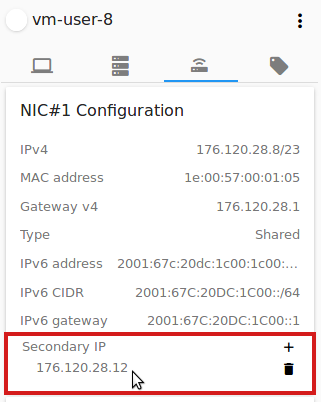
You can delete the secondary IP by clicking the “Delete” button next to it.
- Firewall rules - Allows viewing the security group assigned to the virtual machine, attach and detach groups, edit rules in a group.
It is allowed to attach several groups to one machine. They are listed in the box. Next to each group, you can see the buttons ![]() to view rules of the group and “-” to detach the group from the machine.
to view rules of the group and “-” to detach the group from the machine.
View rules
Click ![]() to open the list of assigned firewall rules.
to open the list of assigned firewall rules.
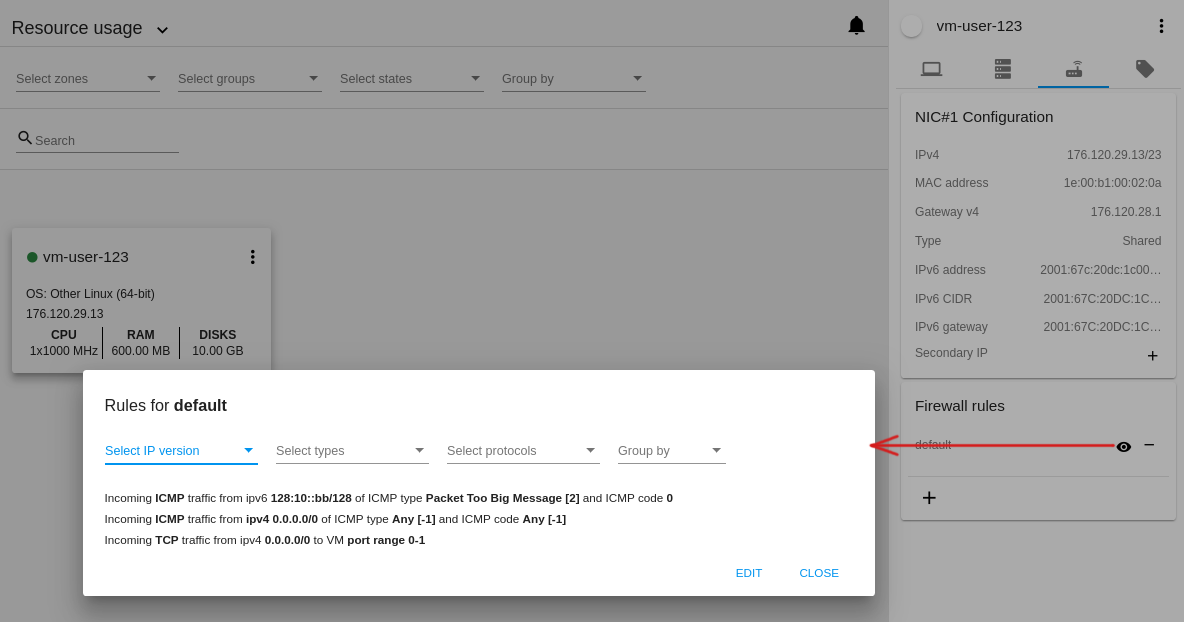
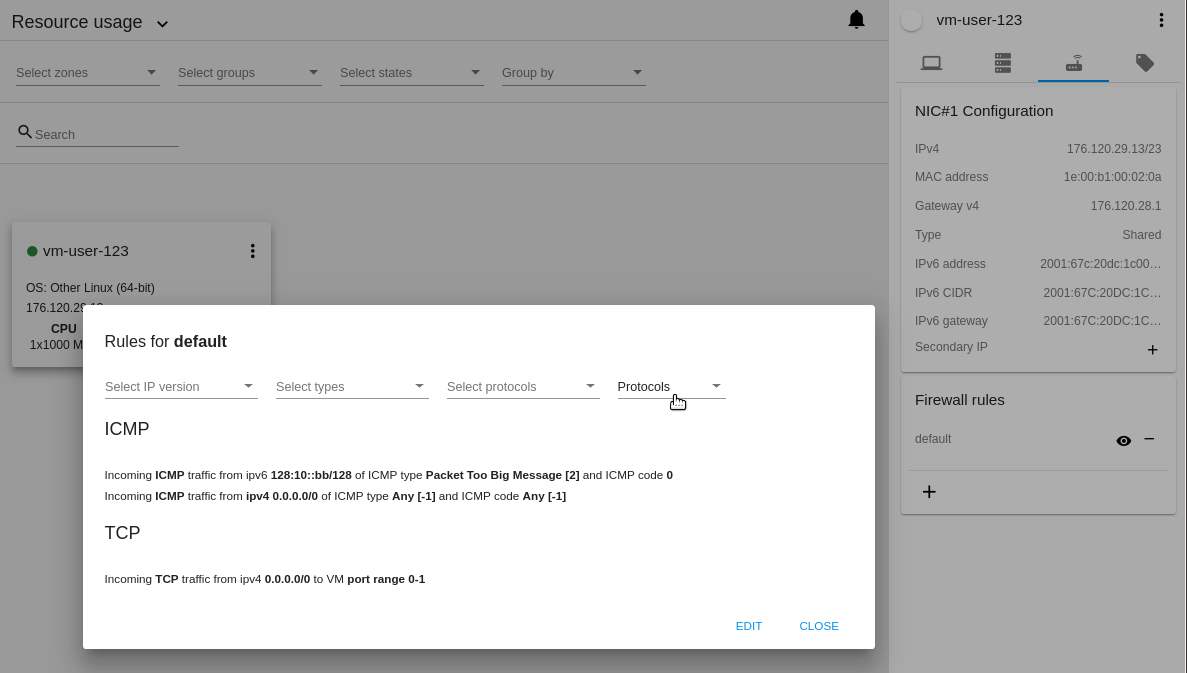
You can filter the list by IP version, types and/or protocols. Or you can adjust the view by grouping the list by types and/or protocols.
Edit rules
In the modal window you can edit a security group. Click “EDIT” to move to the editing form. There you will be able to add rules, or delete the selected ones from the list.
To add rules, please, fill in the fields in the bar above the list and click “+”:
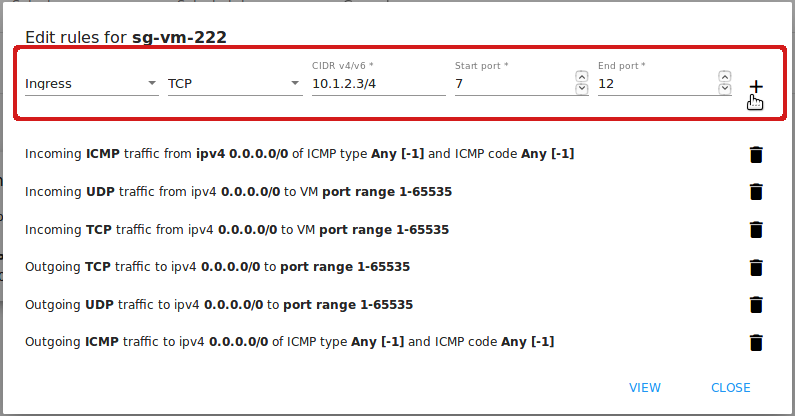
To delete rules, please, click “Delete” icon in the list. The rule will be deleted from the security group.

Then you can move back to the view mode, or close the window.
Please, note, when editing shared security groups, a warning message appears:
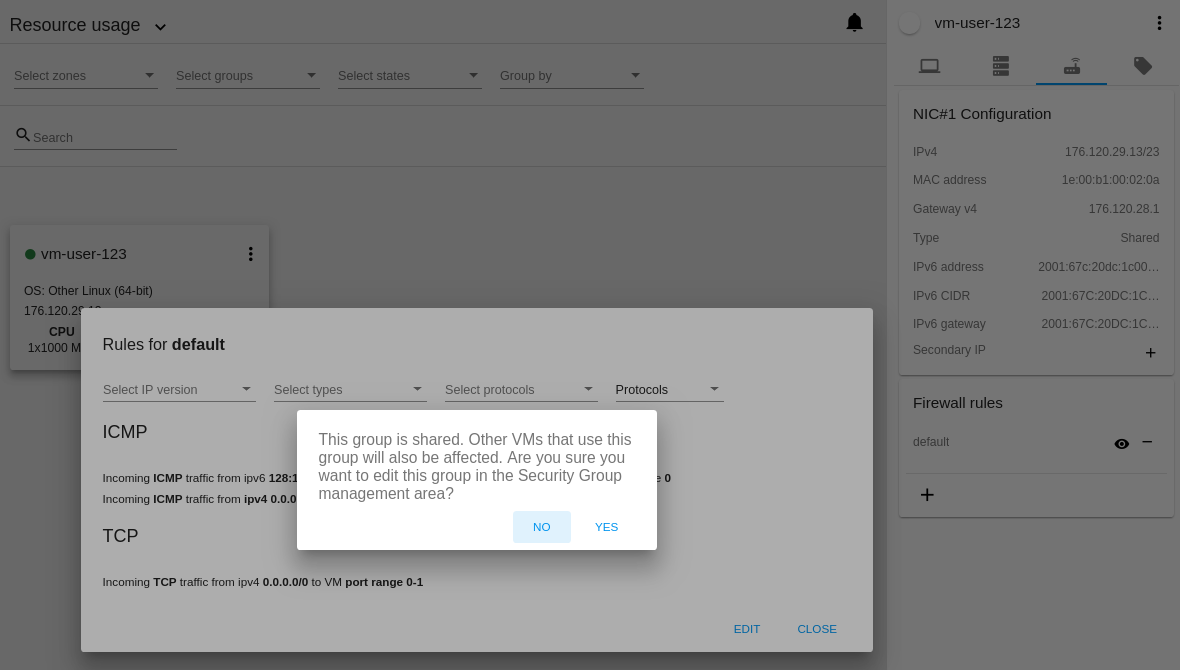
Click “Yes” if you still want to edit a shared security group. You will be moved to the “Firewall” section where you can edit the security group. After editing, go back to the virtual machine that uses this group. You will see the rules are edited.
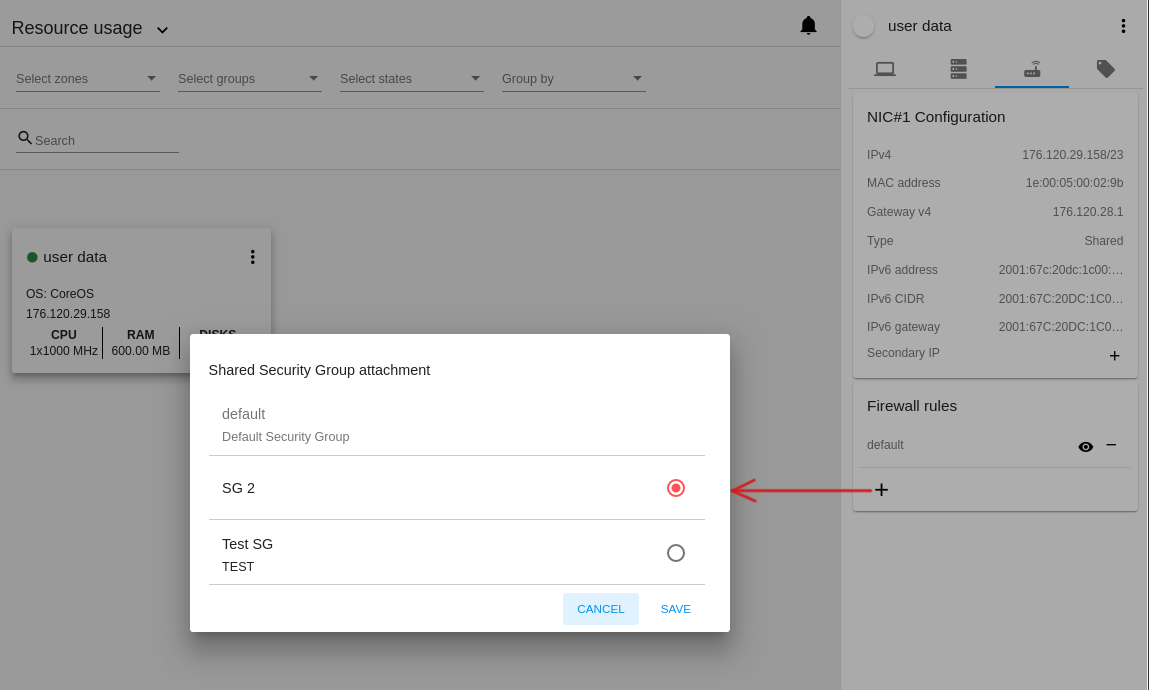
Attach Security Group
A VM can be a member of any number of security groups. To attach a security group to the virtual machine, you can use the “+” button. Click it to open a modal window. It displays the list of all security groups available for the machine. Groups that are attached to the machine are not available for selecting and look grayish. By default, the first option in the list is preselected. Click the radio-button next to the option you wish and press “SAVE”.
If you attach a group to the machine in the Running state, the system will inform you that the machine will be stopped. If you agree, the machine gets stopped and the group appears in the list of attached groups. Then, the machine gets started again.
Detach Security Group
To detach a security group from the virtual machine, use the “-” button. Click it and confirm your action in the dialog box.
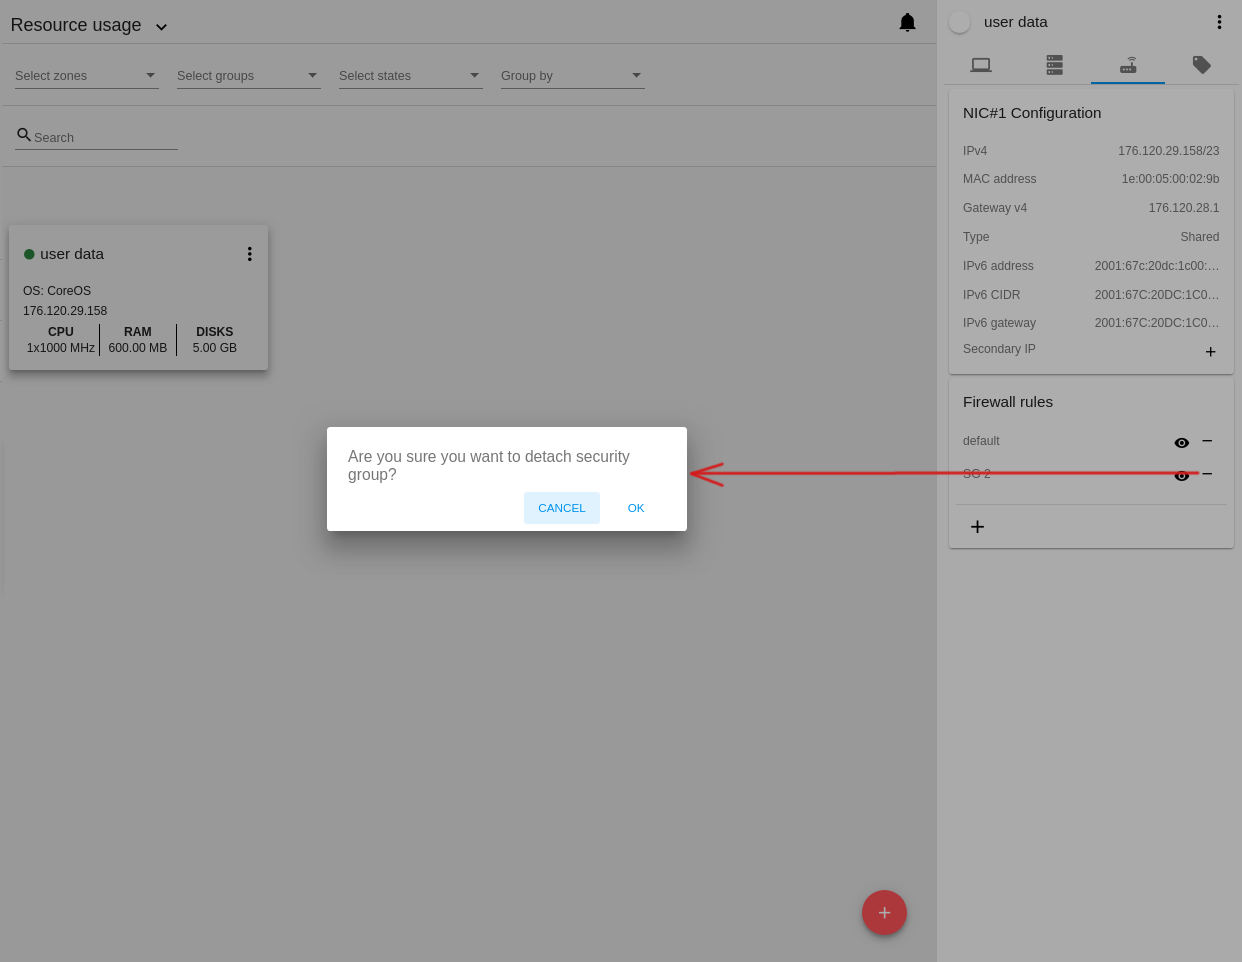
If you detach a group from the machine in the Running state, the system will inform you that the machine will be stopped. If you agree, the machine gets stopped and the group disappears from the list of machine’s security groups. Then, the machine gets started again.
See the Firewall section for more information on firewall rules in the system.
Tags Tab
Under this tab, you can create and see the VM tags.
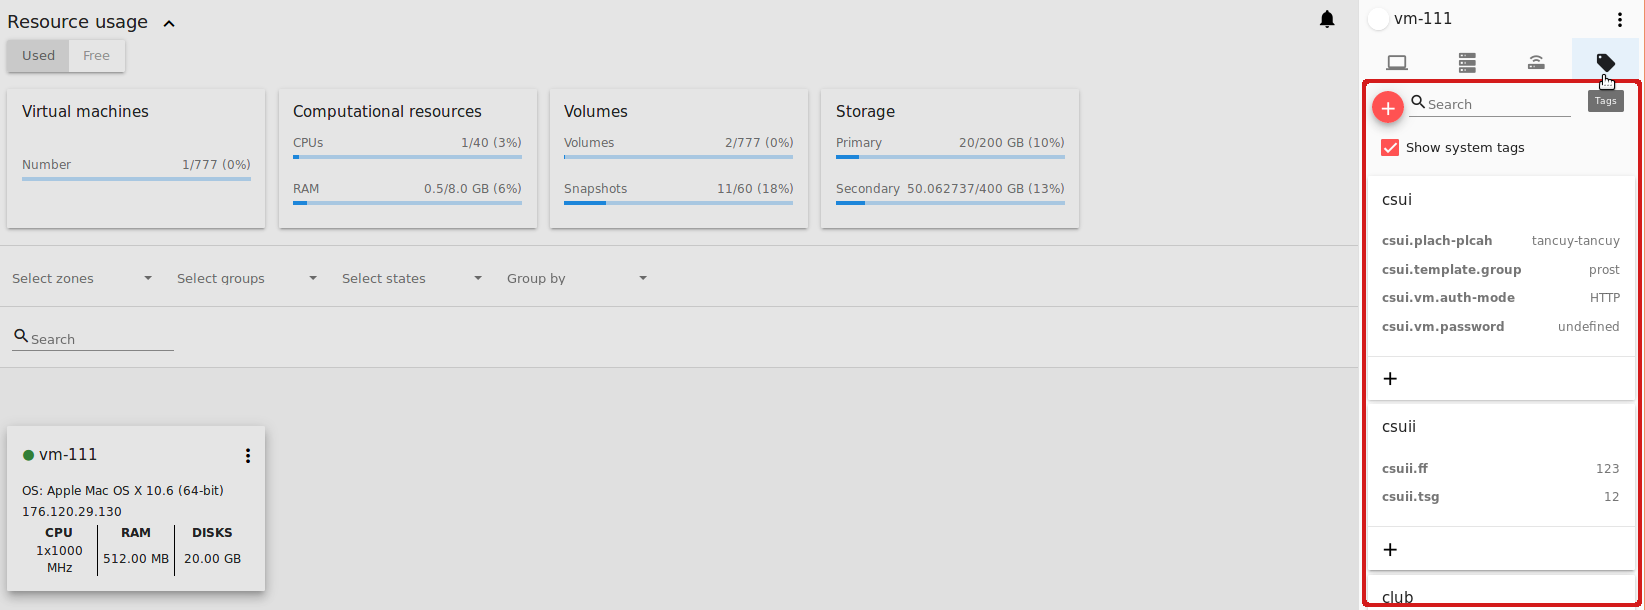
CloudStack-UI uses tags very extensively to provide additional UX capabilities. Tags are key-value pairs. So it makes a kind of a key-value storage for the meta-information - VM description or group, or a user language. The tags used by Cloudstack-UI are system tags. They are prefixed with csui. You can find the full list of system tags supported by CloudStack-UI at the page.
System tags are used to provide functionality from the user interface perspective. Changing these tags affects the functionality of the application. The “Show system tags” checkbox allows to view or hide system tags of the virtual machine. Uncheck this box to hide system tags from the list. It helps to avoid accidental unwanted changes. If a user has disabled displaying of these tags, the system will remember it and next time tags will also be hidden.
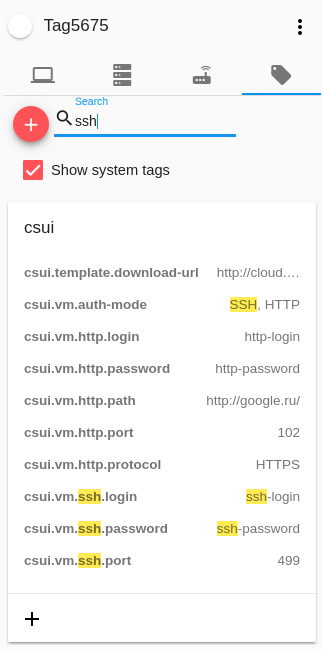
To find the tag you are interested in, please, use the search tool above the tag list. You can enter a name or a part of the tag name to distinguish it in the list.
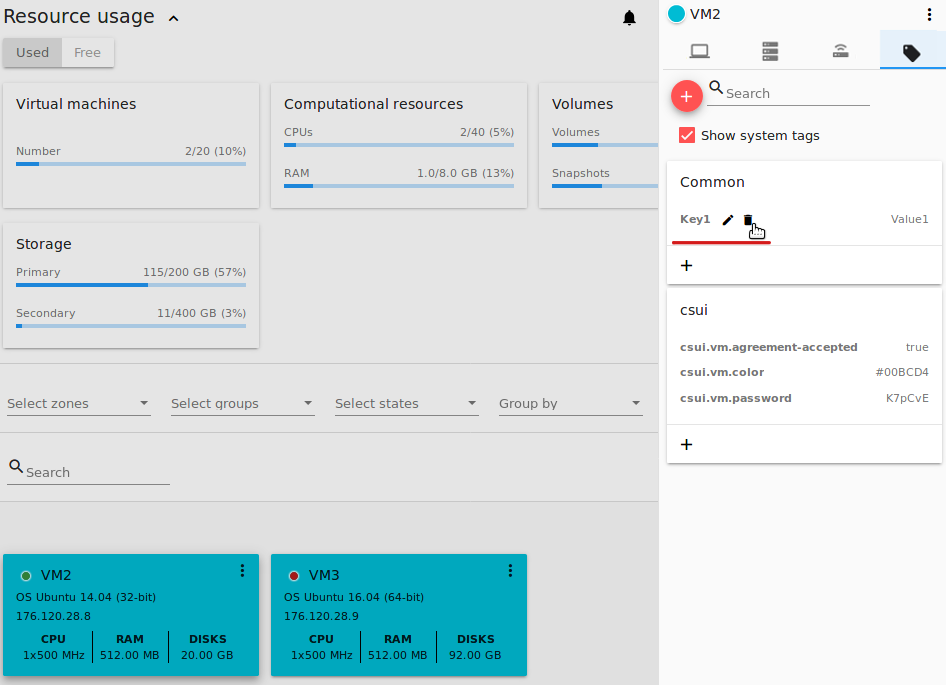
The tags assigned to the virtual machine are presented in the list. System tags are presented in one card, other tags - in a separate card. For each tag in the list the following actions are available when hovering the mouse over the tag key:
- Edit - Allows editing the tag. In the appeared form define a new key and/or value (both fields are required). Click “Edit” to save the edits. Click “Cancel” to drop the edits. The tag won’t be changed then.
- Delete - Allows deleting the tag. Click “Delete” and confirm your action in the dialog window.
Create Tags
You can create a tag right from Tags tab.
Click “Create” ![]() and fill in the appeared form:
and fill in the appeared form:
Note
Required fields are marked with an asterisk (*). You cannot use space as the first symbol.
- Key * - Enter a key here.
- Value * - Enter the value here.
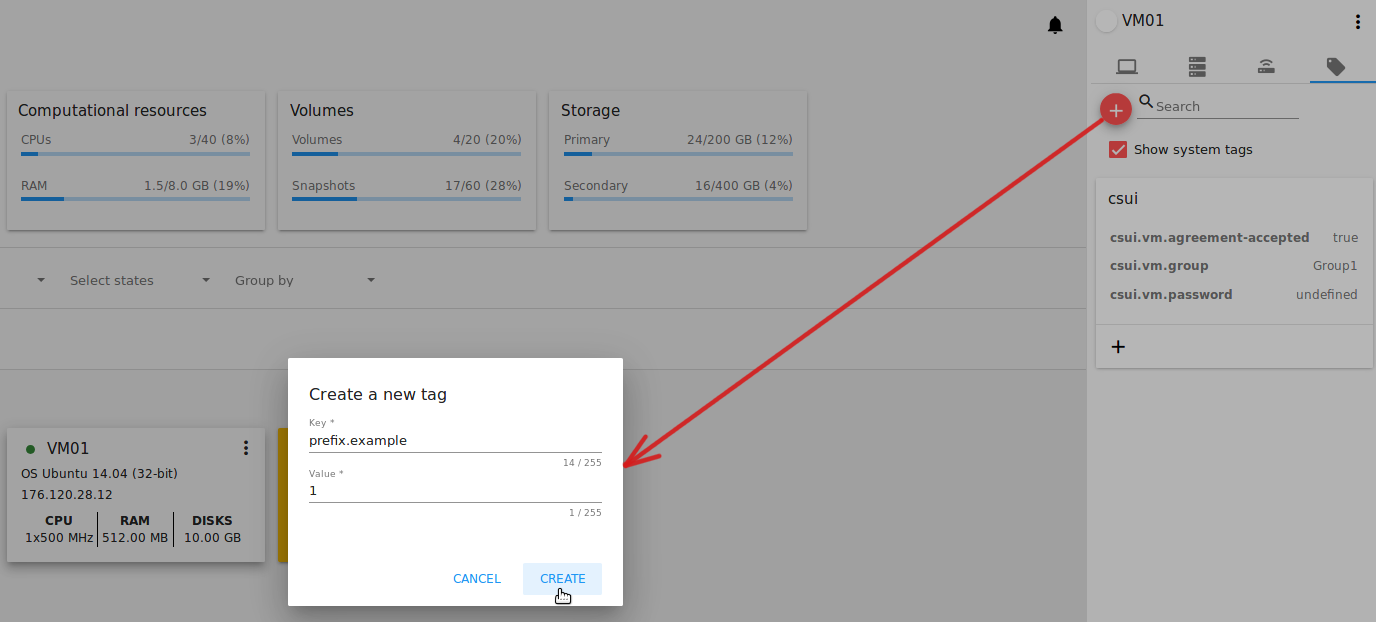
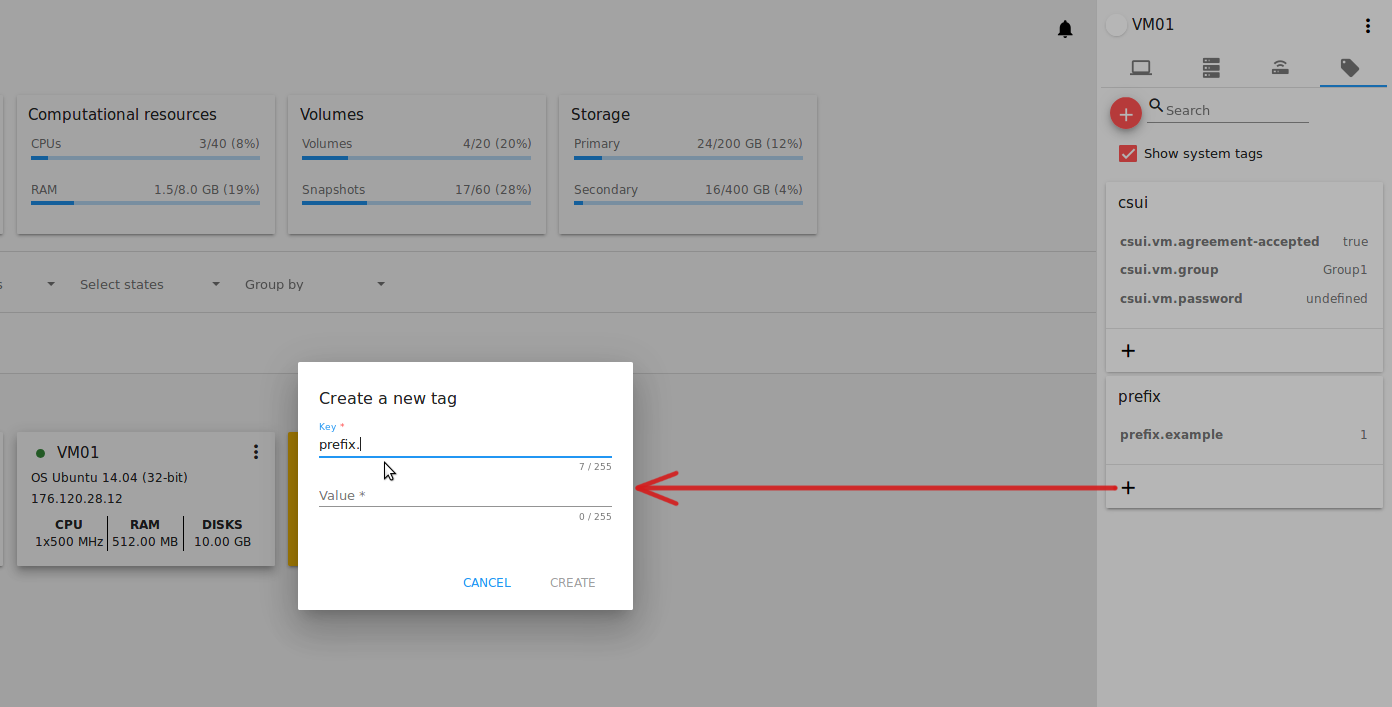
When adding a system tag, click “+” in the card to open the creation form. You will see that the csui prefix is automatically prepopulated here.

If you create a non-system tag, it will be saved in a new card. If you have entered a key in the format <prefix>.<example>, a card will be named as “<prefix>”. When creating a new tag from this card, click “+” in the card and in the tag creation form the Key field will be prepopulated with the <prefix>.
Access a Virtual Machine
Access VM component allows a user to obtain all necessary credentials to access a VM in the final dialog box shown after VM creation, or later when a user selects a corresponding action in the VM Action box. Depending on tags determined for a template or a VM, the system allows getting access to the VM interaction interface. Currently, the following access modes are supported:
- Via a VNC console - active by default for all VMs;
- Via SSH;
- Via HTTP.
The three access modes can be used at the same time for one machine.
You can find more information on how to enable a necessary access mode at the wiki-page.
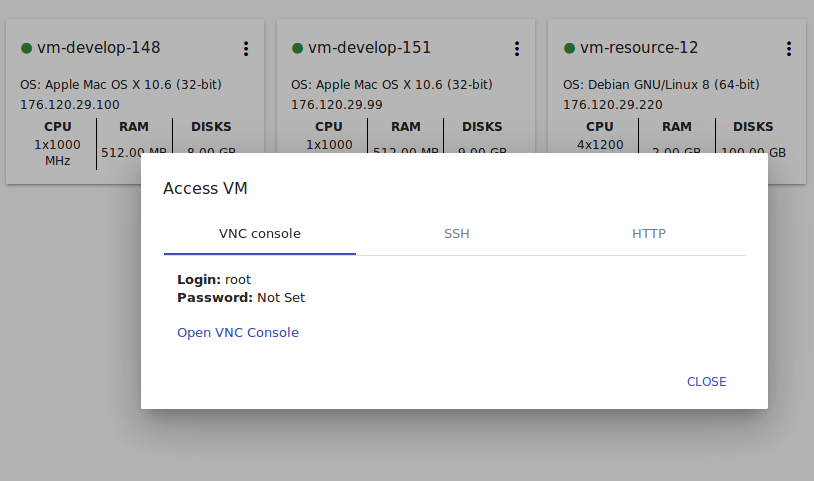
Selecting “Access VM” in the VM action list, you open a modal window with three tabs. The view and contents of the modal window are determined by the defined tags. Some tabs in the window can be inactive. That means these access modes are not enabled for the machine. In active tab(s) you can view detailed access information for the machine: login, password, port, path and other.
In each tab you can click on a corresponding link to open a console or a window to access the VM.
Below you will find more information on each access mode.
VNC console
This tab contains the following details:
- Login;
- Password (if available);
- Open VNC console link that opens a console to access the VM.
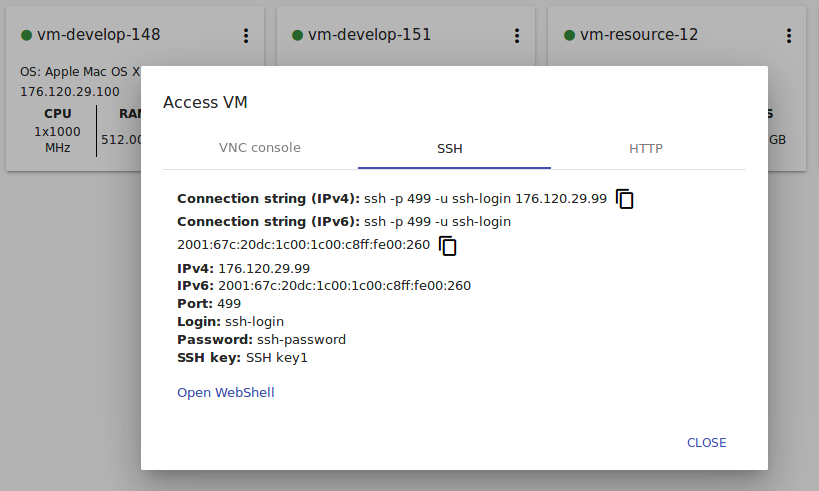
SSH
This tab is active if the access via SSH is enabled. It is determined by the following template tags:
csui.vm.auth-mode = SSH
csui.vm.ssh.login = login
csui.vm.ssh.password = password
csui.vm.ssh.port = port
This tab displays the following details:
- Connection String (IPv4), that can be copied by clicking on .
- Connection String (IPv6), that can be copied by clicking on .
- IPv4
- IPv6
- Port
- Login
- Password
- SSH Key
- Open WebShell - a clickable link to open a WebShell console.
In case the WebShell plugin is enabled, a user can SSH to VM in browser. To find more information on deployment and using the WebShell plugin, please, refer to the page.
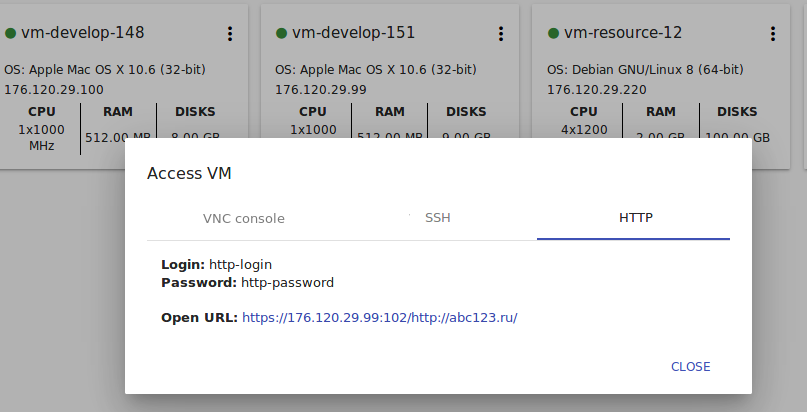
HTTP
Under this tab you can access a VM via HTTP/HTTPS URL. This mode is defined by the tags:
csui.vm.auth-mode = HTTP
csui.vm.http.protocol = HTTP|HTTPS
csui.vm.http.port =
csui.vm.http.path =
csui.vm.http.login =
csui.vm.http.password =
Note
If no csui.vm.http.port is defined, then default values are used:
- for HTTPS protocol: 443
- for HTTP protocol: 80
This tab displays the following information:
- Login;
- Password (if available);
- Open URL with a clickable URL.
To configure VM access via HTTP/HTTPS, please, refer to page.
To close the modal window click “CLOSE”.